8 releases (5 breaking)
| 0.6.0 | Jan 17, 2025 |
|---|---|
| 0.5.0 | Nov 19, 2024 |
| 0.4.0 | Oct 4, 2024 |
| 0.3.4 | Aug 8, 2024 |
| 0.0.1 |
|
#83 in Hardware support
400KB
9K
SLoC
![]()
![]()
pigg - Raspberry Pi GPIO GUI
An app for Raspberry Pi GPIO Output control and Input visualization, with GUI and CLI Support for macos, Linux (including Raspberry Pi) and Windows; GPIO CLI agent for Raspberry Pi and embedded applications for Pi Pico (USB) and Pi Pico W (USB, TCP).
The GUI (Pi Gpio GUI - PIGGUI) is affectionately known as "piggy".
|
|
|
|
What's new in Release 0.6.0 - USB, Pi Pico and Discovery
Full feature support for Pi Pico W and Pi Pico, USB discovery, SSID configuration, GPIO control and mDNS discovery.
Pi Pico support includes:
- Embedded application
porkyandporky_wfor running on the Pi Pico and Pi Pico W. - UF2 firmware files provided as part of release to aid programming Pi Pico devices with
porkyorporky_w - Ability to build
porkyyourself with default SSID information so all devices programmed with that binary connect automatically to Wi-Fi - USB direct connection between
pigguiandporkythat allows you to:- Discover USB connected
porkydevices - View information about the device
- Determine if it is connected to the Wi-Fi network and if it is, get its IP and Port for remote GUI use
- Program the Wi-Fi network it will connect to, instead of the default one as part of the build. This is persisted in Flash memory, so it is used again on restart/reboot.
- Reset a previously programmed Wi-Fi network so that on restart the device will connect to the default one if it exists.
- Full functionality (i.e. Control the device and get input signal level changes) via USB, so on a par with TCP connections to the Pi Pico W, but via USB to either a Pi Pico or Pi Pico W
- Discover USB connected
- Remote network access to the Pi Pico W's GPIO, in the same GUI as remote access to Raspberry Pis (not Pico).
- Pi Pico specific pin layout and numbering displayed in GUI
- Persisting of GPIO config to flash and recovery at reboot/restart so that the GPIO continues to work as before
udevrules file for allowing user access (forpigguiapplication) to USB devices on Linux machines
Additions to piglet functionality:
- Persisting of GPIO config to disk and recovery at reboot/restart so that the GPIO continues where you left off
- mDNS discoverability of
pigletson the network and get the details required to connect to them byTCPorIroh
Other Features
- Directly on a Pi or Pi Pico or remotely from other platforms you can configure the GPIO hardware Inputs and Outputs, controlling the level of the Outputs and view the level of the Inputs in the GUI.
- Pre-built images for different OS and CPU architecture, along with installers. See INSTALLING.md for details.
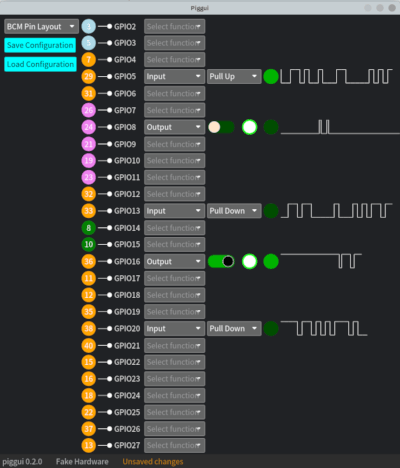
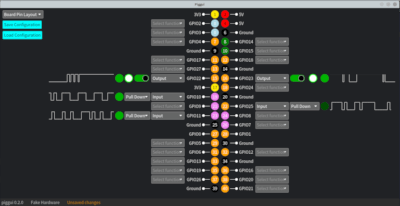
- Visual representation of the GPIO pins in two layouts, a "Board Pin Layout" that mimics the
physical layout of the Pi's GPIO connector/header, or a "BCM Pin Layout" with only the programmable
GPIO pins, ordered by BCM pin number. Physical pin layout adapts to reflect the device that
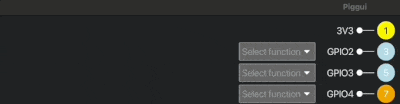
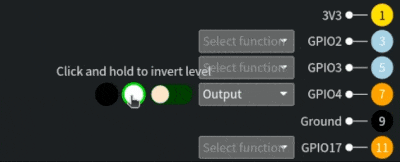
pigguiis connected to as Pi and Pi Pico pin outs are different. - Each pin has its board pin number, name and function.
- Drop down selector to config each pin (Currently as an Input with or without pull-up/pull-down, or as an Output)
- Inputs have a visualization like an LED to show its current level (Black is unknown, Red is off, Green is on), plus a waveform view that shows you the recent history of the level detected on the input.
- Outputs have a toggle switch that can be used to change the stable value of the output, plus a "clicker" for quick inversions of the stable level, plus a waveform view showing the recent history of the level set on the Output.
- GPIO configurations can be loaded at startup with a command line filename option, or loaded via file-picker from the UI or saved to file via file picker, or the device will communicate it's current configuration to the GUI, allowing you to continue with the configuration currently being used by the GPIO hardware.
- GUI discovery of devices using mDNS for networked
piglets andporkys, or USB for direct connectedporkys. - The GUI (
piggui) can connect to a Pi (runningpiglet) over the network, or to a Pi Pico/Pi Pico W (over the network or USB direct connect) to control and view the GPIO hardware from a distance. - The GUI can run on Mac, Linux, Windows or Raspberry Pis. Events are timestamped at source (as close to the hardware as possible) so network delays should not affect the waveforms displayed. Please provide us feedback and ideas related to networking in Discussions or GH issues.
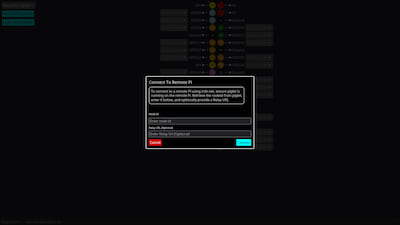
- The data required to connect to a remote node via iroh-net is called the
nodeid.pigletprints this out for you if it is started in the foreground. Whenpiglethas been started as a system service, start another instance in the foreground and this will detect the background instance and display itsnodeidfor you then exit. - Take the
nodeidand either supply it as a command line option topiggui(--nodeid $nodeid, prefixed with--if usingcargo run) or enter it into the GUI. To connect to a remote instance from the GUI, click on the "hardware menu" in the left of the info bar at the bottom of the screen and select the "Connect to remote Pi..." menu item. Then enter thenodeidinto the field provided and hit "Connect" - Here are two videos showing the two ways to use it, with piglet running on a RPi shown via VNC.
- Video with Dialog: https://youtu.be/aToJ1aT7NeM
- Video using CLI argument: https://youtu.be/zcEa_Oke014
You can see more gifs and videos of features here
Piggui (pronounced "Piggy")
piggui is a GUI for configuring pins, observing input levels and controlling output levels.
On Raspberry Pi it has a real GPIO hardware backend (via rppal).
On macOS, Linux and Windows it uses a fake hardware backend (mainly for development) or can connect to a remote
hardware backend that is running piglet.
Piglet
piglet is a "headless" command line utility that interacts with the GPIO hardware, and can either apply a
config supplied from file and stop, or can listen for config changes from a remote piggui and report input
level changes to the GUI.
If built on the Pi (with the "pi_hw" feature), then it has a real GPIO hardware backend.
It can be built on macOS/Linux/Windows/Pi with the "fake_hw" feature for a fake hardware backend, mainly used for development.
It takes an optional config file as a command line option. It will load the GPIO configuration from the file
(like piggui can) and it will apply it to the hardware then stop.
It offers the ability to interact with the hardware from a remote pigguiinstance.
It will print out connection info at startup and start listing for Iroh network connections from piggui instances,
then the user can interact with it and visualize inputs level changes from the piggui GUI.
Porky
porky is an embedded application developer for the Raspberry Pi Pico and Pi Pico W for remote interaction with the
Pico's GPIO hardware. It can be connected to over TCP or USB.
For more details see porky's README.md
Supported Hardware and Operating Systems
pigg has a number of binaries as part of the project (see descriptions above) and they are tested in CI, or
manually or are known to work as follows:
| Application | Arch Supported | Device | OS Supported |
|---|---|---|---|
| piggui | Apple Silicon | macOS 15 | |
| x86_64 | macOS 15 | ||
| x86_64 | macOS 15 | ||
| x86_64 | Ubuntu 24.04 | ||
| x86_64 | Windows 10 | ||
| aarch64 | Pi400 | Pi OS | |
| aarch64 | Pi4 | Pi OS | |
| aarch64 | Pi5 | Pi OS | |
| aarch64 | PiZero 2 | Pi OS | |
| armv7 musl | Pi3B | Ubuntu 18.04.6 LTS | |
| piglet | Apple Silicon | macOS 15 | |
| x86_64 | macOS 15 | ||
| x86_64 | macOS 15 | ||
| x86_64 | Ubuntu 24.04 | ||
| x86_64 | Windows 10 | ||
| aarch64 | Pi400 | Pi OS | |
| aarch64 | Pi4 | Pi OS | |
| aarch64 | Pi5 | Pi OS | |
| aarch64 | PiZero 2 | Pi OS | |
| armv7 musl | Pi3B | Ubuntu 18.04.6 LTS | |
| porky_w | armv7 | Pi Pico W | N/A |
| porky | armv7 | Pi Pico | N/A |
Input from Raspberry Pi users wanted
We would like input from Raspberry Pi users to help us decide the order of things to work on in the future, and input on how integrate new functionalities (e.g. I2C buses, SPI, UART, etc.).
Please let us know what you think, and suggestions, via Discussions or GH issues.
Roadmap
We have identified a number of areas to work on in future releases, but we would really appreciate your input on what could be most useful or just the coolest, many have GH issues.
See issues in milestone 0.7.0 for the up-to-date list and progress.
- Extend Pi Pico support:
- Support for Pi Pico 2 and Pi Pico 2 W
- Expand support beyond Inputs and Outputs ( e.g. Clocks, PWM, I2C, UART, SPI etc.). Issue #53, #52, #5
- True logical layout, grouping pins by function Issue #94
- Custom layouts to order, group pins and only show pins in use
- Smaller window sizes for devices running
pigguiwith small displays - Allow connections between pins Issue #95
- Trigger a script or WebAssembly plugin on an input event (edge, level, etc.)
Installing
See INSTALLING.md
Help
See HELP.md for help with known issues. We hope to grow this and maybe link with the GUI and reported errors.
Building from Source
See BUILDING.md
Running Piggui and Piglet
For details on running piglet and piggui in the foreground or as a system service, on the same machine or with a
remote GUI to Pi hardware, see RUNNING.md
Contributing
See CONTRIBUTING.md
License
See LICENSE
Code of Conduct
Security
See SECURITY.md
Dependencies
~58–105MB
~2M SLoC