5 releases (3 breaking)
| 0.46.0 | Jul 2, 2023 |
|---|---|
| 0.45.1 | Apr 4, 2023 |
| 0.45.0 | Apr 1, 2023 |
| 0.44.2 | Mar 25, 2023 |
| 0.1.0 | Oct 22, 2021 |
#1769 in Hardware support
62 downloads per month
Used in 18 crates
(8 directly)
480KB
11K
SLoC
RustHDL
** Redirect in Progress **
Due to the concerns about having a project with "rust" in the name, I'm
changing this project name to rhdl, and moving active development there.
Sorry for the trouble, but I'd hate to have the project yanked at some
point in the future for something so silly.
I am also in the process of rebuilding this project from scratch to be
significantly faster and more powerful. So I will do the new development
in the rhdl crate/repo, and migrate the existing widgets over time.
At that point, I will archive this repo.
** New docs launched! Check them out at https://rust-hdl.org... **
** Write FPGA Firmware using Rust! **
RustHDL is a crate that allows you to write FPGA firmware using Rust!
Specifically, rust-hdl compiles a subset of Rust down to Verilog so that
you can synthesize firmware for your FPGA using standard tools. It also
provides tools for simulation, verification, and analysis along with strongly
typed interfaces for making sure your design works before heading to the bench.
The workflow is very similar to GPU programming. You write everything in Rust,
including an update kernel that compiles down onto the hardware. You can simulate
and verify everything from the safety and comfort of your Rust environment, and
then head over to standard synthesis tools to get files that program your FPGA.
Links
You may want:
Features
- Safe - have Rust check the validity of your firmware with strongly typed interfaces at compile time, as well as at run time, synthesis, and on the device.
- Fast - Run simulations of your designs straight from your Rust code, with pretty good simulation performance.
- Readable - RustHDL outputs Verilog code for synthesis and implementation, and goes through some effort to make sure that code is readable and understandable, in case you need to resolve timing issues or other conflicts.
- Reusable - RustHDL supports templated firmware for parametric use, as well as a simple composition model based on structs.
- Batteries Included - RustHDL includes a set of basic firmware widgets that provide FIFOs, RAMs and ROMs, Flip flops, SPI components, PWMs etc, so you can get started quickly.
- Free - Although you can use RustHDL to wrap existing IP cores, all of the RustHDL code and firmware is open source and free to use (as in speech and beer).
- Tested - RustHDL has been used to write firmware that is shipping in commercial products. This includes quite complicated designs that use nearly all of a moderately sized FPGA, and take advantage of specialized hardware in the FPGAs themselves.
Quickstart
The definitive example in FPGA firmware land is a simple LED blinker. This typically involves a clock that is fed to the FPGA with a pre-defined frequency, and an output signal that can control an LED. Because we don't know what FPGA we are using, we will do this in simulation first. We want a blink that is 250 msec long every second, and our clock speed is (a comically slow) 10kHz. Here is a minimal working Blinky! example:
use std::time::Duration;
use rust_hdl::prelude::*;
use rust_hdl::docs::vcd2svg::vcd_to_svg;

const CLOCK_SPEED_HZ : u64 = 10_000;

#[derive(LogicBlock)]  // <- This turns the struct into something you can simulate/synthesize
struct Blinky {
    pub clock: Signal<In, Clock>, // <- input signal, type is clock
    pulser: Pulser,               // <- sub-circuit, a widget that generates pulses
    pub led: Signal<Out, Bit>,    // <- output signal, type is single bit
}

impl Default for Blinky {
   fn default() -> Self {
       Self {
         clock: Default::default(),
         pulser: Pulser::new(CLOCK_SPEED_HZ, 1.0, Duration::from_millis(250)),
         led: Default::default(),
       }
    }
}

impl Logic for Blinky {
    #[hdl_gen] // <- this turns the update function into an HDL Kernel that can be turned into Verilog
    fn update(&mut self) {
       // v-- write to the .next member     v-- read from .val() method
       self.pulser.clock.next = self.clock.val();
       self.pulser.enable.next = true.into();
       self.led.next = self.pulser.pulse.val();
    }
}

fn main() {
    // v--- build a simple simulation (1 testbench, single clock)
    let mut sim = simple_sim!(Blinky, clock, CLOCK_SPEED_HZ, ep, {
        let mut x = ep.init()?;
        wait_clock_cycles!(ep, clock, x, 4*CLOCK_SPEED_HZ);
        ep.done(x)
    });

    // v--- construct the circuit
    let mut uut = Blinky::default();
    uut.connect_all();
    sim.run_to_file(Box::new(uut), 5 * SIMULATION_TIME_ONE_SECOND, "blinky.vcd").unwrap();
    vcd_to_svg("/tmp/blinky.vcd","images/blinky_all.svg",&["uut.clock", "uut.led"], 0, 4_000_000_000_000).unwrap();
    vcd_to_svg("/tmp/blinky.vcd","images/blinky_pulse.svg",&["uut.clock", "uut.led"], 900_000_000_000, 1_500_000_000_000).unwrap();
}
Running the above (a release run is highly recommended) will generate a vcd file (which is
a trace file for FPGAs and hardware in general). You can open this using e.g., gtkwave.
If you have, for example, an Alchitry Cu board you can generate a bitstream for this exampling
with a single call. It's a little more involved, so we will cover that in the detailed
documentation. It will also render that vcd file into an svg you can view with an ordinary
web browser. This is the end result showing the entire simulation:
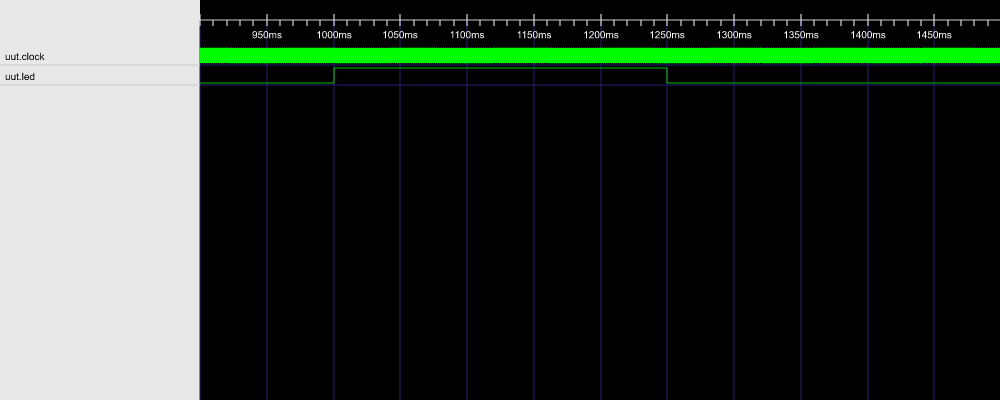
 Here is a zoom in showing the pulse to the LED
The flow behind RustHDL is the following:
- Circuits are modelled using simple
structs, composed of other circuit elements and signal wires that interconnect them. - A
#[derive(LogicBlock)]annotation on the struct adds autogenerated code needed by RustHDL. - You
impl Logicon yourstruct, and provide thefn update(&mut self)method, which is the HDL update kernel. - That gets annotated with a
#[hdl_gen]attribute to generate HDL from the Rust code - You can then simulate and synthesize your design - either in software, or by using an appropriate BSP and toolchain.
The rest is detail. Some final things to keep in mind.
- RustHDL is a strict subset of Rust. The
rustccompiler must be satisfied with your design first. That means types, exhaustive enum matching, etc. - The goal is to eliminate a class of mistakes that are easy to make in other HDLs with checks taking place at compile time, via static analysis at run time, and then with testbenches.
- Although the performance can always be improved, RustHDL is pretty fast, especially in release mode.
License: MIT
Dependencies
~8.5MB
~155K SLoC