20 releases
| 0.2.13 | Apr 22, 2025 |
|---|---|
| 0.2.12 | Apr 14, 2025 |
| 0.2.11 | Feb 6, 2025 |
| 0.2.10 | Sep 17, 2024 |
| 0.1.3 | May 23, 2024 |
#510 in Command line utilities
314 downloads per month
2MB
3K
SLoC
Introduction
redu in a nutshell: it's ncdu for your restic repo.
If you ever wanted to know what's taking so much space in your restic repo so that you can find all the caches and useless things you might be backing up and delete them from the snapshots, then this is exactly for you.
redu aggregates data from all snapshots into one view so you can easily find the culprits!
Installing
You can either grab a pre-built binary from Github, currently available for:
- Darwin (MacOS) arm64
- Darwin (MacOS) x86-64
- Linux arm64
- Linux x86-64
- Windows arm64
- Windows x86-64
Note: On MacOS if you download via browser you might need to remove quarantine with:
xattr -d com.apple.quarantine <binary name>
or you can install with cargo:
cargo install redu --locked
Running
You can specify the repository and the password command in exactly the same ways that restic supports.
For example using environment variables:
$ export RESTIC_REPOSITORY='sftp://my-backup-server.my-domain.net'
$ export RESTIC_PASSWORD_COMMAND='security find-generic-password -s restic -a personal -w'
$ redu
Or via command line arguments:
redu -r 'sftp://my-backup-server.my-domain.net' --password-command 'security find-generic-password -s restic -a personal -w'
Note: --repository-file (env: RESTIC_REPOSITORY_FILE) and --password-file (env: RESTIC_PASSWORD_FILE),
as well as plain text passwords set via the RESTIC_PASSWORD environment variable,
are supported as well and work just like in restic.
Similar to restic, redu will prompt you to enter the password, if it isn't given any other way.
Usage
Redu keeps a cache with your file/directory sizes (per repo). On each run it will sync the cache with the snapshots in your repo, deleting old snapshots and integrating new ones into the cache.
If you have a lot of large snapshots the first sync might take some minutes depending on your connection speed and computer. It will be much faster the next time as it no longer needs to fetch the entire repo.
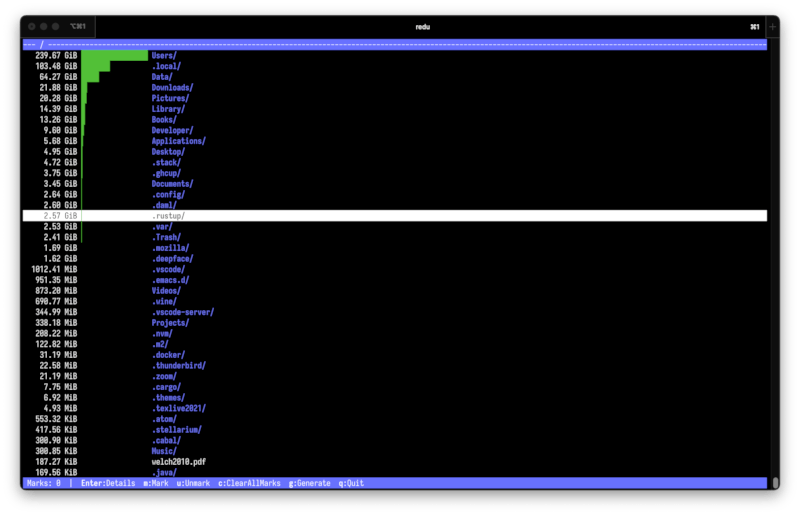
After some time you will see something like this:

You can navigate using the arrow keys or hjkl. Going right enters a directory and going left leaves back to the parent.
PgUp/PgDown or C-b/C-b scroll up or down a full page.
The size that redu shows for each item is the maximum size of the item across all snapshots. That is, it's the size of that item for the snapshot where it is the biggest.
The bars indicate the relative size of the item compared to everything else in the current location.
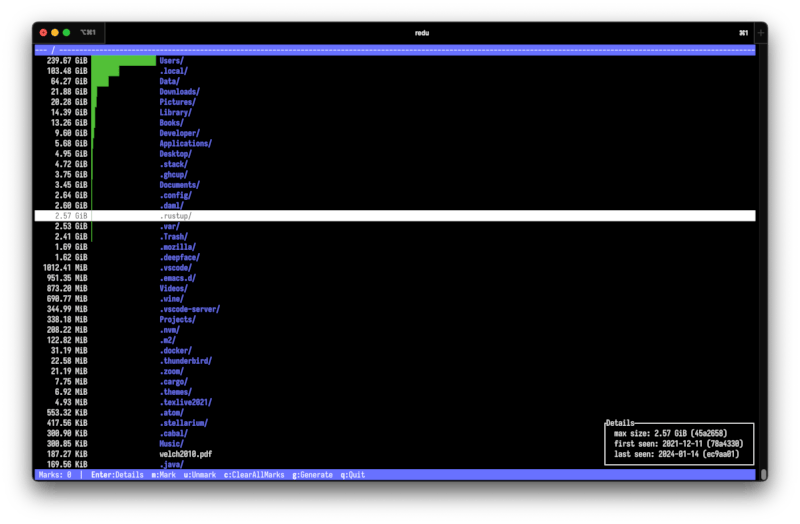
By pressing Enter you can make a small window visible that shows some details about the currently highlighted item:
- The latest snapshot where it has maximum size
- The earliest date and snapshot where this item appears
- The latest date and snapshot where this item appears

You can keep navigating with the details window open and it will update as you browse around.
Hint: you can press Escape to close the details window (as well as other dialogs).
Marking files
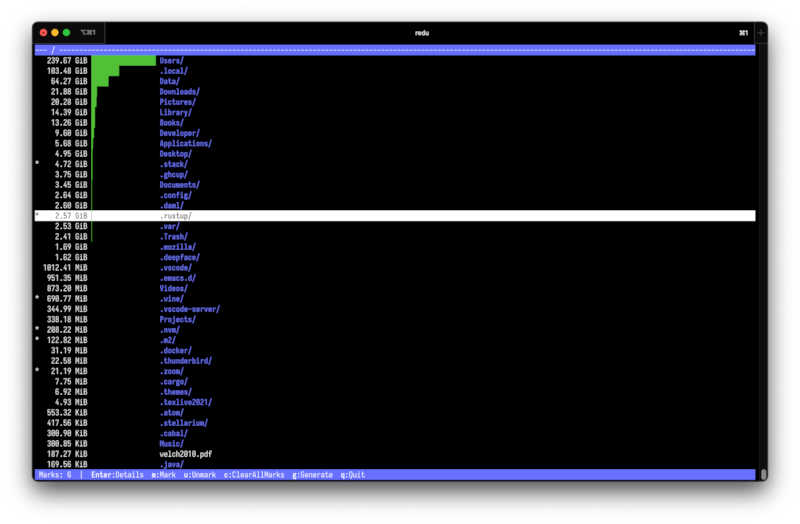
You can mark files and directories to build up your list of things to exclude. Keybinds
- m: mark selected file/directory
- u: unmark selected file/directory
- c: clear all marks (this will prompt you for confirmation)
The marks are persistent across runs of redu (they are saved in the cache file), so feel free to mark a few files and just quit and come back later.
The marks are shown with an asterik at the beginning of the line and you can see how many total marks you have on the bar at the bottom.

Generating the excludes
Press g to exit redu and generate a list with all of your marks in alphabetic order to stdout.
Everything else that redu prints (including the UI itself) goes to stderr, so this allows you to redirect redu's output to a file to get an exclude-file that you can directly use with restic.
For example:
$ redu > exclude.txt
$ restic rewrite --exclude-file=exclude.txt --forget
Note: redu is strictly read-only and will never modify your repository itself.
Quit
You can also just quit without generating the list by pressing q.
Contributing
Bug reports, feature requests and PRs are all welcome! Just go ahead!
You can also shoot me an email or talk to me on the rust Discord or Freenode if you want to contribute and want to discuss some point.
Tests and Benchmarks
You can run the tests with
cargo test
There are also a couple of benchmarks based on criterion that can be run with
cargo bench --features bench
Dependencies
~46MB
~798K SLoC