28 releases
| 0.2.0 | Oct 21, 2024 |
|---|---|
| 0.1.27 | Sep 12, 2024 |
| 0.1.26 | Apr 16, 2024 |
| 0.1.25 | Jan 15, 2024 |
| 0.1.13 | Sep 24, 2023 |
#75 in Command-line interface
8,235 downloads per month
Used in 5 crates
(3 directly)
5.5MB
9K
SLoC
r3bl_tuify
Why R3BL?

R3BL TUI library & suite of apps focused on developer productivity
We are working on building command line apps in Rust which have rich text user interfaces (TUI). We want to lean into the terminal as a place of productivity, and build all kinds of awesome apps for it.
-
🔮 Instead of just building one app, we are building a library to enable any kind of rich TUI development w/ a twist: taking concepts that work really well for the frontend mobile and web development world and re-imagining them for TUI & Rust.
- Taking inspiration from things like React, SolidJS, Elm, iced-rs, Jetpack Compose, JSX, CSS, but making everything async (so they can be run in parallel & concurrent via Tokio).
- Even the thread running the main event loop doesn't block since it is async.
- Using proc macros to create DSLs to implement something inspired by CSS & JSX.
-
🌎 We are building apps to enhance developer productivity & workflows.
- The idea here is not to rebuild
tmuxin Rust (separate processes mux'd onto a single terminal window). Rather it is to build a set of integrated "apps" (or "tasks") that run in the same process that renders to one terminal window. - Inside of this terminal window, we can implement things like "app" switching, routing, tiling layout, stacking layout, etc. so that we can manage a lot of TUI apps (which are tightly integrated) that are running in the same process, in the same window. So you can imagine that all these "app"s have shared application state. Each "app" may also have its own local application state.
- Here are some examples of the types of "app"s we plan to build (for which this
infrastructure acts as the open source engine):
- Multi user text editors w/ syntax highlighting.
- Integrations w/ github issues.
- Integrations w/ calendar, email, contacts APIs.
- The idea here is not to rebuild
All the crates in the r3bl-open-core
repo provide lots of useful
functionality to help you build TUI (text user interface) apps, along w/ general
niceties & ergonomics that all Rustaceans 🦀 can enjoy 🎉.
Table of contents
- Introduction
- Changelog
- Learn how these crates are built, provide feedback
- How to use it as a library?
- APIs
- How to use it as a binary?
- Style the components
- Build, run, test tasks
- References
Introduction
r3bl_tuify is a Rust crate that allows you to add simple interactivity to your CLI app.
r3bl_tuify crate can be used in two ways:
-
As a library. This is useful if you want to add simple interactivity to your CLI app written in Rust. You can see an example of this in the
examplesfolder in themain_interactive.rsfile. You can run it usingcargo run --example main_interactive. -
As a binary. This is useful if you want to use this crate as a command line tool. The binary target is called
rt.
Changelog
Please check out the changelog to see how the library has evolved over time.
Learn how these crates are built, provide feedback
To learn how we built this crate, please take a look at the following resources.
- If you like consuming video content, here's our YT channel. Please consider subscribing.
- If you like consuming written content, here's our developer site. Please consider subscribing to our newsletter.
- If you have questions, please join our discord server.
How to use it as a library?
Here's a demo of the library target of this crate in action.
To install the crate as a library, add the following to your Cargo.toml file:
[dependencies]
r3bl_tuify = "*" # Get the latest version at the time you get this.
r3bl_core = "*" # Get the latest version at the time you get this.
The following example illustrates how you can use this as a library. The function that
does the work of rendering the UI is called
select_from_list. It takes a list of items and returns
the selected item or items (depending on the selection mode). If the user does not
select anything, it returns None. The function also takes the maximum height and
width of the display, and the selection mode (single select or multiple select).
It works on macOS, Linux, and Windows. And is aware of the terminal color output limitations of each. For eg, it uses Windows API on Windows for keyboard input. And on macOS Terminal.app it restricts color output to a 256 color palette.
use r3bl_core::*;
use r3bl_tuify::*;
use std::io::Result;

fn main() -> Result<()> {
    // Get display size.
    let max_width_col_count: usize = get_size().map(|it| it.col_count).unwrap_or(ch!(80)).into();
    let max_height_row_count: usize = 5;

    let user_input = select_from_list(
        "Select an item".to_string(),
        [
            "item 1", "item 2", "item 3", "item 4", "item 5", "item 6", "item 7", "item 8",
            "item 9", "item 10",
        ]
        .iter()
        .map(|it| it.to_string())
        .collect(),
        max_height_row_count,
        max_width_col_count,
        SelectionMode::Single,
        StyleSheet::default(),
    );

    match &user_input {
        Some(it) => {
            println!("User selected: {:?}", it);
        }
        None => println!("User did not select anything"),
    }

    Ok(())
}
APIs
We provide 2 APIs:
select_from_list: Use this API if you want to display a list of items with a single line header.select_from_list_with_multi_line_header: Use this API if you want to display a list of items with a multi line header.
select_from_list
Use this API if you want to display a list of items with a single line header.
[select_from_list] code example:
use r3bl_core::*;
use r3bl_tuify::*;
use std::io::Result;

fn main() -> Result<()> {
    // Get display size.
    let max_height_row_count: usize = 5;
    let user_input = select_from_list(
        "Select an item".to_string(),
        [
            "item 1", "item 2", "item 3", "item 4", "item 5", "item 6", "item 7", "item 8",
            "item 9", "item 10",
        ]
        .iter()
        .map(|it| it.to_string())
        .collect(),
        max_height_row_count,
        0,
        SelectionMode::Single,
        StyleSheet::default(),
    );

    match &user_input {
        Some(it) => {
            println!("User selected: {:?}", it);
        }
        None => println!("User did not select anything"),
    }

    Ok(())
}
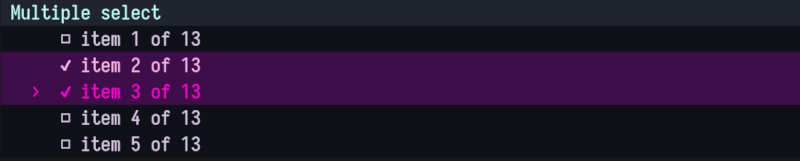
select_from_list_with_multi_line_header
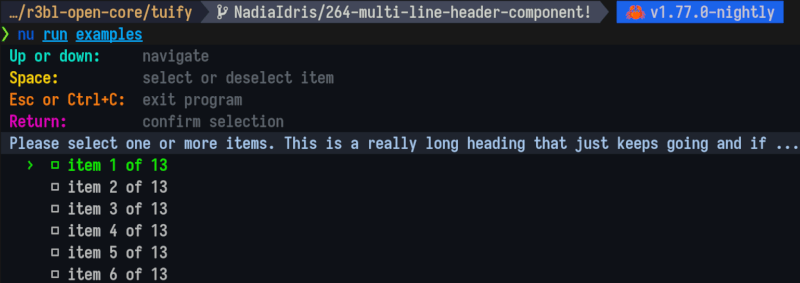
Use the select_from_list_with_multi_line_header API if you want to display a list of items with a
multi line header. The first 5 lines are all part of the multi line header.
[select_from_list_with_multi_line_header] code example:
use std::{io::Result, vec};

use r3bl_ansi_color::{AnsiStyledText, Color, Style as RStyle};
use r3bl_core::*;
use r3bl_tuify::{
    components::style::StyleSheet,
    select_from_list_with_multi_line_header,
    SelectionMode,
};

fn multi_select_instructions() -> Vec<Vec<AnsiStyledText<'static>>> {
    let up_and_down = AnsiStyledText {
        text: " Up or down:",
        style: &[
            RStyle::Foreground(Color::Rgb(9, 238, 211)),
            RStyle::Background(Color::Rgb(14, 17, 23)),
        ],
    };
    let navigate = AnsiStyledText {
        text: "     navigate",
        style: &[
            RStyle::Foreground(Color::Rgb(94, 103, 111)),
            RStyle::Background(Color::Rgb(14, 17, 23)),
        ],
    };

    let line_1 = vec![up_and_down, navigate];

    let space = AnsiStyledText {
        text: " Space:",
        style: &[
            RStyle::Foreground(Color::Rgb(255, 216, 9)),
            RStyle::Background(Color::Rgb(14, 17, 23)),
        ],
    };
    let select = AnsiStyledText {
        text: "          select or deselect item",
        style: &[
            RStyle::Foreground(Color::Rgb(94, 103, 111)),
            RStyle::Background(Color::Rgb(14, 17, 23)),
        ],
    };

    let line_2 = vec![space, select];

    let esc = AnsiStyledText {
        text: " Esc or Ctrl+C:",
        style: &[
            RStyle::Foreground(Color::Rgb(255, 132, 18)),
            RStyle::Background(Color::Rgb(14, 17, 23)),
        ],
    };
    let exit = AnsiStyledText {
        text: "  exit program",
        style: &[
            RStyle::Foreground(Color::Rgb(94, 103, 111)),
            RStyle::Background(Color::Rgb(14, 17, 23)),
        ],
    };

    let line_3 = vec![esc, exit];
    let return_key = AnsiStyledText {
        text: " Return:",
        style: &[
            RStyle::Foreground(Color::Rgb(234, 0, 196)),
            RStyle::Background(Color::Rgb(14, 17, 23)),
        ],
    };
    let confirm = AnsiStyledText {
        text: "         confirm selection",
        style: &[
            RStyle::Foreground(Color::Rgb(94, 103, 111)),
            RStyle::Background(Color::Rgb(14, 17, 23)),
        ],
    };
    let line_4 = vec![return_key, confirm];
    vec![line_1, line_2, line_3, line_4]
}

fn main() -> Result<()> {
   let header = AnsiStyledText {
        text: " Please select one or more items. This is a really long heading that just keeps going and if your terminal viewport is small enough, this heading will be clipped",
        style: &[
            RStyle::Foreground(Color::Rgb(171, 204, 242)),
            RStyle::Background(Color::Rgb(31, 36, 46)),
        ],
    };

    let mut instructions_and_header: Vec<Vec<AnsiStyledText>> = multi_select_instructions();
    instructions_and_header.push(vec![header]);

    let user_input = select_from_list_with_multi_line_header(
        instructions_and_header,
        [
            "item 1 of 13",
            "item 2 of 13",
            "item 3 of 13",
            "item 4 of 13",
            "item 5 of 13",
            "item 6 of 13",
            "item 7 of 13",
            "item 8 of 13",
            "item 9 of 13",
            "item 10 of 13",
            "item 11 of 13",
            "item 12 of 13",
            "item 13 of 13",
        ]
        .iter()
        .map(|it| it.to_string())
        .collect(),
        Some(6),
        None,
        SelectionMode::Multiple,
        StyleSheet::default(),
    );
    match &user_input {
        Some(it) => {
            println!("User selected: {:?}", it);
        }
        None => println!("User did not select anything"),
    }
   Ok(())
}
How to use it as a binary?
Here's a demo of the binary target of this crate in action.
You can install the binary using cargo install r3bl_tuify (from crates.io). Or
cargo install --path . from source. rt is a command line tool that allows you to select one of the options from the list that is passed into it
via stdin. It supports both stdin and stdout piping.
Here are the command line arguments that it accepts:
-sor--selection-mode- Allows you to select the selection mode. There are two options:singleandmultiple.-cor--command-to-run-with-selection- Allows you to specify the command to run with the selected item. For example"echo foo \'%\'"simply prints each selected item.-tor--tui-height- Optionally allows you to set the height of the TUI. The default is 5.
Interactive user experience
Typically a CLI app is not interactive. You can pass commands, subcommands, options, and arguments to it, but if you get something wrong, then you get an error and have to start all over again. This "conversation" style interface might require a lot of trial and error to get the desired result.
The following is an example of using the binary with many subcommands, options, and arguments.
cat TODO.todo | cargo run -- select-from-list \
    --selection-mode single \
    --command-to-run-with-each-selection "echo %"
Here's a video of this in action.
What does this do?
cat TODO.todo- prints the contents of theTODO.todofile tostdout.|- pipes the output of the previous command to the next command, which isrt(ie, the binary target of this crate).cargo run --- runs thertdebug binary in the target folder.select-from-list- runs thertbinary with theselect-from-listsubcommand. This subcommand requires 2 arguments:--selection-modeand--command-to-run-with-each-selection. Whew! This is getting long!--selection-mode single- sets the selection mode tosingle. This means that the user can only select one item from the list. What list? The list that is piped in from the previous command (ie,cat TODO.todo).--command-to-run-with-each-selection "echo %"- sets the command to run with each selection. In this case, it isecho %. The%is a placeholder for the selected item. So if the user selectsitem 1, then the command that will be run isecho item 1. Theechocommand simply prints the selected item tostdout.
Now that is a lot to remember. It is helpful to use clap to provide nice command line help but
that are still quite a few things that you have to get right for this command to work.
It doesn't have to be this way. The binary can be interactive along with
the use of clap to specify some of the subcommands, and arguments. It doesn't
have to be an all or nothing approach. We can have the best of both worlds. The following
videos illustrate what happens when:
-
--selection-modeand--command-to-run-with-each-selectionare not passed in the command line.cat TODO.todo | cargo run -- select-from-listHere are the 3 scenarios that can happen:
-
The user first chooses
singleselection mode (using a list selection component), and then types inecho %in the terminal, as the command to run with each selection. This is an interactive scenario since the user has to provide 2 pieces of information: the selection mode, and the command to run with each selection. They didn't provide this upfront when they ran the command. -
Another scenario is that the user does not provide the required information even when prompted interactively. In this scenario, the program exits with an error and help message.
Here they don't provide what
selection-modethey want. And they don't provide whatcommand-to-run-with-each-selectionthey want. Without this information the program can't continue, so it exits and provides some help message.
-
-
--selection-modeis not passed in the command line. So it only interactively prompts the user for this piece of information. Similarly, if the user does not provide this information, the app exits and provides a help message.cat TODO.todo | cargo run -- select-from-list --command-to-run-with-each-selection "echo %" -
--command-to-run-with-each-selectionis not passed in the command line. So it only interactively prompts the user for this piece of information. Similarly, if the user does not provide this information, the app exits and provides a help message.cat TODO.todo | cargo run -- select-from-list --selection-mode single
Paths
There are a lot of different execution paths that you can take with this relatively simple program. Here is a list.
-
Happy paths:
rt- prints help.cat Cargo.toml | rt -s single -c "echo foo \'%\'"-stdinis piped in, and it prints the user selected option tostdout.cat Cargo.toml | rt -s multiple -c "echo foo \'%\'"-stdinis piped in, and it prints the user selected option tostdout.
-
Unhappy paths (
stdinis not piped in and, orstdoutis piped out):rt -s single- expectsstdinto be piped in, and prints help.rt -s multiple- expectsstdinto be piped in, and prints help.ls -la | rt -s single | xargs -0- does not expectstdoutto be piped out, and prints help.ls -la | rt -s multiple | xargs -0- does not expectstdoutto be piped out, and prints help.
Due to how unix pipes are implemented, it is not possible to pipe the
stdoutof this command to anything else. Unix pipes are non-blocking. So there is no way to stop the pipe "midway". This is whyrtdisplays an error when thestdoutis piped out. It is not possible to pipe thestdoutofrtto another command. Instead, thertbinary simply takes a command that will run after the user has made their selection. Using the selected item(s) and applying them to this command.
Style the components
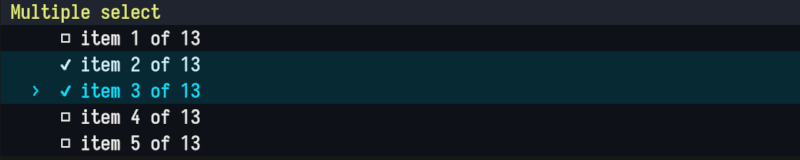
Choose one of the 3 built-in styles
Built-in styles are called default, sea_foam_style, and hot_pink_style. You can find them in the style.rs file (tuify/src/components/style.rs).
Default style:
sea_foam_style:
hot_pink_style:
To use one of the built-in styles, simply pass it as an argument to the select_from_list function.
use r3bl_core::*;
use r3bl_tuify::*;
use std::io::Result;

fn main() -> Result<()> {
    // 🎨 Uncomment the lines below to choose the other 2 built-in styles.
    // let default_style = StyleSheet::default();
    // let hot_pink_style = StyleSheet::hot_pink_style();
    let sea_foam_style = StyleSheet::sea_foam_style();

    let max_width_col_count: usize = get_size().map(|it| it.col_count).unwrap_or(ch!(80)).into();
    let max_height_row_count: usize = 5;

    let user_input = select_from_list(
        "Select an item".to_string(),
        [
            "item 1", "item 2", "item 3", "item 4", "item 5", "item 6", "item 7", "item 8",
            "item 9", "item 10",
        ]
        .iter()
        .map(|it| it.to_string())
        .collect(),
        max_height_row_count,
        max_width_col_count,
        SelectionMode::Single,
        sea_foam_style,  // 🖌️ or default_style or hot_pink_style
    );

    match &user_input {
        Some(it) => {
            println!("User selected: {:?}", it);
        }
        None => println!("User did not select anything"),
    }

    Ok(())
}
Create your style
To create your style, you need to create a StyleSheet struct and pass it as an argument to the select_from_list function.
use std::io::Result;
use r3bl_ansi_color::{AnsiStyledText, Color};
use r3bl_tuify::{components::style::{Style, StyleSheet},
select_from_list,
SelectionMode};
fn main() -> Result<()> {
// This is how you can define your custom style.
// For each Style struct, you can define different style overrides.
// Please take a look at the Style struct to see what you can override.
let my_custom_style = StyleSheet {
focused_and_selected_style: Style {
fg_color: Color::Rgb(255, 244, 0),
bg_color: Color::Rgb(15, 32, 66),
..Style::default()
},
focused_style: Style {
fg_color: Color::Rgb(255, 244, 0),
..Style::default()
},
unselected_style: Style { ..Style::default() },
selected_style: Style {
fg_color: Color::Rgb(203, 170, 250),
bg_color: Color::Rgb(15, 32, 66),
..Style::default()
},
header_style: Style {
fg_color: Color::Rgb(171, 204, 242),
bg_color: Color::Rgb(31, 36, 46),
..Style::default()
},
};
// Then pass `my_custom_style` as the last argument to the `select_from_list` function.
let user_input = select_from_list(
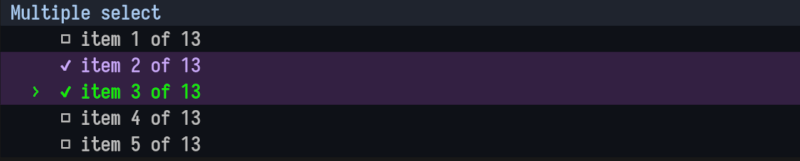
"Multiple select".to_string(),
["item 1 of 3", "item 2 of 3", "item 3 of 3"]
.iter()
.map(|it| it.to_string())
.collect(),
6, // max_height_row_count
80, // max_width_col_count
SelectionMode::Multiple,
my_custom_style,
);
match &user_input {
Some(it) => {
println!("User selected: {:?}", it);
}
None => println!("User did not select anything"),
}
Ok(())
}
Build, run, test tasks
Prerequisites
🌠 For these to work you have to install the Rust toolchain, nu, cargo-watch,
bat, and flamegraph on your system. Here are the instructions:
- Install the Rust toolchain using
rustupby following the instructions here. - Install
cargo-watchusingcargo install cargo-watch. - Install
flamegraphusingcargo install flamegraph. - Install
batusingcargo install bat. - Install
nushell on your system usingcargo install nu. It is available for Linux, macOS, and Windows.
Nushell scripts to build, run, test, etc.
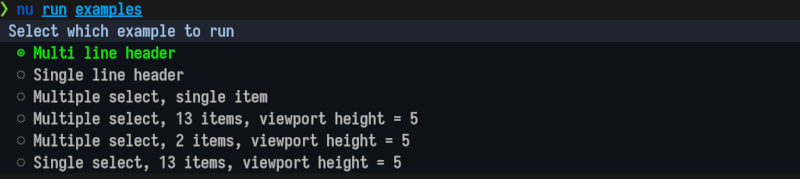
Go to the tuify folder and run the commands below. These commands are defined in the ./run folder.
| Command | Description |
|---|---|
nu run examples |
Run examples in the ./examples folder |
nu run piped |
Run binary with piped input |
nu run build |
Build |
nu run clean |
Clean |
nu run all |
All |
nu run examples-with-flamegraph-profiling |
Run examples with flamegraph profiling |
nu run test |
Run tests |
nu run clippy |
Run clippy |
nu run docs |
Build docs |
nu run serve-docs |
Serve docs over VSCode Remote SSH session. |
nu run upgrade-deps |
Upgrade deps |
nu run rustfmt |
Run rustfmt |
The following commands will watch for changes in the source folder and re-run:
| Command | Description |
|---|---|
nu run watch-examples |
Watch run examples |
nu run watch-all-tests |
Watch all test |
nu run watch-one-test <test_name> |
Watch one test |
nu run watch-clippy |
Watch clippy |
nu run watch-macro-expansion-one-test <test_name> |
Watch macro expansion for one test |
There's also a run script at the top level folder of the repo. It is intended to
be used in a CI/CD environment w/ all the required arguments supplied or in
interactive mode, where the user will be prompted for input.
| Command | Description |
|---|---|
nu run all |
Run all the tests, linting, formatting, etc. in one go. Used in CI/CD |
nu run build-full |
This will build all the crates in the Rust workspace. It will install all the required pre-requisite tools needed to work with this crate (what install-cargo-tools does) and clear the cargo cache, cleaning, and then do a really clean build. |
nu run install-cargo-tools |
This will install all the required pre-requisite tools needed to work with this crate (things like cargo-deny,and flamegraph will all be installed in one go) |
nu run check-licenses |
Use cargo-deny to audit all licenses used in the Rust workspace |
References
CLI UX guidelines:
- Handling Arguments
- Configuration
- Hierarchical Config
- Hierarchical Config
- Clap Derive Overview
- Command Line Interface Guidelines
ANSI escape codes:
- ANSI Escape Codes Notes
- ANSI Escape Code - Wikipedia
- ASCII Table
- Xterm 256 Color Chart
- 256 Colors Cheat Sheet
- List of ANSI Color Escape Sequences - Stack Overflow
- Color Metric
License: Apache-2.0
Dependencies
~20–34MB
~552K SLoC