5 releases
| 0.0.5 | Jan 14, 2024 |
|---|---|
| 0.0.4 | Jan 14, 2024 |
| 0.0.3 | Jan 8, 2024 |
| 0.0.2 | Jan 8, 2024 |
| 0.0.1 | Jan 8, 2024 |
#479 in Command-line interface
128 downloads per month
Used in 4 crates
1.5MB
3K
SLoC
Promptuity
Promptuity = Prompt + Ingenuity
Promptuity is a library that provides interactive prompts. It is highly extensible, allowing you to build your original prompts from scratch. It brings ingenuity to various projects.
Table Of Contents
- Concept
- Quick Start
- Examples
- Documentation
- Prompts
- Themes
- Customize
- Error Handling
- Testing
- Alternatives
- Contributing
- CHANGELOG
- License
Concept
- ⚡ Not easy, But simple
- Avoids APIs with implicit behavior, aiming to provide as transparent APIs as possible.
- The amount of code required to start a prompt may be more compared to other libraries.
- 🔨 Extensible
- You can customize built-in prompts or build your prompts from scratch.
- The built-in prompts are minimal, assuming that prompt requirements vary by project.
- 💅 Beautiful
- Offers two types of built-in Themes.
- Themes can also be fully customized to fit your ideal.
Quick Start
The basic usage is as follows.
use promptuity::prompts::{Confirm, Input, Select, SelectOption};
use promptuity::themes::FancyTheme;
use promptuity::{Error, Promptuity, Term};
fn main() -> Result<(), Error> {
let mut term = Term::default();
let mut theme = FancyTheme::default();
let mut p = Promptuity::new(&mut term, &mut theme);
p.term().clear()?;
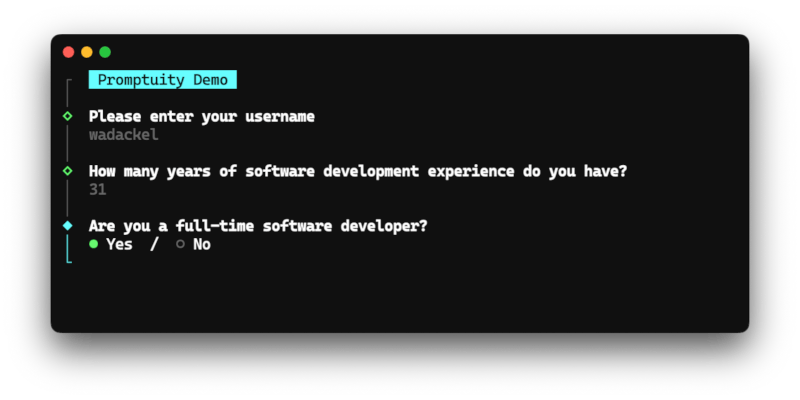
p.with_intro("Survey").begin()?;
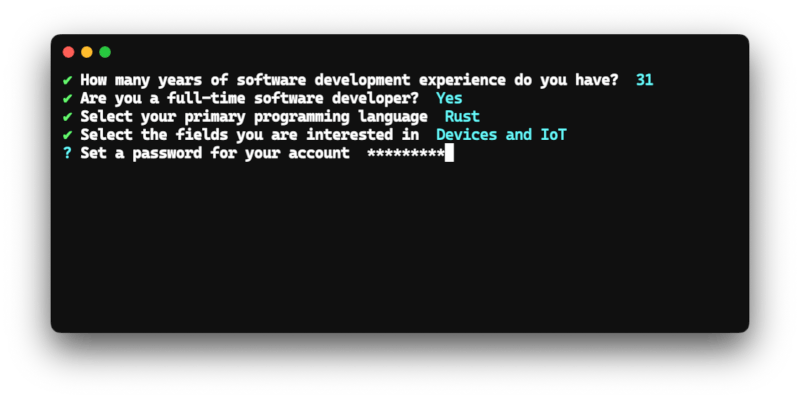
let name = p.prompt(Input::new("Please enter your username").with_placeholder("username"))?;
let _ = p.prompt(Confirm::new("Are you a full-time software developer?").with_default(true))?;
let _ = p.prompt(
Select::new(
"Select your primary programming language",
vec![
SelectOption::new("Rust", "rust"),
SelectOption::new("Go", "go"),
SelectOption::new("C++", "cpp"),
SelectOption::new("C", "c"),
SelectOption::new("TypeScript", "typescript"),
SelectOption::new("JavaScript", "javascript"),
SelectOption::new("Deno", "deno"),
SelectOption::new("Python", "python"),
SelectOption::new("Java", "java"),
SelectOption::new("Dart", "dart"),
SelectOption::new("Other", "other"),
],
)
.with_hint("Submit with Space or Enter."),
)?;
p.with_outro(format!("Thank you for your response, {}!", name))
.finish()?;
Ok(())
}
Examples
If you want to see more examples, please refer to the examples directory.
Documentation
Please refer to the documentation.
Prompts
promptuity::prompts offers five built-in prompts.
To implement your original prompt, please see the Build your own Prompt section.
Input
A prompt for general text input.
let name = p.prompt(
    Input::new("What is your accout name?")
        .with_placeholder("username")
        .with_hint("Only alphanumeric characters are allowed.")
        .with_validator(|value: &String| {
            if value.chars().all(|c| c.is_alphanumeric()) {
                Ok(())
            } else {
                Err("Invalid format".into())
            }
        }),
)?;
Password
A text input prompt where the input is not displayed.
let secret = p.prompt(
    Password::new("Set a password for your account")
        .with_hint("Please enter more than 6 alphanumeric characters.")
        .with_validator(|value: &String| {
            if value.len() < 6 {
                Err("Password must be at least 6 characters long".into())
            } else {
                Ok(())
            }
        }),
)?;
Number

A prompt for inputting only integer values.
let age = p.prompt(Number::new("How old are you?").with_min(0).with_max(120))?;
Select
A prompt for selecting a single element from a list of options.
let color = p.prompt(
    Select::new(
        "What is your favorite color?",
        vec![
            SelectOption::new("Red", "#ff0000"),
            SelectOption::new("Green", "#00ff00").with_hint("recommended"),
            SelectOption::new("Blue", "#0000ff"),
        ],
    )
    .as_mut(),
)?;
MultiSelect

A prompt for selecting multiple elements from a list of options.
let color = p.prompt(
    MultiSelect::new(
        "What are your favorite colors?",
        vec![
            MultiSelectOption::new("Red", "#ff0000"),
            MultiSelectOption::new("Green", "#00ff00").with_hint("recommended"),
            MultiSelectOption::new("Blue", "#0000ff"),
        ],
    )
    .as_mut(),
)?;
Confirm
A prompt for inputting a Yes/No choice.
let like = p.prompt(
    Confirm::new("Do you like dogs?")
        .with_hint("This is just a sample prompt :)")
        .with_default(true),
)?;
Autocomplete
Note
Autocomplete is not provided as a built-in feature. This is because the optimal behavior for Fuzzy Match and key bindings varies by project.
While not provided as a built-in, a reference implementation is available in examples/autocomplete.rs. Please adapt this to suit your project's needs.
Themes
Promptuity offers two different built-in themes.
To implement your original Theme, please see the Build your own Theme section.
MinimalTheme
MinimalTheme is similar to Inquirer. It provides a compact UI.
use promptuity::themes::MinimalTheme;

fn main() {
    let mut theme = MinimalTheme::default();
    // ...
}
FancyTheme
FancyTheme is similar to clack. It provides a rich UI.
use promptuity::themes::FancyTheme;

fn main() {
    let mut theme = FancyTheme::default();
    // ...
}
Customize
This section provides guidance on how to construct original prompts and Themes.
Build your own Prompt
Creating an original prompt can be achieved by implementing the Prompt trait. By implementing three lifecycle methods, you can build prompts that are usable with Promptuity::prompt.
Promptuity prompts consist of the following elements:
| Item | Description |
|---|---|
| Message | Displays the question content of the prompt. |
| Input | A single-line item that accepts user key inputs. |
| Body | A multi-line item that accepts user key inputs. |
| Hint | Displays a message to assist with prompt input. |
- Prompts that accept single-line inputs, like
InputorPassword, do not utilize Body. - Prompts that do not accept inputs, like
SelectorMultiSelect, do not utilize Input.
Keep these points in mind when building your prompts.
0. Setting Up a Custom Prompt
Let's use the implementation of a custom prompt similar to Confirm as an example.
use promptuity::Prompt;

struct CustomConfirm {
    message: String,
    hint: Option<String>,
    value: bool,
}

impl Prompt for CustomConfirm {
    type Output = bool;

    // TODO
}
Define a struct with a message, hint, and value. Specify the final result type in Output.
First, let's implement the reception of key inputs.
1. Receiving Key Input
Handle key inputs in the Prompt::handle method.
For example, let's implement it so that pressing y for Yes and n for No finalizes the result.
use promptuity::event::{KeyCode, KeyModifiers};
use promptuity::{Prompt, PromptState};

// ...

impl Prompt for CustomConfirm {
    // ...

    fn handle(&mut self, code: KeyCode, modifiers: KeyModifiers) -> PromptState {
        match (code, modifiers) {
            (KeyCode::Enter, _) => PromptState::Submit,
            (KeyCode::Esc, _) | (KeyCode::Char('c'), KeyModifiers::CONTROL) => PromptState::Cancel,
            (KeyCode::Char('y'), KeyModifiers::NONE) | (KeyCode::Char('Y'), KeyModifiers::NONE) => {
                self.value = true;
                PromptState::Submit
            }
            (KeyCode::Char('n'), KeyModifiers::NONE) | (KeyCode::Char('N'), KeyModifiers::NONE) => {
                self.value = false;
                PromptState::Submit
            }
            _ => PromptState::Active,
        }
    }
}
You can freely combine key codes and modifiers, allowing the construction of complex prompts tailored to specific requirements.
Important
Commonly, prompts are interrupted with Ctrl + C, but Promptuity does not automatically handle this.
If the implementation is omitted, it results in a prompt that cannot be interrupted, leading to poor usability. Therefore, when building an original prompt, you must explicitly implement the interruption process yourself.
2. Rendering the Prompt
Construct the rendering content in the Prompt::render method. Here's a simple example using only Input without a Body.
use promptuity::event::{KeyCode, KeyModifiers};
use promptuity::{Prompt, PromptState, RenderPayload};

// ...

impl Prompt for CustomConfirm {
    // ...

    fn render(&mut self, state: &PromptState) -> Result<RenderPayload, String> {
        let payload = RenderPayload::new(self.message.clone(), self.hint.clone(), None);

        match state {
            PromptState::Submit => {
                let raw = if self.value { "Yes" } else { "No" };
                Ok(payload.input(PromptInput::Raw(raw.into())))
            }

            PromptState::Cancel => Ok(payload),

            _ => Ok(payload.input(PromptInput::Raw("Y/n"))),
        }
    }
}
Determine the appropriate rendering content based on the PromptState returned by Prompt::handle. The above implementation achieves the following requirements:
- The result displays either
YesorNo. - If the prompt is interrupted, only the message is displayed.
- During user input reception, it displays
Y/n.
3. Returning Submission Results
This is the final step in constructing a custom prompt.
Implement the Prompt::submit method, which returns the final value for the received key input.
impl Prompt for CustomConfirm {
    // ...

    fn submit(&mut self) -> Self::Output {
        self.value
    }
}
Prompt::submit is a lifecycle method called immediately after Prompt::handle returns PromptState::Submit.
Handling key inputs and rendering based on input state form the foundation of prompt construction.
For building more complex prompts, examples/autocomplete.rs should serve as a useful reference.
Build your own Theme
Just like prompts, you can build an original Theme by implementing the Theme trait.
For a complete example, please refer to examples/custom_theme.rs.
Error Handling
All errors are consolidated into promptuity::Error.
In many cases, prompt interruptions will need to be handled individually. Interruptions occur during user input reception, typically through inputs like Ctrl + C or ESC.
use promptuity::prompts::Input;
use promptuity::themes::MinimalTheme;
use promptuity::{Error, Promptuity, Term};

fn ask() -> Result<String, Error> {
    let mut term = Term::default();
    let mut theme = MinimalTheme::default();
    let mut p = Promptuity::new(&mut term, &mut theme);

    p.begin()?;
    let name = p.prompt(Input::new("Please enter your username").with_placeholder("username"))?;
    p.finish()?;

    Ok(name)
}

fn main() {
    match ask() {
        Ok(name) => println!("Hello, {}!", name),
        Err(Error::Cancel) => {}
        Err(e) => eprintln!("Error: {}", e),
    }
}
Prompt interruptions can be handled as Error::Cancel. In the above examples, no message is displayed in the event of an interruption.
Testing
Generally, validations involving user input are costly. Since Promptuity implements terminal behaviors as the Terminal trait, it's easy to replace with a Fake.
The Terminal that simulates key inputs, used in Promptuity's integration tests, can be referenced in Term.
Below is an example of testing prompts using a Fake Terminal.
#[test]
fn test_prompts() {
    let mut term = fake_term::Term::new(&[
        (KeyCode::Char('a'), KeyModifiers::NONE),
        (KeyCode::Char('b'), KeyModifiers::NONE),
        (KeyCode::Char('c'), KeyModifiers::NONE),
        (KeyCode::Enter, KeyModifiers::NONE),
    ]);

    let mut theme = MinimalTheme::default();

    let result = {
        let mut p = Promptuity::new(&mut term, &mut theme);
        p.prompt(Input::new("Input Message").as_mut()).unwrap()
    };

    let output = term.output();

    assert_eq!(result, String::from("abc"));

    // This is an example of performing snapshots on outputs.
    insta::with_settings!({ omit_expression => true }, {
        insta::assert_snapshot!(output);
    });
}
Alternatives
The Rust ecosystem contains many wonderful crates.
Inspired
Promptuity's various prompts and design have been greatly inspired by these projects. We are very grateful for their development.
Contributing
See CONTRIBUTING.md.
CHANGELOG
See CHANGELOG.md.
License
Dependencies
~2.5–8MB
~61K SLoC