2 releases
| 0.1.1 | May 28, 2024 |
|---|---|
| 0.1.0 | May 27, 2024 |
#526 in Images
95KB
2K
SLoC
(What is) PixelArt👾?
Code to pixel image! This is what this library dose at the moment.
![]()
Made by pixelart 👾 (This is how).
Why?
The very first-stone purpose of this lib is to somehow visualize what your code dose for maybe learning and understating purposes, and of course having fun!
As I already used a lot in tests, If the generated pixel image seems right, you can confirm that your code is also working right. That's one of the "learning and understating purposes", I mentioned before.
We map a simple fixed size 2D array of pixels to pixels on a real image. So you can generate image and see how it changes based on what you do with that array.
How?
Simply!
Quick example
Take a look at the example below:
// Let the fun begins ...
use pixelart::prelude::*;

pub fn main() {
    // A 5x5 pixel canvas.
    let mut canvas = PixelCanvas::<5>::default();

    // mutably access the pixel at the center.
    let center_pixel = &mut canvas[StrictPositions::Center];
    // Change its color to blue.
    center_pixel.color = PixelColor::BLUE;

    // Create and save image based on the canvas.
    let image_builder = canvas.default_image_builder().with_scale(5);
    image_builder.save("my_first_art.png").unwrap();
}
This will be the result.
![]()
Breakdown
Let's break down and see what happened though it must be clear enough.
-
Create a default
PixelCanvas.The
PixelCanvasis a wrapper over so called "fixed size 2D array of pixels". The inner type is aPixelTablewhich is an array ofPixelRowwhich is an array what? you guess.This some sort of fish syntax
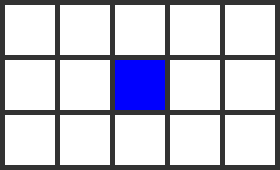
::<5>indicates the size of our array. A 2D array has a height (H, rows count) and a width (W, columns count).In this case we set
Hto5, which implicitly setsWto5if you don't set that explicitly. So it's equivalent to::<5, 5>(::<H, W>).You could for example do something like this:
// ---- sniff ----

// A 3x5 pixel canvas.
let mut canvas = PixelCanvas::<3, 5>::default();

// ---- sniff ----
The result will be:

-
Accessing the pixel at the center.
You can index into canvas using positions (a combination of row and column of a pixel). In this case we use
StrictPositionsenum which can magically generate positions based on canvas size.StrictPositions::Centeris center position (2, 2as we start from zero you know).&mutmeans I need mutable access to the pixel to change its color, otherwise i can't.And the we can change color property of the pixel to
PixelColor::BLUE. -
Generating image.
The last part in to generate image. We first get the image builder based on canvas and then we scale it up a bit (
.with_scale), to make it more visible.And jesus please save me as png (With respect).
You can do many other things like iterating over rows and pixels, creating templates and more ...
More?
The library aims to provide more method and type to make your life easier, some of these functionalities are:
-
Using
MaybePixelinstead ofPixelin canvas allows us to Create Templates. -
In above examples you can review usage of rust iterables and extension methods.
-
Using Pen to have fun.
Where?
- For now we're focusing on creating images and make it as smooth as possible. But there're more to do.
- Generating pixel animations (More likely).
- Add some interactivity maybe?! (Not sure about this, must be so hard).
License
Licensed under the mercy and kindness of GOD.
Please use and help making it more useable (Contribute I mean).
Next?
Just Remember to have fun 🍟.
Dependencies
~11MB
~222K SLoC