37 breaking releases
| 0.38.0 | Jan 17, 2025 |
|---|---|
| 0.37.0 | Jul 11, 2024 |
| 0.36.0 | Dec 4, 2023 |
| 0.35.0 | May 12, 2023 |
| 0.7.1 | Jul 26, 2020 |
#93 in Audio
2,660 downloads per month
6MB
18K
SLoC
Make xenharmonic music and explore musical tunings.
Overview
microwave is a microtonal modular waveform synthesizer and effects processor application with soundfont rendering capabilities based on:
- tune – a microtonal library
- magnetron – a modular synthesizer architecture
- fluid-xenth – a microtonal soundfont renderer
- Bevy – a graphics and game engine
The application enables musicians to play polyphonic microtonal music using various input methods such as the touch screen, computer keyboard, MIDI keyboard, or mouse.
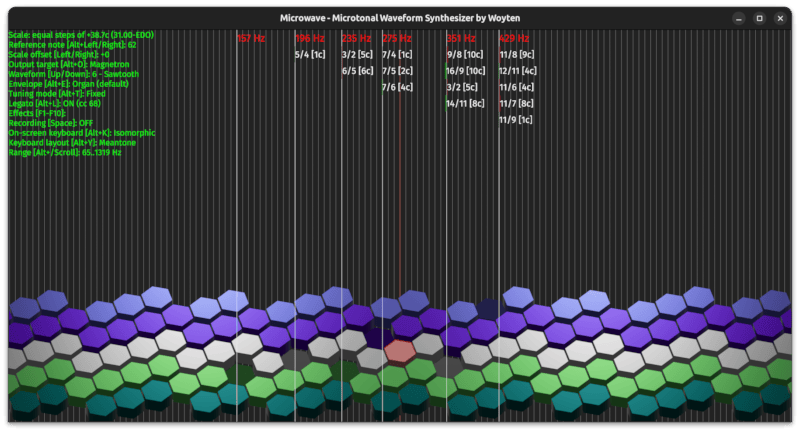
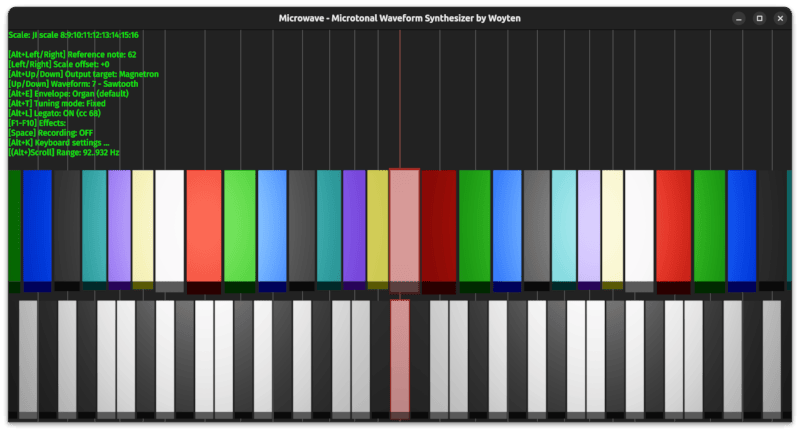
The application's user interface provides information about pitches and just intervals in custom tuning systems and allows users to switch between different keyboard layouts, including isometric ones like the Lumatone.
The built-in modular synthesis engine does not use any fixed architecture and can be customized to react to all sorts of input events.
Resources
- Download / Changelog
- Browser Application
- Demo: Xênerie (15-EDO)
- Demo: Don't Take Five (16-EDO)
- Demo: The Bedoginning (17-EDO)
Features
First-Class Microtonal Support
- Specify custom scales (scale expressions)
- Import SCL and KBM files
- Connect to MIDI-out using various types of tuning techniques
- Display frequencies and approximated just ratios
- Render isomorphic and linear keyboards including irregular ones
Lumatone and Isomorphic Layouts
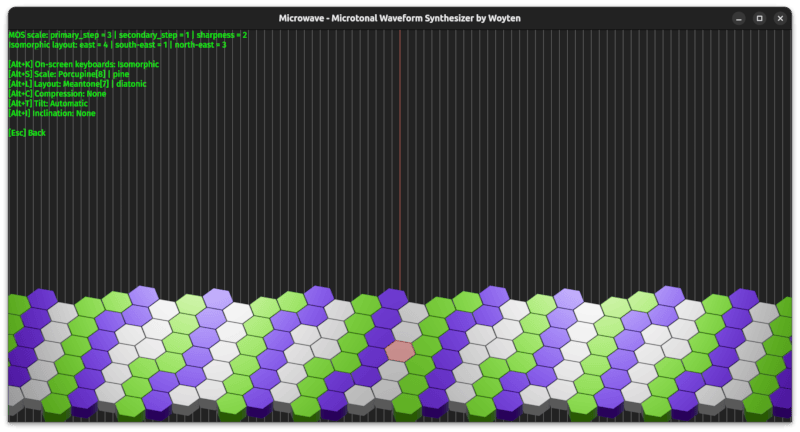
- Find automatic keyboard layouts for Meantone, Mavila, Porcupine, Tetracot and Hanson scales
- Mix scale colors and step sizes to create new layouts
- Compress or expand layouts for better ergonomics
- Define custom layouts and color schemas
- Send isomorphic layouts to the Lumatone
Irregular custom color schema
Porcupine[8] color schema with Meantone[7] layout and flat keys
The above mentioned layout synced to the Lumatone

Synthesizer
- Modular waveform synthesizer
- Customizable audio processing stages
- Physical modeling synthesis
- Soundfont renderer
- Microphone / aux input
- WAV recording
Controls
- Sequencer / piano keyboard via MIDI-in
- Lumatone / multichannel input via MIDI-in
- Computer keyboard (isomorphic input)
- Touch screen (pitch and key pressure)
- Mouse (pitch and breath)
- Channel events (pitch-bend, modulation, pedals, channel pressure, etc.)
- Polyphonic events (key pressure)
- LF sources (envelopes, oscillators, faders, etc.)
Effects
- Low-pass
- 2nd order low-pass
- High-pass
- 2nd order high-pass
- Band-pass
- Notch filter
- All-pass
- Reverb
- Spatial delay
- Rotary speaker
Browser Support
- Use all features without installing any new software.
Download / Installation
Option A: Run microwave in a web browser without installing any additional software.
Option B: Download a precompiled version of microwave for the supported target architectures:
Option C: Use Rust and Cargo to build a fresh binary from scratch for your specific target architecture:
# If you are using Linux: Make sure all dev dependencies are installed.

# On the CI environment (Ubuntu based) we only need to add two dev dependencies:
sudo apt install libasound2-dev libudev-dev

# Make sure pkg-config is installed
sudo apt install pkg-config

cargo install -f microwave
microwave should run out-of-the box on a recent (Ubuntu) Linux, Windows or macOS installation. If it doesn't, the problem is probably caused by the Bevy framework. In that case, try following these instructions.
Usage
Hint: Run microwave with parameters from a shell environment (Bash, PowerShell). Double-clicking on the executable will not provide access to all features!
microwave run                       # 12-EDO scale (default)
microwave run steps 1:22:2          # 22-EDO scale
microwave run scl-file my_scale.scl # imported scale
microwave run help                  # Show help explaining how to set the parameters to start microwave
This action should open a window providing access to a virtual isomorphic keyboard. You can play melodies on the keyboard using your touch screen, computer keyboard, MIDI keyboard or mouse.
Lumatone Mode
When running in Lumatone mode, microwave will automatically synchronize the currently displayed layout (color and MIDI settings) with your Lumatone. Hooray! You no longer have to spend hours with configuring every key manually using the Lumatone editor!
To run microwave in Lumatone mode, use the following command:
microwave luma <midi-out-device> --midi-in <midi-in-device> steps 1:31:2
Usually, both <midi-out-device> and <midi-in-device> resolve to Lumatone. However, for some MIDI setups this might not be the case.
Profiles – Configure Microwave
On startup, microwave tries to load a profile specified by the -p / --profile parameter or the MICROWAVE_PROFILE environment variable. If no such file is found microwave will create a default profile for you.
Example Profiles
microwave is packaged with the following example profiles:
audio-effect.yml: Demo showing how to configure an effect-only profile.microwave.yml: The default profile created at first startup.sympathetic.yml: Demo showing how to use note-input controlled waveguides to achieve a sympathetic resonance effect.
To use a profile, run:
microwave run -p <profile-name>
Profile Structure
The profile has the following structure:
num_buffers:   # Number of main audio buffers
audio_buffers: # Indexes of the buffers (stereo) whose content is played back on the main audio device
globals:       # Globally computed values to be used in the main audio stages
templates:     # Reusable fragments to be used by the Magnetron synthesizer
envelopes:     # Reusable envelopes to be used by the Magnetron synthesizer
stages:        # Stages that can create or process audio or MIDI data
color_palette: # Defines the colors to draw from when generating automatic color schemas
LF (Low-Frequency) Sources
Almost all numerical profile parameters can update in real-time. To keep the audio engine performant updates are usually evaluated at a much lower rate than the audio sampling rate. LF sources, therefore, add control and expressiveness to your playing but aren't well suited for spectral sound modulation.
To define an LF source the following data types can be used:
- Numbers, e.g.
frequency: 440.0 - Strings referring to a named template, e.g.
frequency: WaveformPitch - Nested LF source expressions, e.g.
or (using indented style)frequency: { Mul: [ 2.0, WaveformPitch ] }frequency: Mul: - 2.0 - WaveformPitch
Unfortunately, no detailed LF source documentation is available yet. However, the example profile, microwave's error messages and basic YAML knowledge should enable you to find valid LF source expressions.
globals Section
The globals section of the profile defines named LF sources which are evaluated globally in order to be used by downstream consumers. All consumers of a global receive the exact same value. This is useful, for example, if you need an oscillating signal that is expected to be synchronized over multiple voices or effects.
To assign a global value to a parameter, use the syntax <name-of-parameter>: { Global: <name-of-global> }. Globals can reference other globals as long as the referenced global appears earlier in the list.
templates Section
The purpose of the templates section of the profile is to define the most important LF sources s.t. they do not have to be redefined over and over again. Templates can be understood as computational fragments that will get inlined into the computation graph once used.
To use a template, provide the name of the template as a single string argument. Examples:
frequency: WaveformPitch
fadeout: Fadeout
out_levels: [EnvelopeL, EnvelopeR]
Templates can reference other templates but are not allowed to call into itself in order to avoid infinite recursion.
The default microwave.yml profile contains some important builtin templates which will be explained in the following sections.
WaveformPitch and WaveformPeriod Templates
templates:
  - name: WaveformPitch
    value:
      Mul:
        - Property: WaveformPitch
        - Semitones:
            Controller:
              kind: PitchBend
              map0: 0.0
              map1: 2.0
  - name: WaveformPeriod
    value:
      Mul:
        - Property: WaveformPeriod
        - Semitones:
            Controller:
              kind: PitchBend
              map0: 0.0
              map1: -2.0
The given fragment defines a template with name WaveformPitch or WaveformPeriod, respectively. The output values are calculated by reading the waveform's WaveformPitch/WaveformPeriod property and multiplying it with the pitch-bend wheel's value in whole tones.
Note: Reacting to pitch-bend events is not a hardcoded feature of microwave but a behavior that the user can define by themself!
Fadeout Template
templates:
  - name: Fadeout
    value:
      Controller:
        kind: Damper
        map0: { Property: OffVelocitySet }
        map1: 0.0
The Fadeout template provides a value describing to what extent a waveform is supposed to be faded out. It works in the following way:
- While a key is pressed down,
OffVelocitySetresolves to 0.0. As a result,Controller, as well, resolves to 0.0, regardless of the damper pedal state. Therefore, the waveform remains stable. - As soon as a key is released,
OffVelocitySetwill resolve to 1.0. Now,Controllerwill interpolate between 1.0 (map0= damper released released) and 0.0 (map1= damper pedal pressed). As a consequence, the waveform will fade out unless the damper pedal is pressed.
Note: Like in the examples before, reacting to the damper pedal is not a hardcoded feature built into microwave but customizable behavior.
EnvelopeL and EnvelopeR Templates
templates:
  - name: EnvelopeL
    value:
      Mul:
        - Controller:
            kind: Pan
            map0: { Property: Velocity }
            map1: 0.0
        - Controller:
            kind: Volume
            map0: 0.0
            map1: 0.25
  - name: EnvelopeR
    value:
      Mul:
        - Controller:
            kind: Pan
            map0: 0.0
            map1: { Property: Velocity }
        - Controller:
            kind: Volume
            map0: 0.0
            map1: 0.25
These templates are designed to provide a reasonable envelope amplitude of ≈ -18dB which is sensitive to the pan controller, the volume controller and the pressed key's velocity. The result is obtained by multiplying the following quantities:
- Pan controller: From 1 to 0 (left channel) or 0 to 1 (right channel) (≈ -6dB)
- Velocity controller: From 0 to 0.25 (≈ -12dB)
- Key velocity: From 0 to 1
Note: You are not forced to couple envelope amplitudes to those quantities. For example, you could replace the pan controller with the balance controller. Use an LF source that matches your use case.
envelopes Section
Every waveform needs to refer to an envelope defined in the envelopes section of the config file. Envelopes transfer the result of the internal waveform buffers to the main audio pipeline and limit the waveform's lifetime.
An envelope definition typically looks as follows:
envelopes:
  - name: Piano
    in_buffer: 7
    out_buffers: [0, 1]
    out_levels: [EnvelopeL, EnvelopeR]
    fadeout: Fadeout
    attack_time: 0.01
    decay_rate: 1.0
    release_time: 0.25
with
name: The name of the envelope.in_buffer: The waveform buffer containing the signal that is supposed to be enveloped.out_buffers: The (stereo) buffers of the main audio pipeline that the enveloped signal is supposed to be written to.out_levels: The amplitude factor to apply when writing to the main audio pipeline. It makes sense to useEnvelopeL/EnvelopeRas a value but the user can choose whatever LF source expression they find useful.fadeout: The amount by which the waveform should fade out. Important: If this value is set to constant 0.0 the waveform will never fade out and continue to consume CPU resources, eventually leading to an overload of the audio thread.attack_time: The linear attack time in seconds.decay_rate: The exponential decay rate in 1/seconds (inverse half-life) after the attack phase is over.release_time: The linear release time in seconds. The waveform is considered exhausted as soon as the integral overfadeout / release_time * dtreaches 1.0.
stages Section / Main Audio Pipeline
The stages section defines the sections that are evaluated sequentially while the main audio thread is running. Not all sections (e.g. MidiOut) contribute to the main audio pipeline but, since they will be added to the user interface, it makes sense to declare them here as well. Some of the stages, the output targets, are sensitive to note inputs. In that case, the note_input property has to be set which can have the following values:
- Foreground: Only activate notes when the given output target is currently active.
- Background: Always activate notes when a note event is received.
Magnetron Synthesizer – Create Your Own Waveforms
To enable the modular magnetron synthesizer engine add the following stage:
stages:
  - stage_type: Magnetron
    note_input: Foreground
    num_buffers: # Number of waveform audio buffers
    waveforms:   # Waveform definitions
waveforms Section
The waveforms section defines the waveform render stages to be applied sequentially when a waveform is triggered.
You can mix and match as many stages as you want to create the tailored sound you are looking for. The following example config defines a clavinettish sounding waveform that I discovered by accident:
waveforms:
  - name: Funky Clavinet
    envelope: Piano
    stages:
      - stage_type: Generator
        generator_type: Oscillator
        out_buffer: 0
        out_level: 440.0
        oscillator_type: Sin
        frequency: WaveformPitch
      - stage_type: Processor
        in_buffer: 0
        out_buffer: 1
        processor_type: Oscillator
        oscillator_type: Triangle
        frequency: WaveformPitch
        modulation: ByFrequency
      - stage_type: Processor
        in_buffer: 1
        out_buffer: 7
        processor_type: Filter
        filter_type: HighPass2
        resonance:
          Mul:
            - WaveformPitch
            - Fader:
                movement: 10.0
                map0: 2.0
                map1: 4.0
          quality: 5.0
While rendering the sound the following stages are applied:
- Generate a sine wave with the waveform's nominal frequency F and an amplitude of 440. Write this waveform to buffer 0.
- Generate a triangle wave with frequency F and an amplitude of 1.0. Modulate the waveform's frequency (in Hz) sample-wise by the amount stored in buffer 0. Write the modulated waveform to buffer 1.
- Apply a second-order high-pass filter to the samples stored in buffer 1. The high-pass's resonance frequency rises from 2F to 4F within 0.1 seconds. Write the result to buffer 7.
- Wrap an envelope around the signal in buffer 7 and transfer the enveloped signal to buffer 0 and 1 of the main audio pipeline. This is the behavior defined for the
Pianoenvelope in theenvelopessection (see above).
To create your own waveforms use the default config file as a starting point and try editing it by trial-and-error. Let microwave's error messages guide you to find valid configurations.
Fluid Synthesizer
For playback of sampled sounds you need to add a Fluid stage to the stages section.
The following example starts up a Fluid stage which renders the contents of a given soundfont file. The rendered audio will be written to the audio buffers 0 and 1 of the main audio pipeline.
stages:
  - stage_type: Fluid
    out_buffers: [0, 1]
    note_input: Foreground
    soundfont_location: <soundfont-location>
SF3 support
If you like to use compressed sf3 files you need to compile microwave with the sf3 feature enabled. Note that the startup will take significantly longer since the soundfont needs to be decompressed first.
Effects – Create Your Own
To add your own customized effects add a StereoProcessor stage with processor_type: Effect. The following config will add a rotary-speaker effect stage to the main audio pipeline.
stages:
  - stage_type: StereoProcessor
    in_buffers: [4, 5]
    out_buffers: [14, 15]
    processor_type: Effect
    effect_type: RotarySpeaker
    buffer_size: 100000
    gain:
      Controller:
        kind: Sound9
        map0: 0.0
        map1: 0.5
    rotation_radius: 20.0
    speed:
      Fader:
        movement:
          Controller:
            kind: Sound10
            map0: -2.0
            map1: 1.0
        map0: 1.0
        map1: 7.0
The given config defines the following properties:
in_buffers: Buffers 4 and 5 are used as effect inputs.out_buffers: Buffers 14 and 15 are used as effect outputs.buffer_size: A fixed delay buffer size of 100000 samples.gain: An input gain ranging from 0.0 to 0.5. The input gain can be controlled via the F9 key or MIDI CCN 78.rotation_radius: A rotation radius of 20 cm.speed: A rotation speed ranging from 1 Hz to 7 Hz. The selected speed is determined by theFadercomponent which will gradually fade between the two values. The movement of the fader is controlled by the the F10 key or MIDI CCN 79 and ranges from -2.0/s to 1.0/s in order to simulate the rotary speaker's deceleration and acceleration.
MIDI Out
To enable playback through an external MIDI device add the following stage to the audio pipeline:
stages:
  - stage_type: MidiOut
    note_input: Foreground
    out_device: <midi-device>
    out_channel: 0
    num_out_channels: 9
    device_id: 127
    tuning_program: 0
    tuning_method: <tuning-method>
The available tuning methods are full, full-rt, octave-1, octave-1-rt, octave-2, octave-2-rt, fine-tuning and pitch-bend.
To retrieve a list of available MIDI devices run:
microwave devices
MIDI In
To listen for events originating from an external MIDI device you need to specify the name of the input device:
microwave devices # List MIDI devices
microwave run --midi-in name-of-my-device
microwave run --midi-in "name of my device" # If the device name contains spaces
To enable microwave to receive events from a multi-channel MIDI source such as the Lumatone, you need to expand the key range and define the channel-specific note offset.
Live Interactions
You can live-control your waveforms and effects with your mouse pointer, touch pad or any MIDI Control Change messages source.
The following example stage defines a resonating low-pass filter whose resonance frequency can be controlled with a MIDI modulation wheel/lever from 2,000 to 10,000 Hz.
stage_type: Processor
in_buffer: 0
out_buffer: 7
processor_type: Filter
filter_type: LowPass2
resonance:
  Controller:
    kind: Modulation
    map0: 2000.0
    map1: 10000.0
quality: 5.0
If you want to use the mouse's vertical axis for sound control use the Breath controller.
resonance:
  Controller:
    kind: Breath
    map0: 2000.0
    map1: 10000.0
If you want to use the touchpad for polyphonic sound control use the KeyPressure property.
resonance:
  Linear:
    input:
      Property: KeyPressure
    map0: 2000.0
    map1: 10000.0
Note: While Controller values are scaled to 0..1 (or -1..1 in the case of pitch-bend events) and require a range mapping (map0/map1 parameters), Property values can be directly digested. If necessary, they can be rescaled using Mul or Linear.
More Settings
The command line enables you to set set up sample rates, buffer sizes and other startup parameters. To print a full list of available command-line arguments run:
microwave run help
# 31-EDO Lumatone preset centered around D4 (62, Layout offset -5)
microwave ref-note 62 --root 57 --luma-offs 31 --lo-key 0 --up-key 155 --midi-in lumatone steps 1:31:2
Browser Application
The browser application allows you to utilize microwave and all of its features without the need to install any additional software. Simply open the Web Launcher in your web browser.
The Web Launcher functions as a command-line terminal, allowing you to launch microwave with the command-line arguments shown in the previous sections.
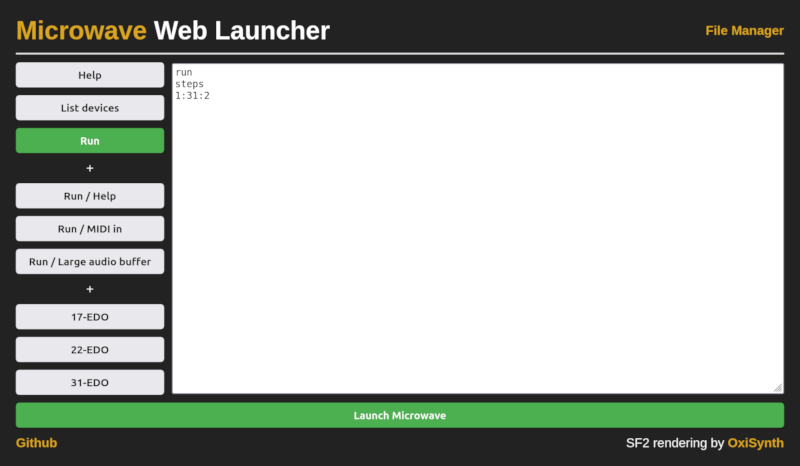
To interact with files read from and written to by the browser application, open the File Manager, which facilitates file exchange between your file system and the application.
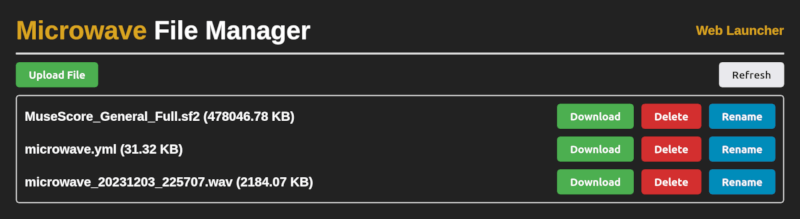
Note: Files managed by microwave are stored in the browser-local indexed database. No data is exchanged with a remote server!
Help
For a complete list of command line options run
microwave help
License
microwave statically links against OxiSynth for soundfont rendering capabilities. This makes the binary executable of microwave a derivative work of OxiSynth. OxiSynth is licensed under the GNU Lesser General Public License, version 2.1.
Dependencies
~39–73MB
~1M SLoC