1 unstable release
| 0.3.1 | Jan 13, 2023 |
|---|
#1381 in Embedded development
71KB
1K
SLoC
![]()
esp32-wroom-rp
A Rust-based RP2040 series driver providing WiFi functionality via Espressif ESP32-WROOM-32U/UE WiFi daughter controllers/boards.
Supports the ESP32-WROOM-32E, ESP32-WROOM-32UE modules.
Future implementations will support the ESP32-WROOM-DA module.
Usage
use rp2040_hal as hal;

use esp32_wroom_rp::{wifi::Wifi, gpio::EspControlPins};
use embedded_hal::blocking::delay::DelayMs;

use embedded_hal::spi::MODE_0;
use fugit::RateExtU32;
use hal::{clocks::Clock, pac};

let _spi_miso = pins.gpio16.into_mode::<hal::gpio::FunctionSpi>();
let _spi_sclk = pins.gpio18.into_mode::<hal::gpio::FunctionSpi>();
let _spi_mosi = pins.gpio19.into_mode::<hal::gpio::FunctionSpi>();

let spi = hal::Spi::<_, _, 8>::new(pac.SPI0);

// Exchange the uninitialized SPI driver for an initialized one
let spi = spi.init(
    &mut pac.RESETS,
    clocks.peripheral_clock.freq(),
    8_000_000u32.Hz(),
    &MODE_0,
);

let esp_pins = EspControlPins {
    // CS on pin x (GPIO7)
    cs: pins.gpio7.into_mode::<hal::gpio::PushPullOutput>(),
    // GPIO0 on pin x (GPIO2)
    gpio0: pins.gpio2.into_mode::<hal::gpio::PushPullOutput>(),
    // RESETn on pin x (GPIO11)
    resetn: pins.gpio11.into_mode::<hal::gpio::PushPullOutput>(),
    // ACK on pin x (GPIO10)
    ack: pins.gpio10.into_mode::<hal::gpio::FloatingInput>(),
};

let wifi = Wifi::init(spi, esp_pins, &mut delay).unwrap();
let version = wifi.firmware_version();
Hardware
In order to run this code you need to purchase some hardware. This section provides a list of required hardware needed at minimum, and some suggested items to make your life even easier.
Required Hardware
-
Pimoroni Pico Wireless Pack (1x)
-
Breadboard (1x)
- Note: If you already have a medium/large breadboard, then don't worry about purchasing this specific one
Optional but Helpful Hardware
-
Break Away Headers (1x)
- If you want to solder headers to the non-pre-soldered BME280 sensor board from #2 above
-
Straight 7" Jumper Wires M/M (1x)
- Helpful to have some of these on hand
-
Straight 6" Jumper Wires M/F (1x)
- Helpful to have some of these on hand
-
Saleae Logic 8 (1x)
- Note: Only needed if you'd like to participate in developing/debugging parts of this project that communicate on the SPI/I2C buses
Wiring Details
Start with the section Pico to Pico Wiring in this article to set up using two Picos together, one as a Picoprobe (flash/debug) and the other as your embedded target.
Once properly wired, it should look similar to the following:
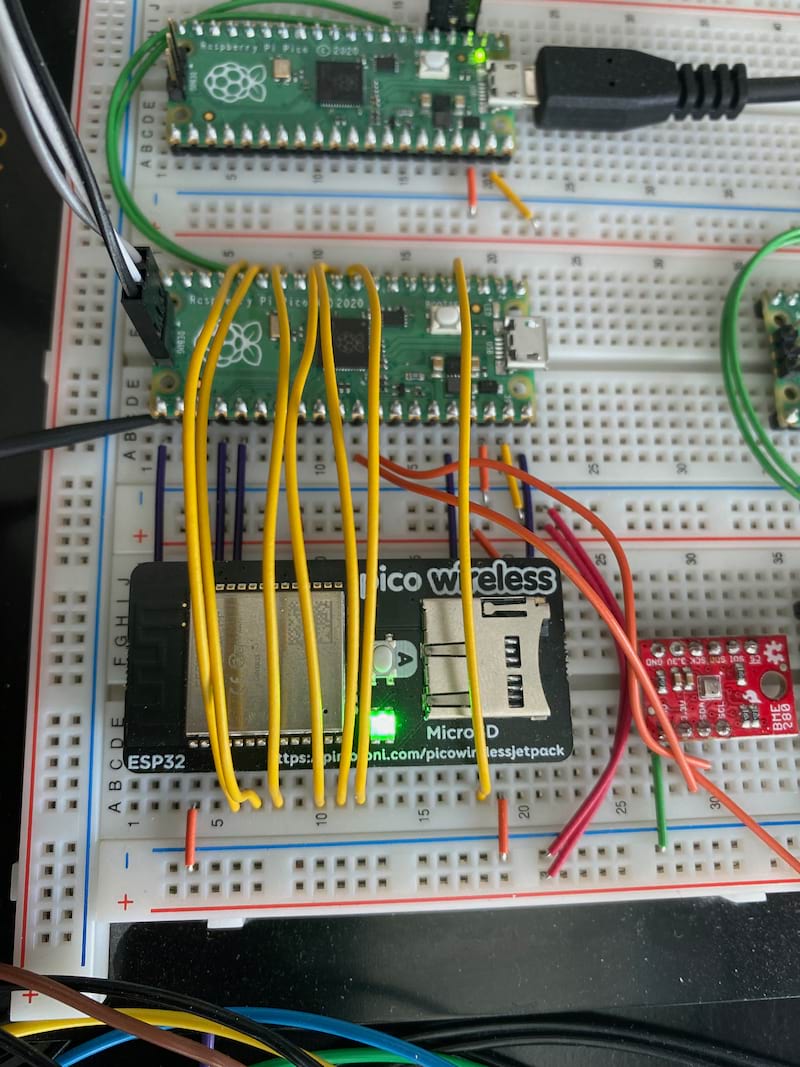
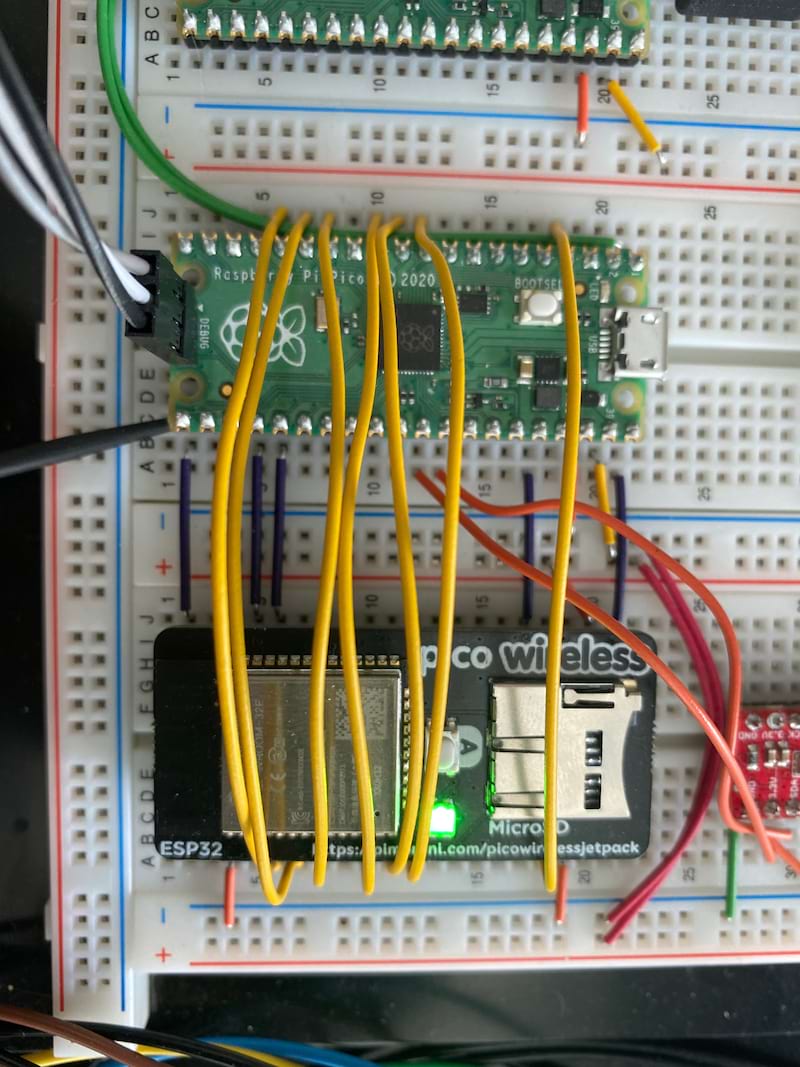
Pico to ESP32 WiFi
The following table lists the pin name and pin number to properly wire between a Pico board and an ESP32 WiFi. This can be done on a breadboard such as the one listed above. Note that V+/- rail means the +/- columns on the breadboard for use as +5 VDC and GND respectively.
| Pico | ESP32 WiFi | Adafuit Airlift | Breadboard |
|---|---|---|---|
| GND (Pin 3) | GND (Pin 3) | V- rail | |
| GP2 (Pin 4) | GPIO0 (Pin 4) | GP0 (Pin 10) | |
| GP7 (Pin 10) | ESP_CSn (Pin 10) | CS (Pin 7) | |
| GP8 (Pin 11) | |||
| GP9 (Pin 12) | |||
| GP10 (Pin 14) | ACK (Pin 14) | Busy (Pin 8) | |
| GP11 (Pin 15) | RESETn (Pin 15) | RSTn (Pin 9) | |
| GP12 (Pin 16) | SW_A (Pin 16) | N/A | |
| GND (Pin 18) | V- rail | ||
| VBUS (Pin 40) | VBUS (Pin 40) | ||
| VSYS (Pin 39) | VSYS (Pin 39) | VIN (Pin 1) | V+ rail |
| GND (Pin 38) | GND (Pin 38) | V- rail | |
| 3V3(OUT) (Pin 36) | 3V3 (Pin 36) | 3Vo (Pin 2) | |
| GP19 (Pin 25) | MOSI (Pin 25) | MOSI (Pin 5) | |
| GP18 (Pin 24) | SCLK (Pin 24) | SCK (Pin 4) | |
| GND (Pin 23) | V- rail | ||
| GP16 (Pin 21) | MISO (Pin 21) | MISO (Pin 5) |
Software Requirements
-
The standard Rust tooling (cargo, rustup) which you can install from https://rustup.rs/
-
Toolchain support for the cortex-m0+ processors in the rp2040 (thumbv6m-none-eabi)
-
flip-link - this allows you to detect stack-overflows on the first core, which is the only supported target for now.
Installation of development dependencies
rustup target install thumbv6m-none-eabi
cargo install flip-link
cargo install probe-run
Building the crate and running the examples
To build the esp32-wroom-rp crate:
cargo build
To build all examples
cd cross
cargo build
To build a specific example (e.g. get_fw_version):
cd cross
cargo build --bin get_fw_version
To run a specific example (e.g. get_fw_version):
cd cross
cargo run --bin get_fw_version
Running the crate's unit tests
cargo test
Getting Involved
This project launched in April, 2022). See the main page section Getting Involved for more info on how to contribute to this project and the Rust Never Sleeps community.
To get involved, please request to join the community here on GitHub and then start contributing to the research and design discussions currently underway.
Project Team
- Architect: Caleb Bourg
- Rust Developer: Dilyn Corner
- Rust Developer: Glyn Matthews
- Project Oversight & Rust Developer: Jim Hodapp
Dependencies
~2.5MB
~41K SLoC