1 unstable release
| 0.1.0 | Jul 25, 2021 |
|---|
#370 in Science
89KB
1K
SLoC
Node Crunch
Allows to distribute computations across several nodes. (Keywords: numeric computing, scientific computing, HPC)
Table of contents
- Node Crunch
Features
- 100% safe Rust.
- Easy to use API.
- If one of the nodes crashes the server and all other nodes can still continue with their work. (Heartbeat messages are used internally.)
- While running the user application more nodes can be added dynamically to speed up computation even more.
- The nodes can be a mixture of different OS and hardware architecture. If it compiles it runs.
Note 1: It is still in development and the API may change.
Note 2: The communication between the server and the nodes are not encrypted and there is no authentication, so use this in a trusted environment only! (The nodes can connect to the server via SSH or VPN for example. You have to set this up accordingly)
Introduction
Node Crunch is a crate that allows users to write distributed code easily. The code is organized in two main parts: one for the server and one for the node.
This is reflected in the two traits that must be implemented for Node Crunch to work:
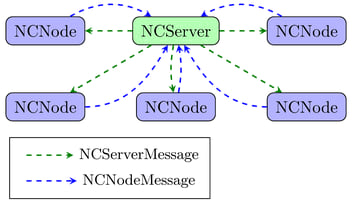
-
The NCSever trait. This contains the functionality for the server. Here the data is split up for the nodes to do the computation and later the data is collected from all the nodes. The trait has five functions that have to be implemented accordingly:
1.1
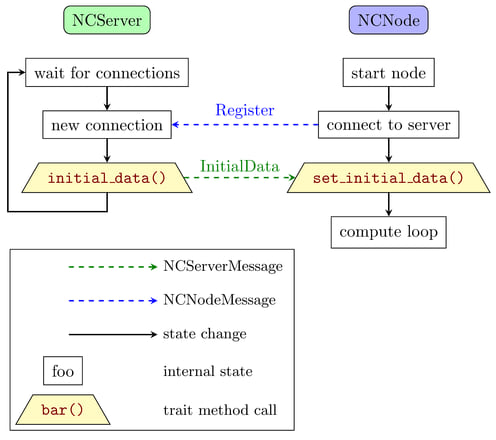
initial_data()This is called when a node contacts the server for the first time. Here the server internally assigns a new and unique node id and sends that back to the node together with an optional initial data. This only needs to be implemented when initial data has to be sent to each node before the main computation begins.1.2
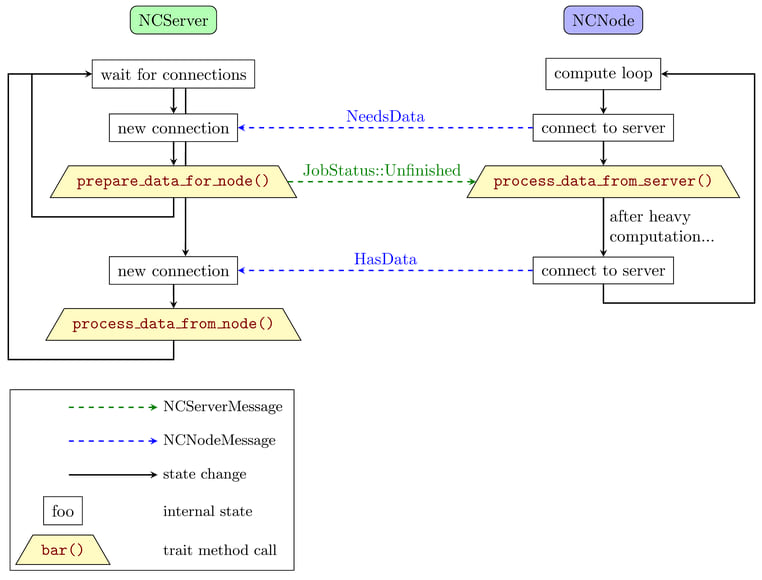
prepare_data_for_node()After initializing the node it contacts the server again for some data to process. This method has to be implemented to prepare the data that will be send to the node.1.3
process_data_from_node()When the node is done with processing the data it will send the results back to the server. This method has to be implemented by the server code.1.4
heartbeat_timeout()Each node sends a heartbeat message internally to the server. If one of the node fails in sending this heartbeat message then this method is called. It has to be implemented in the server code and in here the node should be marked as offline.1.5
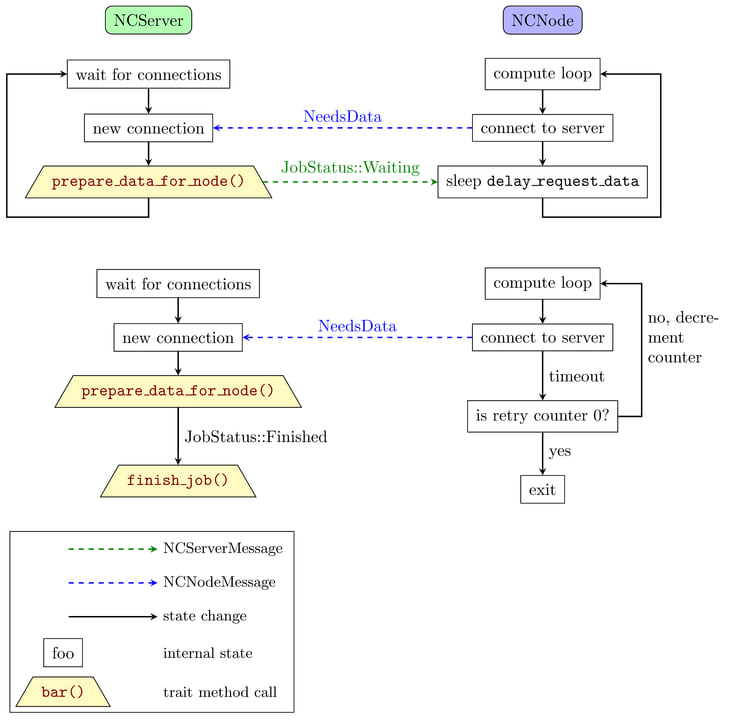
finish_job()After all the data has been processed this method is called. Implement this method for example to write all the results to disk, etc. -
The NCNode trait. This contains the functionality for each node. Here most of the processing is done by the node code. The trait has two methods that have to be implemented accordingly.
2.1
set_initial_data()When the node contacts the server for the first time the new node id is given to the node here along with some optional initial data. This method only has to be implemented when there is a need for some initial data.2.2
process_data_from_server()Here the main processing is done by the node code. This method receives the data that has to be processed and returns the processed data.
Start of node and server:
Node receives data from server and does computation, sends results back to server:
All computation is done, server will exit:
Node sends heartbeat message to server:
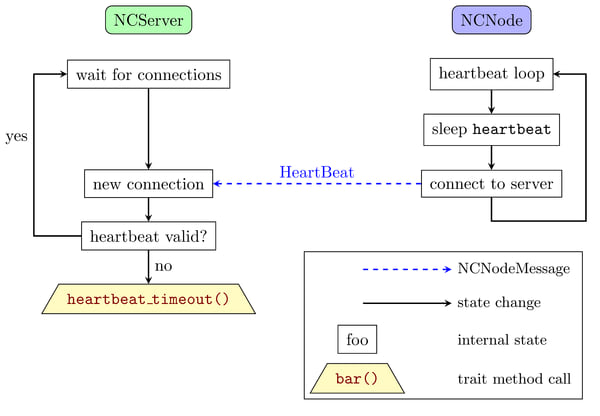
Both traits will be implemented for the user defined data structures that are passed to the starter for the server and the starter for the node.
Server template
Here is a small template for the server:
struct MyServer {
    // ...
}

impl NCServer for MyStruct {
    // The method initial_data() doesn't have to be implemented if no initial data is needed.

    fn prepare_data_for_node(&mut self, node_id: NodeID) -> Result<NCJobStatus, NCError> {
        // ...
    }

    fn process_data_from_node(&mut self, node_id: NodeID, node_data: &[u8]) -> Result<(), NCError> {
        // ...
    }

    fn heartbeat_timeout(&mut self, nodes: Vec<NodeID>) {
        // ...
    }

    fn finish_job(&mut self) {
        // ...
    }
}

let server = MyServer {
    // ...
}

// The configuration is shared between server and node.
let configuration = NCConfiguration {
    // ...
    ..Default::default()
};

let mut server_starter = NCServerStarter::new(configuration);

match server_starter.start(server) {
    Ok(_) => {
        info!("Calculation finished");
    }
    Err(e) => {
        error!("An error occurred: {}", e);
    }
}
Node template
Here is a small template for the node:
struct MyNode {
    // ...
}

impl NCNode for MyNode {
    // The method set_initial_data() doesn't have to be implemented if no initial data is needed.

    fn process_data_from_server(&mut self, data: &[u8]) -> Result<Vec<u8>, NCError> {
        // ...
    }
}

// The configuration is shared between server and node.
let configuration = NCConfiguration {
    // ...
    ..Default::default()
};

let node = MyNode{};
let mut node_starter = NCNodeStarter::new(configuration);

match node_starter.start(node) {
    Ok(_) => {
        info!("Calculation finished");
    }
    Err(e) => {
        error!("An error occurred: {}", e);
    }
}
How to start the application
Manually
Usually there is one binary for both the server and the node code. You just specify which mode is used for example with a command line. For example we are using the switch "-s" to specify the server mode. Since there is only one server and lots of nodes, the node mode should be the default:
./myapp -s & # option "-s" means run in server mode.

./myapp & # start one task in node mode, this is used more often so no need to specify this mode.

./myapp & # start another task in node mode.

./myapp --ip ip_of_server & # from a different computer.
And in the main function a simple check does the job:
fn main() {
    // Read settings from command line or configuration file
    let options = get_option();

    if options.server {
        run_server(options);
    } else {
        run_node(options);
    }
}
Using SLURM / sbatch
If you're using a HPC (high performance cluster) you will run new jobs through a job scheduler. The mostly used one (at least in the TOP500 list) is SLURM (Simple Linux Utility for Resource Management).
First start the server on one computer where the ip address is known (let's call it ip_of_server):
./myapp -s & # again here "-s" means run in server mode
Then make sure that the binary is available on all the compute node in the same folder / path. Now you can start multiple jobs using the job scheduler, in this case start 8 jobs:
for i in {1..8}; do sbatch run_single.sbatch; done
The batch file "run_single.sbatch" may look like this, we're using the command line option "--ip" to specify the ip address of the server (ip_of_server from above):
#!/bin/bash -l
## Example run script for Node Crunch with SLURM

## General configuration options
#SBATCH -J Node_Crunch
#SBATCH -o node_crunch.%j.%N.out
#SBATCH -e node_crunch.%j.%N_Err.out
#SBATCH --mail-user=my_email@somewhere.com
#SBATCH --mail-type=ALL

## Machine and CPU configuration
## Number of tasks per job:
#SBATCH -n 1
## Number of nodes:
#SBATCH -N 1
## How long will this job run at maximum, here for example 8 hours:
#SBATCH --time=08:00:00
## How much memory will this job consume at maximum, here for example 128 MB
#SLURM --mem-per-cpu=128

# Ensure that all the binaries are available on all the cluster nodes at the same place.
# Usually this is done in the cluster setup via NFS or some other distributed
# filesystem already.

# change this to the actual ip address of the system where the server is running.
myapp --ip ip_of_server
Now let's imagine that your code is running fine but it will take a lot of time before it is finished. What should you do ? You can log in to the same cluster again (or a different cluster) and just start more nodes to help speed up the computation:
for i in {1..32}; do sbatch run_single.sbatch; done
This time we've just started additional 32 jobs, so we have a total of 8 + 32 = 40 jobs.
Using PBS / Torque / qsub
Another commonly used job scheduler is PBS (Portable Batch System) or Torque. Again ensure that the binary is available on all compute nodes. Then you can start multiple jobs (8 in this case):
for i in {1..8}; do qsub run_single.qsub; done
Here the file "run_single.qsub" may look like this:
#!/bin/bash -l
## Example run script for Node Crunch with SLURM
#PBS -N Node_Crunch
#PBS -o ${PBS_JOBNAME}.out_${PBS_JOBID}
#PBS -j oe
## Mailing information a(bort),b(egin),e(nd)
#PBS -m abe
#PBS -M my_email@somewhere.com

## Machine and CPU configuration
## Number of tasks per job:
#PBS -l nodes=1:ppn=1
## How long will this job run at maximum, here for example 8 hours:
#PBS -l walltime=8:00:00
## How much memory will this job consume at maximum, here for example 128 MB
#PBS -l pmem=128mb

# Ensure that all the binaries are available on all the cluster nodes at the same place.
# Usually this is done in the cluster setup via NFS or some other distributed
# filesystem already.

# change this to the actual ip address of the system where the server is running.
myapp --ip ip_of_server
And again like with the other job scheduler you can just start additional jobs at any time to speed up the computation.
Full working examples
Using the two traits looks complicated at first but there are a couple of examples that show how to use it in "real world" applications:
- Distributed Mandelbrot, and using rayon
- Distributed Path Tracing
- Using Fortran code with Node Crunch
- ...
How does it compare to x ?
MPI
MPI (Message Passing Interface) is the gold standard for distributed computing. It's battle tested, highly optimized and has support for C, C++ and Fortran. There are also bindings for other programming languages available. Node Crunch works mainly with Rust and is still in development. It is possible to call C / C++ / Fortran code, see the Fortran example. Writing correct code in MPI is difficult and if one of the nodes crash all other nodes (including the main node) will be terminated. Node Crunch on the other hand doesn't care if one of the nodes crash. The heartbeat system detect if one of the nodes is no longer available and the server continues with the other nodes. Rust makes it very easy to write correct code, the user doesn't have to take care of synchronization and other things and can fully concentrate on the computing part. The number of nodes in MPI is fixed the whole time once the application has started, whereas with Node Crunch you can add more and more nodes while it's running if needed. Using MPI you are limited what kind of CPU / architecture / operating system you use when you want to run your application on a cluster. With Node Crunch you can mix different OS, CPUs and job scheduler as needed. You just have to compile the node code for each OS / hardware you want tu use.
BOINC
BOINC (Berkeley Open Infrastructure for Network Computing) is also used for distributed computing and is well tested and high-performance. Scientists use it to scale their computations massively by providing desktop clients that can run as screen savers on normal PCs, Macs, etc. It utilizes the resources that the computer is currently not using for numeric computations. The most famous (and first) application is the SETI@home client. Node Crunch is a lot smaller but also a lot easier to set up ;-)
TODO
You may have noticed that the data that is send around is passed as &[u8] or Vec<u8>. In the future this will be generic parameters that correspond to user defined data structures. For now the user has to de- / serialize all the data that is passed to and returned from the trait methods. But helper functions are provided in the nc_utils module.
Other things that need to be done in the next releases:
-
Currently the communication between the server and the nodes are not compressed, not encrypted and there is no authentication. Maybe I'll switch to a small web framework that does all this, like warp for example. A web framework may be overkill but it would be very easy to add a nice web GUI for the server. Also look into the QUIC protocol.
-
The crate doesn't use any async code (tokio, async-std, ...). Computations usually are more CPU bound than IO bound but there are always exceptions to this. So the currently used thread based strategy may be the limiting factor in some cases.
-
More helper functions and data structures have to be provided. These will show up when there are more use cases and I'm happy to include them when they make sense.
-
And of course refactoring and adding more and better documentation is always good ;-)
FAQ
- Where does the name Node Crunch come from ? Compute node and number crunching.
- Will you add feature x ? It depends, if it makes sense and helps other users as well.
- Can I use Rayon and / or GPGPU with Node Crunch ? Yes of course, no problem. Have a look at the mandel2 example which uses Rayon (TODO: add GPU example).
- Can I use my C / C++ / Fortran / ... code with Node Crunch ? In theory yes but you have to do some work (TODO: add example).
License
This crate is licensed under the MIT license.
Dependencies
~1.9–2.8MB
~53K SLoC