4 releases
| 0.2.0 | Nov 15, 2021 |
|---|---|
| 0.1.2 | Feb 9, 2021 |
| 0.1.1 | Jan 6, 2021 |
| 0.1.0 | Nov 29, 2020 |
#1084 in Audio
44 downloads per month
Used in 2 crates
160KB
4K
SLoC
Loopers
![]()
![]()
Loopers is a graphical live looper, written in Rust, designed for ease of use and rock-solid stability. It can be used as a practice tool, compositional aid, or for performing looped works in a live setting.
Currently it runs on Linux as a standalone Jack application, which allows it to interface with other Jack clients like effect racks, software instruments, and DAWs, or on MacOS using Jack or (experimentally) directly with CoreAudio.

The system is modeled as a series of hardware loop units (like the Boss Loop Station) which are synchronized with a single time control. The number of loop units is limited only by your display size, and loop lengths are limited only by available memory.
Features
- Multiple loops synchronized by a common time control
- Loops can be recorded to (setting loop length), overdubbed, cleared, muted, and soloed
- Up to four parts can be used to divide up portions of a performance
- Supports beat, measure, and free quantization of loop commands making it easy to keep things in sync
- Unlimited undo/redo
- Double speed and half speed playback (and overdubbing!)
- Every operation can be controlled via the GUI or MIDI
- Sessions can be saved and restored
- A built-in metronome (on a separate Jack output) helps keep you in time with your loops
- No limitations on loop lengths aside from your computer's memory
- Cross-fading ensures a perfect loop, every time
- It's fun!
Getting started
Linux
To build loopers, you will need jack and sdl2.
For Ubuntu/Debian these can be installed with:
$ sudo apt install jackd2 libjack-jackd2-dev libgl1-mesa-dev libsdl2-dev
Now you're ready to install loopers itself. First get a rust toolchain installed (https://rustup.rs), then:
$ cargo install loopers
Then start it with the command
$ loopers
(If you get an error about Jack not running, you will need to start the Jack server first. See the Jack documentation for details.)
This will create a Jack client, which can be hooked up to your inputs/outputs/effects with any number of tools (I recommend Claudia from KXStudio).
Loopers should also be fully compatible with PipeWire, which removes the need for a separate Jack server.
MacOS
Loopers has experimental support for running on CoreAudio, the native audio system for MacOS (you can also run it on top of jack on MacOS, which is currently better supported). To build on Mac with coreaudio:
$ brew install jack sdl2
$ cargo install loopers
$ loopers
By default it will run using CoreAudio. To run with jack instead,
$ loopers --driver jack
Note: midi is not currently supported via coreaudio, and there is no ability to choose audio sources and sinks (the default devices are used).
Documentation
UI Tour
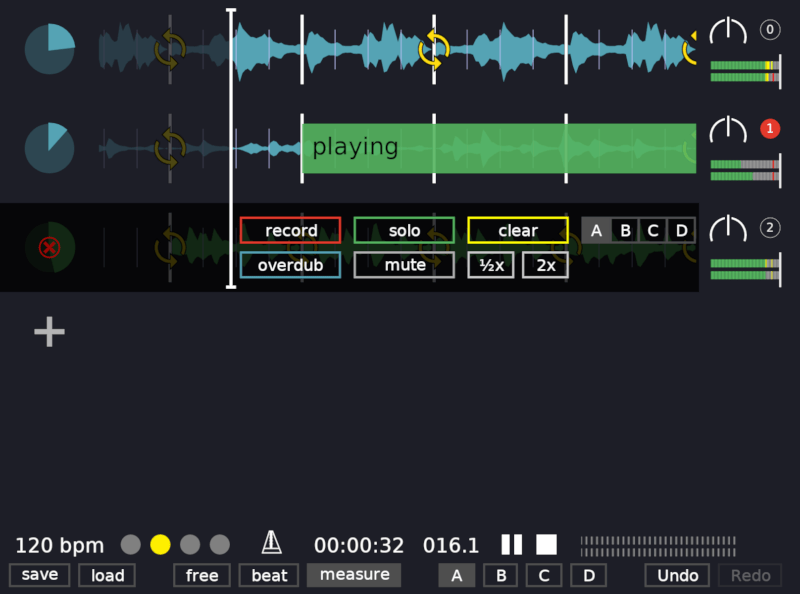
The UI is divided into two parts: the top contains the set of loopers, while the bottom contains controls and settings for the engine. Hovering over each looper shows controls for that looper, including setting the parts the looper is part of and controlling the mode.
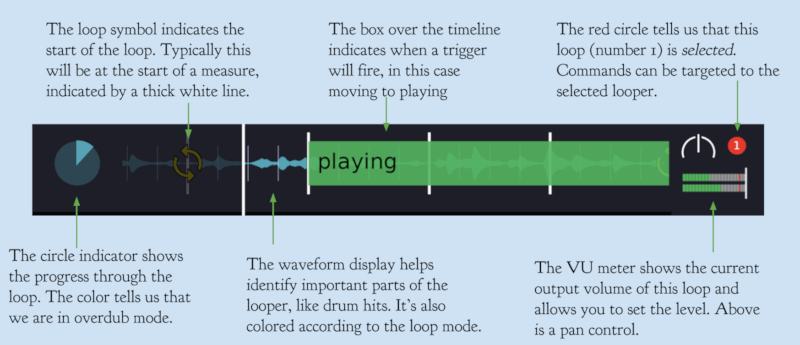
Each looper displays some key information to allow the performer to quickly understand its state:
Hovering over the looper produces controls for the looper (although most performers will prefer to use hardware buttons)
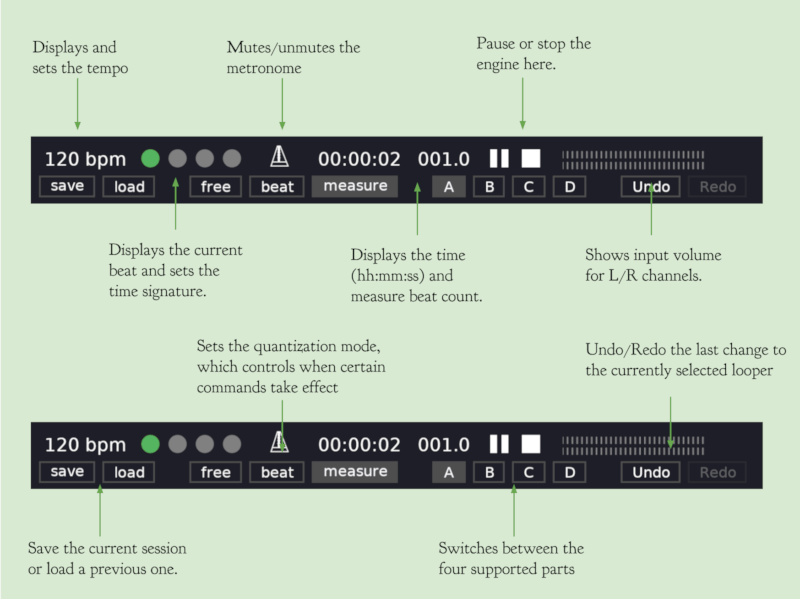
At the bottom we find the engine controls
Looper Modes
At any given time each looper can be in one of several modes, each identified in the UI by a color:
 Play
Play- In play mode, the output from the looper is mixed in with all of the other loopers and sent to the global output. This is the default mode.
 Record
- When recording is started, all existing samples for the looper are cleared. Then new audio is recorded to a sample until recording is finished, establishing the loop length.
 Overdub
- In overdub mode, we add new input on top of the existing samples in the looper, without changing the loop length.
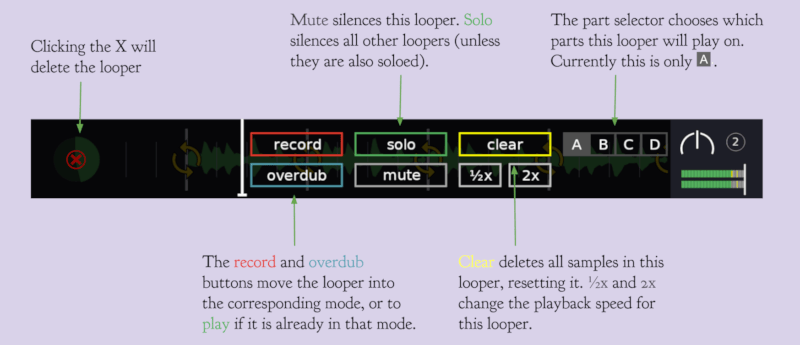
In addition to those exclusive modes, a looper can have one or more of the following modifiers:
- Solo
- If solo is enabled, all other loopers will be silenced (aside from those that are also in solo mode).
 Mute
Mute- When mute is enabled the looper is silenced.
The modes and modifiers can be controlled via the UI or by sending a midi command.
Quantization
When using multiple loopers, it is generally desirable for them to be synchronized together. In Loopers, this is accomplished by having a single time control which is used across all loopers. It is also key that loops have lengths which are exact multiples of each other (for example, you might have a bass loop that is 4 times as long as your rhythm loop). If the length is off by even a few milliseconds, it will quickly be noticeable after a few repeats.
To help performers get loop lengths exactly in sync, Loopers provide a quantization feature. This allows you to synchronize commands (for example, stopping recording and thus setting loop length) to certain metric events.
It supports three quantization modes, set via buttons at the bottom of the UI:
- Free this disables quantization, and causes all commands to take effect immediately
- Beat commands take effect on the next beat after they are issued, as determined by the tempo
- Measure commands take effect at the start of the next measure, as determined by the tempo and time signature
Some commands are affected by quantization, and some take effect immediately. See the commands reference for more.
Commands
Every aspect of the system can be controlled via commands, both in the UI and via midi. For details on configuring midi controls, see settings.
There are two kinds of commands: looper commands, which are applied to one or more loopers, and engine commands which apply to the system as a whole. Commands can take parameters which control the behavior of the command.
Looper commands all take a first parameter that determines which looper will be targeted:
- Selected: targets only the selected looper, as controlled via
the UI or by one of the
Select*Loopercommands - Id: takes an id parameter, and targets the looper with that id
- Index: takes an index parameter and targets the looper at that index in the currently visible part, starting from 0.
- All: targets all loopers
Other commands may also take parameters which control their behavior.
Commands also differ in how they are affected by quantization:
- Immediate commands take place as soon as they are received, regardless of quantization settings or the state of the system
- Queued commands will wait in a queue for other (possibly quantized) commands to take effect before being executed. This allows you to, for example, send the command to switch to the next part (a quantized command), then send a SelectNextLooper command (a queued command), which will wait for part switch before executing.
- Quantized commands will wait until the next quantization boundary (e.g., the start of the next measure, see Quantization for details) to execute.
Looper commands
| Command | Parameters | Quantization | Description |
|---|---|---|---|
| Record | Looper Targets | Quantized | Moves the selected loopers to the Record mode |
| Overdub | Looper Targets | Quantized | Moves the selected loopers to the Overdub mode |
| Play | Looper Targets | Quantized | Moves the selected loopers to the Play mode |
| RecordOverdubPlay | Looper Targets | Quantized① | Cycles from Record -> Overdub -> Play -> Overdub |
| Mute | Looper Targets | Immediate | Toggles the mute modifier on the selected loopers |
| Solo | Looper Targets | Immediate | Toggles the solo modifier on the selected loopers |
| Delete | Looper Targets | Immediate | Deletes the selected loopers |
| Clear | Looper Targets | Quantized | Clears all samples from the selected loopers |
| SetPan | Looper Targets, a pan value from -1 (fully left) to 1 (fully right) | Immediate | Sets the pan for the looper |
| SetLevel | Looper Targets, a level value from 0 (silent) to 1 (full volume) | Immediate | Sets the output level for the looper |
| 1/2x | Looper Targets | Immediate | Sets the looper to 1/2x speed |
| 1x | Looper Targets | Immediate | Sets the looper to 1x speed |
| 2x | Looper Targets | Immediate | Sets the looper to 2x speed |
① RecordOverdubPlay is quantized from Record -> Overdub and Overdub -> Play, but queued from Play -> Overdub.
Engine commands
| Command | Parameters | Quantization | Description |
|---|---|---|---|
| Start | None | Immediate | Starts the engine |
| Stop | None | Immediate | Stops the engine, resetting the time |
| StartStop | None | Immediate | Starts the engine if it is stopped, otherwise stops it |
| PlayPause | None | Immediate | Pauses the engine if it is active, otherwise restarts it |
| Pause | None | Immediate | Stops the engine but does not reset the time |
| Reset | None | Immediate | Resets the engine time |
| SetTime | Time (in samples) | Immediate | Sets the time to the specified number of samples |
| AddLooper | None | Immediate | Adds a looper to the end of the current part |
| SelectLooperById | Looper Id | Immediate | Selects the looper with the given id |
| SelectLooperByIndex | Index | Immediate | Selects the looper at the given index in the current part (starting from 0) |
| SelectPreviousLooper | None | Queued | Selects the previous looper in the current part, wrapping around from the first to the last |
| SelectNextLooper | None | Queued | Selects the next looper in the current part, wrapping around from the last to the first |
| PreviousPart | None | Quantized | Goes to the previous part, skipping those parts with no loopers |
| NextPart | None | Quantized | Goes to the next part, skipping those parts with no loopers |
| GoToPart | One of A, B, C, or D |
Quantized | Goes to the specified part |
| SetQuantizationMode | One of Free, Beat, or Measure |
Immediate | Sets the quantization mode for the engine |
| SetMetronomeLevel | 0-100 | Immediate | Sets the metronome volume to the given percentage |
| SetTempoBPM | bpm (float) | Immediate | Sets the engine's tempo to the given BPM value |
| SetTimeSignature | upper, lower | Immediate | Sets the engine's time signature according to the parameters (e.g. 3, 4) |
| SaveSession | Path | Immediate | Saves the current session to the given path |
| LoadSession | Path | Immediate | Loads a session from the given path, replacing the existing one |
Settings
Configuration is stored the standard system user config location
(typically this will be ~/.config/loopers/). Currently the configuration
consists of a set of mappings from midi messages to loopers
commands. These should be placed in a file called midi_mappings.tsv
in that config directory, which will be automatically created after loopers
is run for the first time.
Each non-empty line of this file should contain the following tab-separated columns:
- Midi channel (either
*for any channel or a channel number) - Midi controller number
- Midi data (can be
*for any data, a single value like50, or a range like0-100) - Command name (see tables above)
- Command arguments (multiple arguments should be tab-separated; the special
value
$datacan be used in the place of certain numerical arguments to use the data value of the midi event, for example for use with an expression pedal)
The midi values (channel, controller, data) can be thought of as filters for incoming midi events; for each event all matching commands will fire.
An example for configuring for use with the Behringer FCB1010 (an excellent pedalboard):
Channel	Controller	Data	Command	Arg1	Arg2	Arg3
*	22	127	RecordOverdubPlay	Selected
*	22	0	RecordOverdubPlay	Selected

*	23	127	SelectNextLooper
*	23	0	SelectNextLooper

*	24	127	NextPart
*	24	0	NextPart

*	25	127	Clear	Selected
*	25	0	Clear	Selected

*	26	127	PlayPause
*	26	0	PlayPause

*	27	0-127	SetPan	Selected	$data
Dependencies
~25–38MB
~675K SLoC