6 stable releases
| 2.2.0 | Mar 8, 2025 |
|---|---|
| 2.1.2 | Jan 14, 2025 |
| 2.1.1 | Sep 20, 2024 |
| 2.1.0 | Sep 5, 2024 |
| 2.0.1 | Sep 3, 2024 |
#1497 in Command line utilities
1.5MB
2.5K
SLoC
gritty
![]()
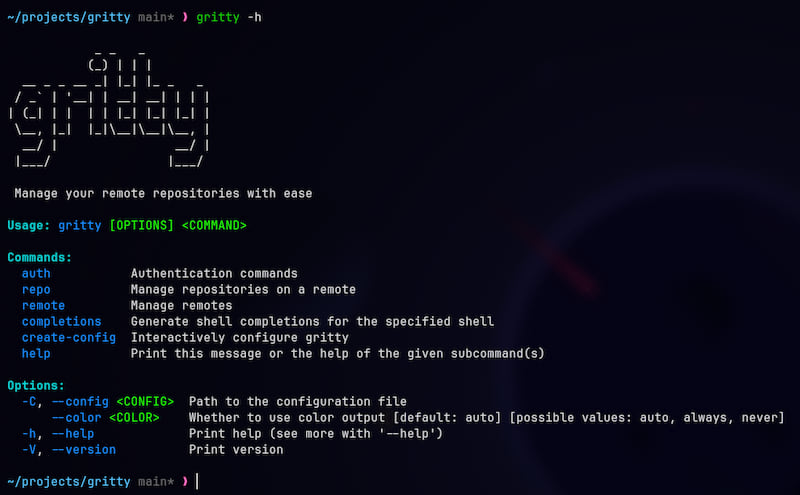
Gritty is a command line tool to manage your remote repositories on GitHub, GitLab and Gitea remotes, written in Rust.
Gritty is designed to be simple and easy to use, with a focus on the most common repository management tasks. It is not meant to be a full-featured Git client, but rather a tool to let you focus on what's important: your code.
Quick Start
- Install gritty using the precompiled binaries or by building from source.
- Interactively configure gritty by running
gritty create-config(See Create-Config).
Now you can use gritty to manage your repositories! See the Usage and Examples sections for more information on the available commands.
Shell Completion
Gritty can generate shell completions for Bash, Zsh, Fish, and PowerShell. To generate completions for your shell, run one of the following commands:
For bash:
dir="${XDG_CONFIG_HOME:-"$HOME/.config"}/bash_completion"
# or dir="/usr/share/bash-completion/completions" if you want to install system-wide
mkdir -p "$dir"
gritty completions bash > "$dir/gritty.bash"
For zsh:
dir="$HOME/.zsh-complete"
# or dir="/usr/share/zsh/site-functions" if you want to install system-wide
mkdir -p "$dir"
gritty completions zsh > "$dir/_gritty"
For fish:
dir="${XDG_CONFIG_HOME:-"$HOME/.config"}/fish/completions"
# or dir="/usr/share/bash-completion/completions" if you want to install system-wide
mkdir -p "$dir"
gritty completions fish > "$dir/gritty.fish"
For PowerShell:
gritty completions power-shell > _gritty.ps1
And then add . _gritty.ps1 to your PowerShell profile.
Installation
Precompiled Binaries
Precompiled binaries are available on the releases page. These binaries are built for Linux, MacOS, and Windows.
Install-Script
You can use the install script to download and install the latest release for your platform:
curl -LO https://raw.githubusercontent.com/benpueschel/gritty/main/install.sh && \
chmod +x install.sh && \
./install.sh && \
rm install.sh
This script will download the latest release for your platform and install it in /usr/local/bin.
To install a specific version, you can pass the version tag (e.g. v0.8.0) as an argument to the script:
./install.sh -v v0.8.0
Cargo install
Gritty is also available on crates.io, so you can install it using cargo:
cargo install gritty
This will install the latest version of gritty into your ~/.cargo/bin directory.
Make sure this directory is in your PATH to use the gritty command.
Manual Installation
Just download and extract the archive for your platform and add the binary to your PATH.
One great way to do this is to move the binary to /usr/local/bin on Linux or
MacOS, which should already be in your PATH.
The releases also include checksums to verify the integrity of the downloaded files.
From Source
To build from source, you will need to have Rust installed. You can install
Rust by following the instructions on the official website.
I recommend using rustup to manage your Rust installation and toolchains.
The project has a Makefile, so you can build and install the binary with:
make && sudo make install
This will use cargo to build the binary and move it to /usr/local/bin.
PLEASE NOTE: building from main is not recommended as it may be unstable.
Consider checking out a release tag instead.
Usage
To see the available commands and options, run:
gritty help
If you didn't manually create a configuration file, running gritty create-config will
create a default configuration file in the default location for your platform.
You can then edit this file to add your remotes and access tokens.
Gritty currently supports the following subcommands:
gritty create-config: interactively create a configuration file.gritty auth login [remote]: authenticate with the specified remote.gritty auth status: show the authentication status for all remotes.gritty repo clone [repo] [remote]: clone a repository from the specified remote.gritty repo fork [owner] [repo] [remote]: fork a repository from the specified remote.gritty repo create [repo] [remote]: create a new repository on the specified remote.gritty repo delete [repo] [remote]: delete a repository from the specified remote.gritty repo list [remote]: list all repositories on the specified remote.gritty remote list: list all remotes in the configuration file.gritty remote add [remote]: add a new remote to the configuration file.
To see the available options for a subcommand, run:
gritty help [subcommand]
Create-Config
The create-config subcommand will ask you a series of questions to create a
configuration file for gritty. This file is located at ~/.config/gritty/config.toml
by default, but you can specify a different location if you like.
The questions are as follows:
- Enter the config file path (default: ~/.config/gritty/config.toml). Leave blank for default.
- How do you want to store your access tokens? (Keyring, SecretsFile, Plaintext)
- Keyring: uses the system keyring to store access tokens (HIGHLY RECOMMENDED).
- SecretsFile: stores access tokens in a plaintext file.
- Plaintext: stores access tokens directly in the config file.
- Do you want to add a remote? (y/n). Answer 'y' to configure remotes.
- Enter the remote name (e.g. github, gh, gitea, awesome-sauce).
- Enter the provider (GitHub, Gitea, GitLabj).
- Enter the remote URL (e.g. https://github.com, https://gitea.example.com).
- Enter your username for the remote.
- Enter the clone protocol (ssh, https).
- Do you want to add authentication for this remote? (y/n). Answer 'y' to authenticate.
- Enter your token.
- Do you want to add another remote? (y/n). Answer 'y' to add another remote. The process will repeat until you answer 'n'.
The configuration file will be automatically created at the specified path, if you've added authentication for your remotes in the previous step, you can begin using gritty right away.
After creating your configuration file, you can authenticate with a remote using:
gritty auth login [remote]
This command will prompt you for your username and password. Leave the username blank to use an access token (which you should definitely do because gritty doesn't support Basic Auth with a password yet). Please note that this step is required if using keyring storage for access tokens.
After authenticating, you can use the other subcommands to manage your repositories.
Configuration
Gritty requires a configuration file to manage remotes and access tokens.
This file is located at ~/.config/gritty/config.toml on Linux and MacOS, but
can use ~/.gritty/config.toml as a fallback - though you need to manually move
the config to that path.
The configuration file is a TOML file with the following structure:
# This will use the system keyring to store access tokens.
# On Linux, you will need to have a keyring daemon,
# like gnome-keyring, installed and running.
# On MacOS and Windows, the keyring should work out of the box.
[secrets]
type = "Keyring"

# You can also store access tokens in a plaintext file:
# Please note that this is not recommended for security reasons.
#
# [secrets]
# type = "SecretsFile"
# file = "~/.config/gritty/secrets.toml"

# You can also store access tokens directly in the config file:
# Please note that this is by far the least secure option to store your tokens.
#
# [secrets]
# type = "Plaintext"
# [secrets.github]
# token = "your_access_token"
# [secrets.gitea]
# token = "your_access_token"

# You can add as many remotes as you like. The name of the remote is
# specified in square brackets after the `remotes` keyword. If you want the
# remote name to contain special characters like periods, you can wrap the
# remote name in quotes:
#[remotes."github.com"]
[remotes.github]
provider = "GitHub"
url = "https://github.com"
username = "your_username"
clone_protocol = "ssh" # or "https"

# This adds a second remote to the configuration file, using Gitea as the provider.
[remotes.gitea]
provider = "Gitea"
url = "https://gitea.example.com"
username = "your_username"
clone_protocol = "https" # or "ssh"

# You can also configure color output for gritty:
[colors.repo]
color = "Red"
background = "Black"
bold = true

[colors.important]
color = { r = 255, g = 10, b = 124 }
underline = true
italic = true

[colors.commit]
color = 24
inverse = true
Colors
Gritty supports colored output for the following fields:
- important - used for error messages and important prompts (such as delete confirmation).
- repo - used for repository names
- origin - used for origin names
- remote - used for remote names
- username - used for usernames
- path - used for local paths
- protocol - used for clone protocols (ssh, https)
- url - used for remote URLs
- commit - used for commit hashes
- date - used for commit dates
- author - used for author names in commit messages
- commit_msg - used for commit messages
- warning - used for warning messages
- special - used for other special messages
The color can be specified as a string (e.g. "Red", "Blue", "Green"), as an 8-bit
ANSI color code (0-255), or as an RGB color code (r, g, b).
The background color can be specified in the same way.
You can also specify whether the text should be bold, italic, or underlined.
The inverse option will swap the text and background colors.
Examples
To create a public repository on GitHub:
gritty repo create my-repo github
To create a private repository:
gritty repo create my-private-repo github --private
or use the shorthand:
gritty repo new -p my-private-repo github
Example output:

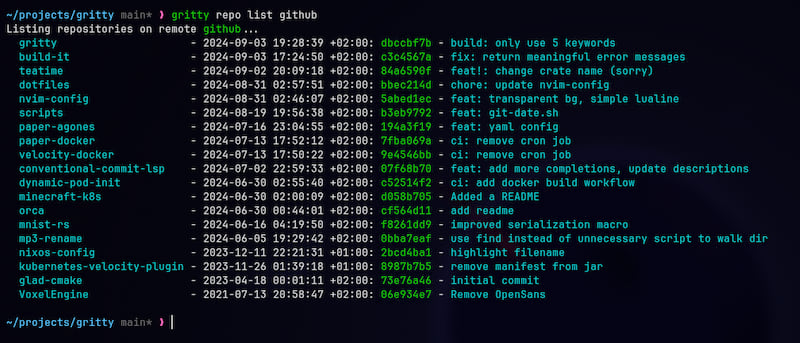
To list all repositories on Gitea:
gritty repo list gitea
Example output:
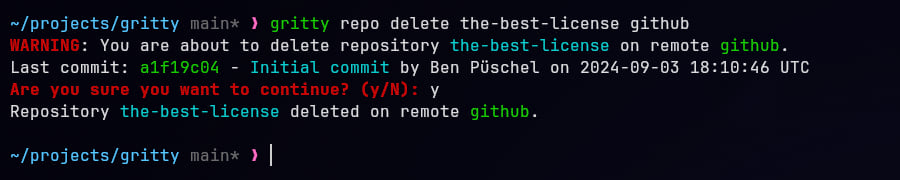
To delete a repository from a remote:
gritty repo rm my-repo my-awesome-remote
This will prompt you for confirmation and show you the last commit before deleting.
Example output:
Dependencies
~20–34MB
~548K SLoC