19 releases (10 breaking)
| 0.11.0 | Apr 24, 2025 |
|---|---|
| 0.10.0 | Feb 7, 2025 |
| 0.9.0 | Nov 22, 2024 |
| 0.7.0 | Dec 20, 2023 |
| 0.1.0 | Mar 23, 2020 |
#2220 in Procedural macros
1,011,534 downloads per month
Used in 36 crates
(via tabled)
50KB
1.5K
SLoC
![]()
![]()
 tabled
An easy to use library for pretty printing tables of Rust structs and enums.
You can do a lot of things with the library.
If it does not do something which you feel it should or it is not clear how to, please file an issue.
This README contains lots of information but it might still be not complete,
you can find more examples in the examples folder.

Table of Contents
- Usage
- Settings
- Derive
- Table types
- Tips and Tricks
- Features
- Formats
- Notes
Usage
To print a list of structs or enums as a table, there are 2 ways.
- Using a builder pattern to build a table step by step.
- Implement a
Tabledtrait for your type.
A builder pattern gets handy when a data schema is unknown.
While a typed struct is useful in cases where we know the data structure beforehand.
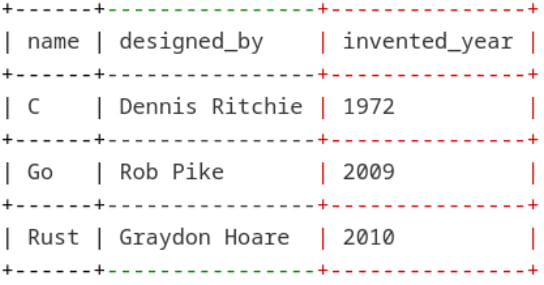
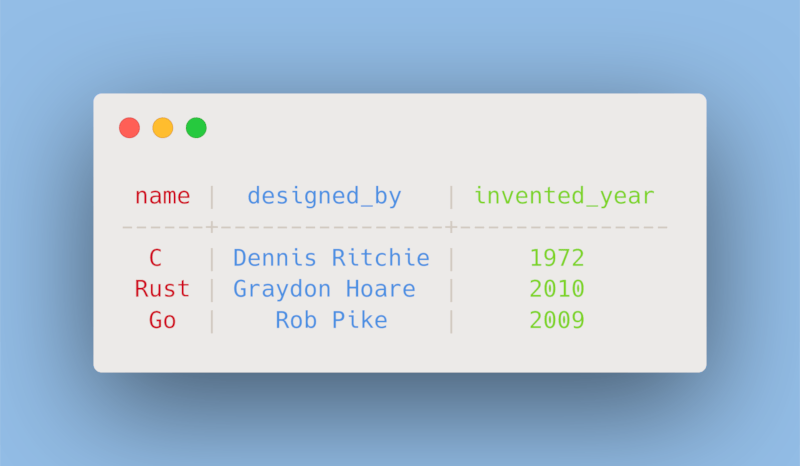
use tabled::{Tabled, Table};
use tabled::assert::assert_table;

#[derive(Tabled)]
struct Language {
    name: &'static str,
    designed_by: &'static str,
    invented_year: usize,
}

let languages = vec![
    Language { name: "C",    designed_by: "Dennis Ritchie",  invented_year: 1972 },
    Language { name: "Go",   designed_by: "Rob Pike",        invented_year: 2009 },
    Language { name: "Rust", designed_by: "Graydon Hoare",   invented_year: 2010 },
];

let table = Table::new(languages);

assert_table!(
    table,
    "+------+----------------+---------------+"
    "| name | designed_by    | invented_year |"
    "+------+----------------+---------------+"
    "| C    | Dennis Ritchie | 1972          |"
    "+------+----------------+---------------+"
    "| Go   | Rob Pike       | 2009          |"
    "+------+----------------+---------------+"
    "| Rust | Graydon Hoare  | 2010          |"
    "+------+----------------+---------------+"
);
The next example illustrates a builder pattern.
use tabled::{builder::Builder, settings::Style};
use tabled::assert::assert_table;

let mut b = Builder::with_capacity(3, 0);
b.push_record(["row=0 col=0", "row=0 col=1"]);
b.push_column(["row=0 col=2", "row=1 col=2"]);

let mut table = b.build();
table.with(Style::modern());

assert_table!(
    table,
    "┌─────────────┬─────────────┬─────────────┐"
    "│ row=0 col=0 │ row=0 col=1 │ row=0 col=2 │"
    "├─────────────┼─────────────┼─────────────┤"
    "│             │             │ row=1 col=2 │"
    "└─────────────┴─────────────┴─────────────┘"
);
NOTICE: In case you got to perform table rendering fast with no footprint you might be worth looking at
IterTableandCompactTable.
Settings
There are a lot of functions available for your tables, as well as helpers such as derive macros and proc macros.
This section lists the settings you can apply to your table.
All of the settings are leveraged by Table::with and Table::modify.
But you can tweak things yourself by using table.get_records_mut() and table.get_config_mut().
or by creating a new setting, which is a simple do.
Style
Style sole purpouse is to configure table look.
Style primarily usage is in const/static context.
If you want to peak style at runtime Theme might be better suited for it.
Any Style can be customized.
As well as a custom Style can be created from scratch.
use tabled::{Table, Style};

let mut table = Table::new(&data);
table.with(Style::psql());
Styles
There are numerous preconfigured styles. Below there is a rendered list of them.
If you think that there's some valuable style to be added, please open an issue.
ascii
+------+----------------+---------------+
| name | designed_by    | invented_year |
+------+----------------+---------------+
| C    | Dennis Ritchie | 1972          |
+------+----------------+---------------+
| Rust | Graydon Hoare  | 2010          |
+------+----------------+---------------+
| Go   | Rob Pike       | 2009          |
+------+----------------+---------------+
modern
┌──────┬────────────────┬───────────────┐
│ name │ designed_by    │ invented_year │
├──────┼────────────────┼───────────────┤
│ C    │ Dennis Ritchie │ 1972          │
├──────┼────────────────┼───────────────┤
│ Rust │ Graydon Hoare  │ 2010          │
├──────┼────────────────┼───────────────┤
│ Go   │ Rob Pike       │ 2009          │
└──────┴────────────────┴───────────────┘
sharp
┌──────┬────────────────┬───────────────┐
│ name │ designed_by    │ invented_year │
├──────┼────────────────┼───────────────┤
│ C    │ Dennis Ritchie │ 1972          │
│ Rust │ Graydon Hoare  │ 2010          │
│ Go   │ Rob Pike       │ 2009          │
└──────┴────────────────┴───────────────┘
rounded
╭──────┬────────────────┬───────────────╮
│ name │ designed_by    │ invented_year │
├──────┼────────────────┼───────────────┤
│ C    │ Dennis Ritchie │ 1972          │
│ Rust │ Graydon Hoare  │ 2010          │
│ Go   │ Rob Pike       │ 2009          │
╰──────┴────────────────┴───────────────╯
extended
╔══════╦════════════════╦═══════════════╗
║ name ║ designed_by    ║ invented_year ║
╠══════╬════════════════╬═══════════════╣
║ C    ║ Dennis Ritchie ║ 1972          ║
╠══════╬════════════════╬═══════════════╣
║ Rust ║ Graydon Hoare  ║ 2010          ║
╠══════╬════════════════╬═══════════════╣
║ Go   ║ Rob Pike       ║ 2009          ║
╚══════╩════════════════╩═══════════════╝
psql
 name | designed_by    | invented_year
------+----------------+---------------
 C    | Dennis Ritchie | 1972
 Rust | Graydon Hoare  | 2010
 Go   | Rob Pike       | 2009
markdown
| name | designed_by    | invented_year |
|------|----------------|---------------|
| C    | Dennis Ritchie | 1972          |
| Rust | Graydon Hoare  | 2010          |
| Go   | Rob Pike       | 2009          |
re_structured_text
====== ================ ===============
 name   designed_by     invented_year
====== ================ ===============
 C      Dennis Ritchie   1972
 Rust   Graydon Hoare    2010
 Go     Rob Pike         2009
====== ================ ===============
dots
.........................................
: name : designed_by    : invented_year :
:......:................:...............:
: C    : Dennis Ritchie : 1972          :
: Rust : Graydon Hoare  : 2010          :
: Go   : Rob Pike       : 2009          :
:......:................:...............:
ascii_rounded
.---------------------------------------.
| name | designed_by    | invented_year |
| C    | Dennis Ritchie | 1972          |
| Rust | Graydon Hoare  | 2010          |
| Go   | Rob Pike       | 2009          |
'---------------------------------------'
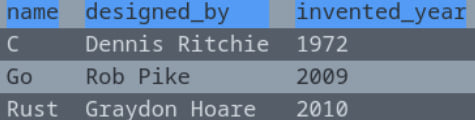
blank
 name   designed_by      invented_year
 C      Dennis Ritchie   1972
 Rust   Graydon Hoare    2010
 Go     Rob Pike         2009
empty
name designed_by    invented_year
C    Dennis Ritchie 1972
Rust Graydon Hoare  2010
Go   Rob Pike       2009
Style customization
You can modify existing styles to fit your needs. Mind that all modifications are done at compile time.
Check the documentation for more customization options.
If you can't make desicions at compile time - use Theme.
An example for castomization, where we remove all vertical and horizontal lines but adding single line.
use tabled::settings::{Style, HorizontalLine, VerticalLine};

let style = Style::modern()
    .horizontals([(1, HorizontalLine::inherit(Style::modern()).horizontal('═'))])
    .verticals([(1, VerticalLine::inherit(Style::modern()))])
    .remove_horizontal()
    .remove_vertical();
This style will look like the next table:
┌──────┬───────────────────────────────┐
│ name │ designed_by     invented_year │
├══════┼═══════════════════════════════┤
│ C    │ Dennis Ritchie  1972          │
│ Go   │ Rob Pike        2009          │
│ Rust │ Graydon Hoare   2010          │
└──────┴───────────────────────────────┘
As was said doing customization at constant context is not always a best choise,
you may need to change a style at runtime, you may use Theme object to do that.
Theme is quite powerful by itself,
you can check it in the documentation.
use tabled::grid::config::{Border, HorizontalLine};
use tabled::settings::Theme;

let mut style = Theme::default();
style.insert_horizontal_line(1, HorizontalLine::full('-', '-', '+', '+'));
style.set_frame(Border::filled('+'));
This style will look like the following:
+++++++++++++++++++++++++++++++++++++++
+ name  designed_by     invented_year +
+-------------------------------------+
+ C     Dennis Ritchie  1972          +
+ Go    Rob Pike        2009          +
+ Rust  Graydon Hoare   2010          +
+++++++++++++++++++++++++++++++++++++++
Cell Border
Sometimes tabled::Style settings are not enough.
Sometimes it's necessary to change a border of a particular cell.
For this purpose you can use Border.
use tabled::{
    settings::{object::Rows, Border, Style},
    assert::assert_table,
    Table,
};

let data = [["123", "456"], ["789", "000"]];

let mut table = Table::new(data);
table.modify(
    Rows::first(),
    Border::inherit(Style::ascii())
        .top('=')
        .corner_top_left('=')
        .corner_top_right('='),
);

assert_table!(
    table,
    "============="
    "| 0   | 1   |"
    "+-----+-----+"
    "| 123 | 456 |"
    "+-----+-----+"
    "| 789 | 000 |"
    "+-----+-----+"
);
Text on borders
You can write text on any border horizontal and vertical. Just bellow you'll find a text set on first horizontal line and first vertical line. Example based on the first example in the readme.
use tabled::settings::{
    object::{Columns, Rows},
    style::LineText, Alignment,
};

table.with(LineText::new("Languages", Rows::first()).offset(2));
table.with(LineText::new("name", Columns::first()).align(Alignment::center_vertical()));

assert_table!(
    table,
    "+-Languages-------------+---------------+"
    "| name | designed_by    | invented_year |"
    "n------+----------------+---------------+"
    "a C    | Dennis Ritchie | 1972          |"
    "m------+----------------+---------------+"
    "e Go   | Rob Pike       | 2009          |"
    "+------+----------------+---------------+"
    "| Rust | Graydon Hoare  | 2010          |"
    "+------+----------------+---------------+"
);
Sometimes though it's not convenient to set a string.
But rather necessary to set a custom character.
You can use LineChar to achieve this.
use tabled::settings::{
    object::{Columns, Object, Rows},
    style::LineChar,
    Style,
};

table.with(Style::modern());
table.modify(
    Rows::first(),
    (LineChar::horizontal('┴', 1), LineChar::horizontal('┴', -1)),
);
table.modify(
    Columns::new(..).not(Columns::first()),
    LineChar::vertical('┼', 0),
);

assert_table!(
    table,
    "┌─┴──┴─┬─┴────────────┴─┬─┴───────────┴─┐"
    "│ name ┼ designed_by    ┼ invented_year │"
    "├──────┼────────────────┼───────────────┤"
    "│ C    ┼ Dennis Ritchie ┼ 1972          │"
    "├──────┼────────────────┼───────────────┤"
    "│ Go   ┼ Rob Pike       ┼ 2009          │"
    "├──────┼────────────────┼───────────────┤"
    "│ Rust ┼ Graydon Hoare  ┼ 2010          │"
    "└──────┴────────────────┴───────────────┘"
);
Colorize borders
You can set colors of borders using BorderColor.
If you need to higlight a border of a specific set of cells check out Highlight
use tabled::settings::{style::BorderColor, Color};
use tabled::settings::object::Columns;

// Set a frame of the table to green color.
table.with(BorderColor::filled(Color::FG_GREEN));
// Set all borders of 1st column column to black color.
table.modify(Columns::first(), BorderColor::filled(Color::FG_BLACK));
// Set all borders of last column column to red color.
table.modify(Columns::last(), BorderColor::filled(Color::FG_RED));
Theme
Theme can be used in interchangebly to Style.
It's just more convinient to use if style must be changed dynamically.
use tabled::settings::{Style, Theme};

let mut theme = Theme::from_style(Style::ascii_rounded());
theme.remove_borders_horizontal();
theme.remove_borders_vertical();

table.with(theme);
You'll see the following output when run against the first example.
.---------------------------------------.
| name   designed_by      invented_year |
| C      Dennis Ritchie   1972          |
| Go     Rob Pike         2009          |
| Rust   Graydon Hoare    2010          |
'---------------------------------------'
Layout
You can change layout of Table after it being created using Layout
use tabled::settings::{
    formatting::Justification, object::Rows, style::Style, themes::Colorization, Color,
};

table.with(Style::empty());
table.with(Colorization::rows([
    Color::BG_WHITE | Color::FG_BLACK,
    Color::BG_BLACK | Color::FG_WHITE,
]));
table.modify(Rows::first(), Color::BG_BLUE);
table.modify(Rows::first(), Justification::colored(' ', Color::BG_BLUE));
Colorize content
You can colorize the content by the pattern or a specific cell.
use tabled::settings::{
    formatting::Justification, object::Rows, style::Style, themes::Colorization, Color,
};

table.with(Style::empty());
table.with(Colorization::rows([
    Color::BG_WHITE | Color::FG_BLACK,
    Color::BG_BLACK | Color::FG_WHITE,
]));
table.modify(Rows::first(), Color::BG_BLUE);
table.modify(Rows::first(), Justification::colored(' ', Color::BG_BLUE));
Column names
You can move the header right to the borders.
use tabled::settings::{themes::ColumnNames, Alignment};

table.with(ColumnNames::head().alignment(Alignment::center()));
+-name-+--designed_by---+invented_year+
| C    | Dennis Ritchie | 1972        |
+------+----------------+-------------+
| Go   | Rob Pike       | 2009        |
+------+----------------+-------------+
| Rust | Graydon Hoare  | 2010        |
+------+----------------+-------------+
Border span correction
When Span is used it may break the Style chosen.
To fix it you can use BorderCorrection
use tabled::settings::{Panel, themes::BorderCorrection};

table.with(Panel::header("LISTING"));
table.with(BorderCorrection::span());

assert_table!(
    table,
    "+---------------------------------------+"
    "| LISTING                               |"
    "+------+----------------+---------------+"
    "| name | designed_by    | invented_year |"
    "+------+----------------+---------------+"
    "| C    | Dennis Ritchie | 1972          |"
    "+------+----------------+---------------+"
    "| Go   | Rob Pike       | 2009          |"
    "+------+----------------+---------------+"
    "| Rust | Graydon Hoare  | 2010          |"
    "+------+----------------+---------------+"
);
Alignment
You can set a horizontal and vertical alignment for any Object (e.g Columns, Rows) using Alignment.
use tabled::settings::{object::Columns, Alignment};

table.modify(Columns::first(), Alignment::right());
table.modify(Columns::last(), Alignment::center());

assert_table!(
    table,
    "+------+----------------+---------------+"
    "| name | designed_by    | invented_year |"
    "+------+----------------+---------------+"
    "|    C | Dennis Ritchie |     1972      |"
    "+------+----------------+---------------+"
    "|   Go | Rob Pike       |     2009      |"
    "+------+----------------+---------------+"
    "| Rust | Graydon Hoare  |     2010      |"
    "+------+----------------+---------------+"
);
Format
Format function provides an interface for modification of cells.
use tabled::{
    settings::{format::Format, object::Rows},
    assert::assert_table,
    Table,
};

let mut table = Table::new([[0; 4]; 3]);
table.modify(
    Rows::new(..),
    Format::positioned(|_, p| ((p.row) * (p.col)).to_string()),
);

assert_table!(
    table,
    "+---+---+---+---+----+----+----+----+----+----+"
    "| 0 | 0 | 0 | 0 | 0  | 0  | 0  | 0  | 0  | 0  |"
    "+---+---+---+---+----+----+----+----+----+----+"
    "| 0 | 1 | 2 | 3 | 4  | 5  | 6  | 7  | 8  | 9  |"
    "+---+---+---+---+----+----+----+----+----+----+"
    "| 0 | 2 | 4 | 6 | 8  | 10 | 12 | 14 | 16 | 18 |"
    "+---+---+---+---+----+----+----+----+----+----+"
    "| 0 | 3 | 6 | 9 | 12 | 15 | 18 | 21 | 24 | 27 |"
    "+---+---+---+---+----+----+----+----+----+----+"
);
Padding
The Padding structure provides an interface for left, right, top and bottom padding of cells.
You can set indent size and color of the padding.
use tabled::settings::{
    object::{Columns, Object, Rows},
    Color, Padding, PaddingColor,
};

// Set a padding for a last column (except first row)
table.modify(
    Columns::last().not(Rows::first()),
    Padding::new(1, 1, 0, 0).fill('[', ']', ' ', ' '),
);

// Set a padding and its color for a first row
table.modify(Rows::first(), Padding::new(2, 2, 0, 2));
table.modify(Rows::first(), PaddingColor::filled(Color::BG_BLUE));
Applying the last change to the first example will result in the following.
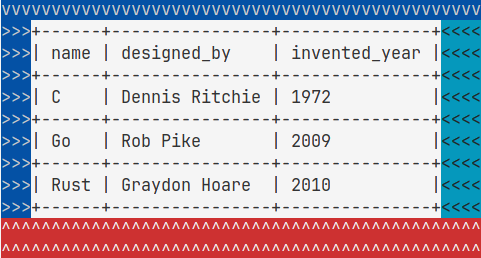
Margin
Margin sets extra space around the table (top, bottom, left, right).
As for Padding you can set indent, size and color of the extra space.
use tabled::settings::Margin;

table.with(Margin::new(3, 4, 1, 2).fill('>', '<', 'v', '^'));
If you run it for a first example you'll get.
vvvvvvvvvvvvvvvvvvvvvvvvvvvvvvvvvvvvvvvvvvvvvvvv
>>>+------+----------------+---------------+<<<<
>>>| name | designed_by    | invented_year |<<<<
>>>+------+----------------+---------------+<<<<
>>>| C    | Dennis Ritchie | 1972          |<<<<
>>>+------+----------------+---------------+<<<<
>>>| Go   | Rob Pike       | 2009          |<<<<
>>>+------+----------------+---------------+<<<<
>>>| Rust | Graydon Hoare  | 2010          |<<<<
>>>+------+----------------+---------------+<<<<
^^^^^^^^^^^^^^^^^^^^^^^^^^^^^^^^^^^^^^^^^^^^^^^^
^^^^^^^^^^^^^^^^^^^^^^^^^^^^^^^^^^^^^^^^^^^^^^^^
Margin Color
You can set a color for the characters.
use tabled::settings::{Margin, Color, MarginColor};

table.with(Margin::new(3, 4, 1, 2).fill('>', '<', 'v', '^'));
table.with(MarginColor::new(
    Color::BG_BRIGHT_BLUE,
    Color::BG_BRIGHT_CYAN,
    Color::BG_BLUE,
    Color::BG_RED,
));
Shadow
Shadow can be used to set a 'shadow' like margin.
use tabled::{settings::{Style, Shadow}, Table};
use tabled::assert::assert_table;

let table = Table::new(vec![["A", "B", "C"]])
    .with(Style::modern())
    .with(Shadow::new(1))
    .to_string();

assert_table!(
    table,
    "┌───┬───┬───┐ "
    "│ 0 │ 1 │ 2 │▒"
    "├───┼───┼───┤▒"
    "│ A │ B │ C │▒"
    "└───┴───┴───┘▒"
    " ▒▒▒▒▒▒▒▒▒▒▒▒▒"
);
Width
Using the following structures you can configure the width of a table and a single cell.
BEWARE that Width controls only content, so it can't make things smaller then a certain minimum.
BEWARE that it DOES NOT consider Padding when adjusting the width.
The functions preserves ansi color sequences (when ansi feature is on).
Below is an example of setting an exact table width.
use tabled::{
    settings::{peaker::Priority, Width},
    Table,
};

fn gen_table(size: usize, width: usize) -> String {
    let data = vec![(size.to_string(), "x".repeat(size))];

    let mut table = Table::new(data);
    table.with((
        Width::wrap(width).priority(Priority::max(true)),
        Width::increase(width).priority(Priority::min(true)),
    ));

    table.to_string()
}

let table = gen_table(50, 40);
println!("{table}");

let table = gen_table(20, 40);
println!("{table}");
The result must be seen as following.
+--------+-----------------------------+
| String | String                      |
+--------+-----------------------------+
| 50     | xxxxxxxxxxxxxxxxxxxxxxxxxxx |
|        | xxxxxxxxxxxxxxxxxxxxxxx     |
+--------+-----------------------------+
+---------------+----------------------+
| String        | String               |
+---------------+----------------------+
| 20            | xxxxxxxxxxxxxxxxxxxx |
+---------------+----------------------+
Truncate
Truncate sets a maximum width of a cell by truncating its content.
use tabled::settings::{Width, object::Rows};

// Truncating content to 10 chars in case it's bigger than that
// in a first row.
table.modify(Rows::first(), Width::truncate(10));

// Truncating content to 7 chars and puts a suffix '...' after it
// in all rows except a first.
table.modify(Rows::new(1..), Width::truncate(10).suffix("..."));
Truncate can be used to set a maximum width of a whole table.
use tabled::settings::Width;

// Tries to set table width to 22, in case it's bigger than that.
table.with(Width::truncate(22));
It can be used in combination with MinWidth to set an exact table size.
Wrapping
Wrap sets a maximum width of a cell by wrapping its content to new lines.
use tabled::settings::{Width, object::Rows};

// Wrap content to 10 chars in case it's bigger than that
// in a first row.
table.modify(Rows::first().with(Width::wrap(10)));

// Use a strategy where we try not to keep words split (where possible).
table.modify(Rows::new(1..).with(Width::wrap(10).keep_words()));
Wrap can be used to set a maximum width of a whole table.
use tabled::settings::Width;

// Tries to set table width to 22, in case it's bigger than that.
table.with(Width::wrap(22));
It can be used in combination with MinWidth to set an exact table size.
Increase width
MinWidth sets a minimal width of an object.
use tabled::settings::{Width, object::Rows};

// increase the space used by cells in all rows except the header to be at least 10
table.modify(Rows::new(1..), Width::increase(10));
MinWidth also can be used to set a minimum width of a whole table.
use tabled::settings::Width;

// increase width of a table in case it was lower than 10.
table.with(Width::increase(10));
It can be used in combination with Truncate and Wrap to set an exact table size.
Justify
You can set a constant width for all columns using Justify.
use tabled::settings::Width;

table.with(Width::justify(10));
Priority
You can tweak Truncate, Wrap, MinWidth logic by setting a priority by which a trim or increase be done.
use tabled::settings::{Width, peaker::Priority};

table.with(Width::truncate(10).priority(Priority::min()));
Percent
By default you use usize int to set width settings,
but you could do it also with tabled::width::Percent.
use tabled::settings::{Width, measurement::Percent};

table.with(Width::wrap(Percent(75)));
Height
You can increase and decrease a table or a specific cell height using the Height modifier.
Beware that Height controls only content,
so it can't make things smaller then a certain minimum.
Below is an example of setting an exact table height and width.
use std::iter::FromIterator;
use tabled::Table;
use tabled::settings::{peaker::Priority, Height};

fn gen_data(width: usize, height: usize) -> Vec<Vec<String>> {
    let dims = format!("{}x{}", width, height);
    let string = vec!["x".repeat(width); height].join("\n");

    vec![
        vec![String::from("N"), String::from("string")],
        vec![dims, string],
    ]
}

fn gen_table(data: Vec<Vec<String>>, height: usize) -> String {
    let mut table = Table::from_iter(data);
    table.with((
        Height::limit(height).priority(Priority::max(true)),
        Height::increase(height),
    ));

    table.to_string()
}

println!("{}", gen_table(gen_data(40, 10), 6));
println!("{}", gen_table(gen_data(40, 4), 10));
+-------+------------------------------------------+
| N     | string                                   |
+-------+------------------------------------------+
| 40x10 | xxxxxxxxxxxxxxxxxxxxxxxxxxxxxxxxxxxxxxxx |
|       | xxxxxxxxxxxxxxxxxxxxxxxxxxxxxxxxxxxxxxxx |
+-------+------------------------------------------+
+------+------------------------------------------+
| N    | string                                   |
|      |                                          |
+------+------------------------------------------+
| 40x4 | xxxxxxxxxxxxxxxxxxxxxxxxxxxxxxxxxxxxxxxx |
|      | xxxxxxxxxxxxxxxxxxxxxxxxxxxxxxxxxxxxxxxx |
|      | xxxxxxxxxxxxxxxxxxxxxxxxxxxxxxxxxxxxxxxx |
|      | xxxxxxxxxxxxxxxxxxxxxxxxxxxxxxxxxxxxxxxx |
|      |                                          |
+------+------------------------------------------+
Height increase
Increasing the height of a cell of a whole table could be done by Height::increase.
use tabled::settings::{Height, object::Rows};

// increase height of a table in case it was lower than 10.
table.with(Height::increase(10));

// increase height of cells in the last row on a table in case if some of them has it lower than 10.
table.modify(Rows::last(), Height::increase(10));
Height limit
Truncation of the height of a cell of a whole table could be done by Height::limit.
use tabled::settings::{Height, object::Rows};

// decrease height of a table to 10 in case it was bigger than that.
table.with(Height::limit(10));

// decrease height of cells in the last row on a table to 10 in case if some of them has it bigger than that.
table.modify(Rows::last(), Height::limit(10));
Rotate
You can rotate a table using tabled::Rotate.
Imagine you have a table already which output may look like this.
┌────┬──────────────┬───────────────────────────┐
│ id │ distribution │ link                      │
├────┼──────────────┼───────────────────────────┤
│ 0  │ Fedora       │ https://getfedora.org/    │
├────┼──────────────┼───────────────────────────┤
│ 2  │ OpenSUSE     │ https://www.opensuse.org/ │
├────┼──────────────┼───────────────────────────┤
│ 3  │ Endeavouros  │ https://endeavouros.com/  │
└────┴──────────────┴───────────────────────────┘
Now we will add the following modificator and the output will be rotated;
use tabled::settings::Rotate;

table.with(Rotate::Left);

assert_table!(
    table,
    "+---------------+----------------+----------+---------------+"
    "| invented_year | 1972           | 2009     | 2010          |"
    "+---------------+----------------+----------+---------------+"
    "| designed_by   | Dennis Ritchie | Rob Pike | Graydon Hoare |"
    "+---------------+----------------+----------+---------------+"
    "| name          | C              | Go       | Rust          |"
    "+---------------+----------------+----------+---------------+"
);
Remove
You can remove certain rows or columns from the table by Remove.
use tabled::settings::{object::{Columns, Rows}, Remove};

table.with(Remove::row(Rows::first()));
table.with(Remove::column(Columns::single(2)));
If the above example be applied for a first example in a file it would look like this.
+------+----------------+
| C    | Dennis Ritchie |
+------+----------------+
| Go   | Rob Pike       |
+------+----------------+
| Rust | Graydon Hoare  |
+------+----------------+
Extract
You can Extract data segments of a table to focus on it closely.
use tabled::settings::Extract;

table.with(Extract::segment(1..3, 1..));

assert_table!(
    table,
    "+----------------+------+"
    "| Dennis Ritchie | 1972 |"
    "+----------------+------+"
    "| Rob Pike       | 2009 |"
    "+----------------+------+"
)
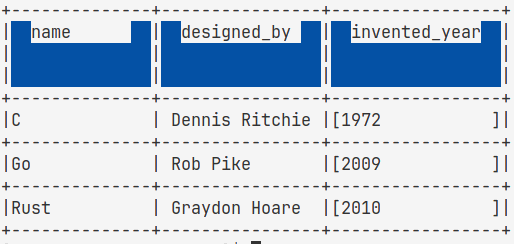
Header and Footer and Panel
You can add a Header and Footer to display some information.
use tabled::settings::Panel;

let count_elements = table.count_rows();

table
    .with(Panel::vertical(0, "A vertical panel").width(1))
    .with(Panel::header("Tabled Name"))
    .with(Panel::footer(format!("{} elements", count_elements)));
When applied to the main example of this file it will result in the following output.
+---+------+----------------+---------------+
| Tabled Name                               |
+---+------+----------------+---------------+
| A | name | designed_by    | invented_year |
|   |      |                |               |
| v |      |                |               |
| e |      |                |               |
+ r +------+----------------+---------------+
| t | C    | Dennis Ritchie | 1972          |
| i |      |                |               |
| c |      |                |               |
+ a +------+----------------+---------------+
| l | Go   | Rob Pike       | 2009          |
|   |      |                |               |
| p |      |                |               |
+ a +------+----------------+---------------+
| n | Rust | Graydon Hoare  | 2010          |
| e |      |                |               |
| l |      |                |               |
+---+------+----------------+---------------+
| 4 elements                                |
+---+------+----------------+---------------+
Merge
It's possible to create "Panel"s by combining the duplicates using Merge.
use tabled::{settings::merge::Merge, Table};

let data = [['A', 'B', 'B'], ['A', 'W', 'E'], ['Z', 'Z', 'Z']];

let mut table = Table::new(data);
table.with(Merge::horizontal()).with(Merge::vertical());

println!("{}", table);
+---+---+---+
| 0 | 1 | 2 |
+---+---+---+
| A | B     |
+   +---+---+
|   | W | E |
+---+---+---+
| Z         |
+---+---+---+
Concat
You can concatenate 2 tables using Concat.
It will stick 2 tables together either vertically or horizontally.
The example below shows the result of horizontal concat of the primary table of this file.
use tabled::settings::Concat;

table.with(Concat::horizontal(table.clone()));
The result.
+------+----------------+---------------+------+----------------+---------------+
| name | designed_by    | invented_year | name | designed_by    | invented_year |
+------+----------------+---------------+------+----------------+---------------+
| C    | Dennis Ritchie | 1972          | C    | Dennis Ritchie | 1972          |
+------+----------------+---------------+------+----------------+---------------+
| Go   | Rob Pike       | 2009          | Go   | Rob Pike       | 2009          |
+------+----------------+---------------+------+----------------+---------------+
| Rust | Graydon Hoare  | 2010          | Rust | Graydon Hoare  | 2010          |
+------+----------------+---------------+------+----------------+---------------+
The example below show the result of vertical concat of the primary table of this file.
use tabled::settings::Concat;

table.with(Concat::vertical(table.clone()));
The result.
+------+----------------+---------------+
| name | designed_by    | invented_year |
+------+----------------+---------------+
| C    | Dennis Ritchie | 1972          |
+------+----------------+---------------+
| Go   | Rob Pike       | 2009          |
+------+----------------+---------------+
| Rust | Graydon Hoare  | 2010          |
+------+----------------+---------------+
Highlight
Highlight can be used to change the borders of target region.
Here's an example.
use tabled::{
    settings::{
        object::{Columns, Object, Rows},
        Border, Highlight, Style,
    },
    Table,
};

let data = vec![["A", "B", "C"], ["D", "E", "F"]];

let mut table = Table::new(data);
table.with(Style::modern());
table.with(
    Highlight::new(Rows::first().and(Columns::single(2).and((1, 1))))
        .border(Border::filled('*')),
);

println!("{}", table);
The resulting table would be the following.
*************
* 0 │ 1 │ 2 *
*****───┼───*
│ A * B │ C *
├───*****───*
│ D │ E * F *
└───┴───*****
Span
It's possible to set a horizontal(column) span and vertical(row) span to a cell.
For certain look and feel, this might cause visual artifacts on table borders (see #399).
This can be fixed by using tabled::settings::themes::BorderCorrection.
Horizontal span
use tabled::{
    settings::{Alignment, Span},
    Table,
};

let data = vec![["A", "B", "C"], ["D", "E", "F"]];

let mut table = Table::new(data);
table
    .modify((0, 0), Span::column(0))
    .modify((1, 0), Span::column(2))
    .with(Alignment::center());

println!("{}", table);
+---+---+---+
|     0     |
+---+---+---+
|   A   | C |
+---+---+---+
| D | E | F |
+---+---+---+
Vertical span
use tabled::{
    settings::{Alignment, Span},
    Table,
};

let data = vec![["A", "B", "C"], ["D", "E", "F"]];

let mut table = Table::new(data);
table
    .modify((0, 1), Span::row(3))
    .with(Alignment::center_vertical());

println!("{}", table);
+---+---+---+
| 0 |   | 2 |
+---+   +---+
| A | 1 | C |
+---+   +---+
| D |   | F |
+---+---+---+
Split
You can Split a table on a row or column to redistribute the cells beyond that point
into a new shape with the provided point acting as the new, upper boundary in the direction selected.
Adding this to a first example will result in the next table.
use tabled::settings::{Style, split::Split};

table.with(Style::modern());
table.with(Split::column(2).concat());
The result of the running example will be as follows.
┌───────────────┬────────────────┐
│ name          │ designed_by    │
├───────────────┼────────────────┤
│ C             │ Dennis Ritchie │
├───────────────┼────────────────┤
│ Go            │ Rob Pike       │
├───────────────┼────────────────┤
│ Rust          │ Graydon Hoare  │
├───────────────┼────────────────┤
│ invented_year │                │
├───────────────┼────────────────┤
│ 1972          │                │
├───────────────┼────────────────┤
│ 2009          │                │
├───────────────┼────────────────┤
│ 2010          │                │
└───────────────┴────────────────┘
Duplicate
It's possible to duplicate a given set of cells.
use tabled::settings::{Dup, object::Rows};

table.with(Dup::new(Rows::last(), Rows::first()));

assert_table!(
    table,
    "+------+----------------+---------------+"
    "| name | designed_by    | invented_year |"
    "+------+----------------+---------------+"
    "| C    | Dennis Ritchie | 1972          |"
    "+------+----------------+---------------+"
    "| Go   | Rob Pike       | 2009          |"
    "+------+----------------+---------------+"
    "| name | designed_by    | invented_year |"
    "+------+----------------+---------------+"
);
Derive
To be able to use a Tabled macros each field must implement std::fmt::Display
otherwise it will not work.
The following example will cause a error.
use tabled::Tabled;
#[derive(Tabled)]
struct SomeType {
    field1: SomeOtherType,
}

struct SomeOtherType;
The Tabled macro is available when derive feature in turned on.
And it is by default.
Most of the default types implement the corresponding traits too.
Override a column name
You can use a #[tabled(rename = "")] attribute to override a column name.
use tabled::Tabled;

#[derive(Tabled)]
struct Person {
    #[tabled(rename = "Name")]
    first_name: &'static str,
    #[tabled(rename = "Surname")]
    last_name: &'static str,
}
Format headers
Using #[tabled(rename_all = "")] you can change a format of a column name.
Supported values are [camelCase, kebab-case, PascalCase, SCREAMING_SNAKE_CASE, snake_case, lowercase, UPPERCASE, lower title case, Upper Title Case, verbatim]
use tabled::Tabled;

#[derive(Tabled)]
#[tabled(rename_all = "CamelCase")]
struct Person {
    id: u8,
    number: &'static str,
    name: &'static str,
    #[tabled(rename_all = "UPPERCASE")]
    middle_name: &'static str,
}
Hide a column
You can mark filds as hidden in which case they will be ignored and not be present on a sheet.
A similar effect could be achieved by the means of a Remove.
use tabled::Tabled;

#[derive(Tabled)]
struct Person {
   id: u8,
   #[tabled(skip)]
   number: &'static str,
   name: &'static str,
}
Set column order
You can change the order in which they will be displayed in table.
use tabled::Tabled;

#[derive(Tabled)]
struct Person {
   id: u8,
   #[tabled(order = 0)]
   number: &'static str,
   #[tabled(order = 1)]
   name: &'static str,
}
Format fields
As was said already, using #[derive(Tabled)] is possible only when all fields implement a Display trait.
However, this may be often not the case for example when a field uses the Option type. There's 2 common ways how to solve this:
- Implement
Tabledtrait manually for a type. - Wrap
Optionto something likeDisplayedOption<T>(Option<T>)and implement a Display trait for it.
Alternatively, you can use the #[tabled(display = "func")] attribute for the field to specify a display function.
use tabled::Tabled;

#[derive(Tabled)]
pub struct Record {
    pub id: i64,
    #[tabled(display = "display_option")]
    pub valid: Option<bool>
}

fn display_option(o: &Option<bool>) -> String {
    match o {
        Some(s) => format!("is valid thing = {}", s),
        None => format!("is not valid"),
    }
}
You can send an argument to a function like this (it also possible to use &self),
using #[tabled(display("some_function", "arg1", 2, self))]
use tabled::Tabled;

#[derive(Tabled)]
pub struct Record {
    pub id: i64,
    #[tabled(display("Self::display_valid", self, 1))]
    pub valid: Option<bool>
}

impl Record {
    fn display_valid(&self, arg: usize) -> String {
        match self.valid {
            Some(s) => format!("is valid thing = {} {}", s, arg),
            None => format!("is not valid {}", arg),
        }
    }
}
There's one more case for display usage.
Is a situation where you have many fields with similar types.
You could set a display function agains the whole type.
See next example.
use tabled::Tabled;

#[derive(Tabled)]
#[tabled(display(Option, "tabled::derive::display::option", "undefined"))]
pub struct Record {
    pub id: i64,
    pub name: Option<String>,
    pub birthdate: Option<usize>,
    pub valid: Option<bool>,
}
To reduce boilerplate code, one can also achieve this using the format attribute within #[derive(Tabled)].
use tabled::Tabled;

#[derive(Tabled)]
pub struct Motorcycle {
    weight: usize,
    #[tabled(format = "{} cc")]
    cc: usize,
}
In the above example, the cc field will be formatted using the specified format string "{} cc", where {} is replaced with the value of cc.
Just like with display_with attribute, you can pass arguments for more complex formatting scenarios:
use tabled::Tabled;

#[derive(Tabled)]
pub struct Motorcycle {
    weight: usize,
    #[tabled(format = "{}/{} cc/kg", self.cc, self.weight)]
    cc: usize,
}
In this case, the cc field will be formatted using the format string "{}/{} cc/kg", and {} will be replaced with the values of cc and weight, respectively.
Inline
It's possible to inline internal data if it implements the Tabled trait using #[tabled(inline)].
You can also set a prefix which will be used for all inlined elements by #[tabled(inline("prefix>>"))].
use tabled::Tabled;

#[derive(Tabled)]
struct Person {
    id: u8,
    name: &'static str,
    #[tabled(inline)]
    ed: Education,
}

#[derive(Tabled)]
struct Education {
    uni: &'static str,
    graduated: bool,
}
And it works for enums as well.
use tabled::Tabled;

#[derive(Tabled)]
enum Vehicle {
    #[tabled(inline("Auto::"))]
    Auto {
        model: &'static str,
        engine: &'static str,
    },
    #[tabled(inline)]
    Bikecycle(
        &'static str,
        #[tabled(inline)] Bike,
    ),
}

#[derive(Tabled)]
struct Bike {
    brand: &'static str,
    price: f32,
}
Table types
tabled has a few representations of tables. Some differ in view, and some differ in implementation details.
There are situations when you might better use one but not another. But sometimes some can be used interchangeably.
Below you'll find a short list of existing ones. You can find descriptive information about each in the documentation.
Table
Main table of the library. It's implemenentation requires that all data be stored on heap.
No example is provided. Cause it must be somewhat apparent how to use it by now :).
IterTable
It's similar to main Table, it's only difference is that it does not buffer data.
It only requires a buffer for 1 row at a time.
It's configuration is quite different to original table,
difference is focused on controll how many passes and memory allocation.
It might be handy when you can't fit all your data in memory.
Here's an example.
use std::borrow::Cow;
use tabled::{settings::Style, tables::IterTable};

struct Language<'a> {
    name: &'a str,
    designed_by: &'a str,
    year: usize,
}

let languages = vec![
    Language { name: "C", designed_by: "Dennis Ritchie", year: 1972 },
    Language { name: "Go", designed_by: "Rob Pike", year: 2009 },
    Language { name: "Rust", designed_by: "Graydon Hoare", year: 2010 },
];

let iter = languages.iter().rev().map(|l| {
    [
        Cow::Borrowed(l.name),
        Cow::Borrowed(l.designed_by),
        Cow::Owned(l.year.to_string()),
    ]
});

let head = [
    Cow::Borrowed("lang"),
    Cow::Borrowed("inventor"),
    Cow::Borrowed("published year"),
];
let iter = std::iter::once(head).chain(iter);

let table = IterTable::new(iter)
    .sniff(2)
    .with(Style::modern().remove_horizontal());

let output = table.to_string();

println!("{output}");
And the result.
Notice that "Dennis Ritchie" name got truncated,
it's because we used only 2 rows for layout estimation.
No more additinal passes will be done.
But these 2 rows will be buffered because we can't do 2nd pass over already seen rows.
┌──────┬───────────────┬────────────────┐
│ lang │ inventor      │ published year │
│ Rust │ Graydon Hoare │ 2010           │
│ Go   │ Rob Pike      │ 2009           │
│ C    │ Dennis Ritchi │ 1972           │
└──────┴───────────────┴────────────────┘
CompactTable
Similar to IterTable but it does not use any buffer.
So we don't do any allocations with this type of table.
But we pay for it with a limited configuration and a nessasity to estimate column width on your own.
It might be useful in a very constrain environments.
It is the only table which supports no-std.
Here's an example.
It's very simmilar to the previous one.
But notice that we set width manually.
use std::borrow::Cow;
use tabled::settings::Style;
use tabled::tables::CompactTable;

struct Language<'a> {
    name: &'a str,
    designed_by: &'a str,
    year: usize,
}

let languages = vec![
    Language { name: "C", designed_by: "Dennis Ritchie", year: 1972 },
    Language { name: "Go", designed_by: "Rob Pike", year: 2009 },
    Language { name: "Rust", designed_by: "Graydon Hoare", year: 2010 },
];

let iter = languages.iter().rev().map(|l| {
    [
        Cow::Borrowed(l.name),
        Cow::Borrowed(l.designed_by),
        Cow::Owned(l.year.to_string()),
    ]
});

let head = [
    Cow::Borrowed("lang"),
    Cow::Borrowed("inventor"),
    Cow::Borrowed("published year"),
];
let iter = std::iter::once(head).chain(iter);

let table = CompactTable::new(iter)
    .rows(languages.len())
    .columns(3)
    .width([10, 20, 20])
    .with(Style::modern().remove_horizontal());

let output = table.to_string();

println!("{output}");
And the result.
┌──────────┬────────────────────┬────────────────────┐
│ lang     │ inventor           │ published year     │
│ Rust     │ Graydon Hoare      │ 2010               │
│ Go       │ Rob Pike           │ 2009               │
└──────────┴────────────────────┴────────────────────┘
PoolTable
Unlike Table it does not nessarily require columns to be aligned.
It provides capabilities for a completely and utterly diverse table layout.
Example
use tabled::{
    settings::{Alignment, Style},
    tables::PoolTable,
};

let characters = [
    "Naruto Uzumaki",
    "Kakashi Hatake",
    "Minato Namikaze",
    "Jiraiya",
    "Orochimaru",
    "Itachi Uchiha",
];

let data = characters.chunks(2);

let table = PoolTable::new(data)
    .with(Style::dots())
    .with(Alignment::center())
    .to_string();

println!("{table}");
The output would look like the following.
...................................
: Naruto Uzumaki : Kakashi Hatake :
:................:................:
:  Minato Namikaze   :  Jiraiya   :
:....................:............:
:  Orochimaru   :  Itachi Uchiha  :
:...............:.................:
ExtendedTable
You can use ExtendedTable if your data structure has a lot of fields.
Here's an example.
use tabled::{tables::ExtendedTable, Tabled};

#[derive(Tabled)]
struct Distribution<'a> {
    name: &'a str,
    is_active: bool,
    is_cool: bool,
}

let data = [
    Distribution { name: "Manjaro", is_cool: true, is_active: true },
    Distribution { name: "Debian", is_cool: true, is_active: true },
    Distribution { name: "Debian", is_cool: true, is_active: true },
];

let table = ExtendedTable::new(&data);

println!("{}", table);
You'll see the following.
-[ RECORD 0 ]------
name      | Manjaro
is_active | true
is_cool   | true
-[ RECORD 1 ]------
name      | Debian
is_active | true
is_cool   | true
-[ RECORD 2 ]------
name      | Debian
is_active | true
is_cool   | true
Table::kv
There's a special layout you can build for original Table.
Which represents Key-Value pairs for your type.
Notice that in essence there's nothing special in the build process, so it can be build for other table types as well.
Here's an example.
use tabled::{Table, Tabled, settings::Style};

#[derive(Tabled)]
struct Language<'a> {
    name: &'a str,
    designed_by: &'a str,
    year: usize,
}

let languages = vec![
    Language { name: "C", designed_by: "Dennis Ritchie", year: 1972 },
    Language { name: "Go", designed_by: "Rob Pike", year: 2009 },
    Language { name: "Rust", designed_by: "Graydon Hoare", year: 2010 },
];

let mut table = Table::kv(languages);
table.with(Style::modern().remove_horizontal());

println!("{table}");
And the result.
┌─────────────┬────────────────┐
│ name        │ C              │
│ designed_by │ Dennis Ritchie │
│ year        │ 1972           │
│ name        │ Go             │
│ designed_by │ Rob Pike       │
│ year        │ 2009           │
│ name        │ Rust           │
│ designed_by │ Graydon Hoare  │
│ year        │ 2010           │
└─────────────┴────────────────┘
Tips and Tricks
std::fmt::* options
You use formatting(std::fmt::*) options to apply certain settings.
use tabled::Table;

let numbers = [(1, 2, 3), (1, 2, 3)];
let table = Table::new(numbers);

println!("{:.^30}", table);
The result will be as follows.
.....+-----+-----+-----+......
.....| i32 | i32 | i32 |......
.....+-----+-----+-----+......
.....|  1  |  2  |  3  |......
.....+-----+-----+-----+......
.....|  1  |  2  |  3  |......
.....+-----+-----+-----+......
ANSI
The library doesn't bind you in the usage of any color library but to be able to work correctly with colored input (with ANSI sequences), and avoid miscalculation of string width
because of embedded ansi sequences, you should add the ansi feature to your Cargo.toml:
tabled = { version = "*", features = ["ansi"] }
Then you can use colored strings as values and table will be properly rendered.
Tuning our favorite example will result in the following:
use tabled::{format::Format, object::Columns, Style, Table};

let mut table = Table::new(&data);
table
    .with(Style::psql())
    .modify(Columns::single(0), Color::FG_RED)
    .modify(Columns::single(1), Color::FG_BLUE)
    .modify(Columns::new(2..), Color::FG_GREEN);
Tuple combination
You also can combine objects which implement Tabled by means of tuples, you will get a combined columns of them.
use tabled::{
    settings::{Alignment, Style},
    assert::assert_table,
    Table, Tabled,
};

#[derive(Tabled)]
struct Developer(#[tabled(rename = "name")] &'static str);

#[derive(Tabled)]
enum Domain {
    Security,
    Embedded,
    Frontend,
    Unknown,
}

let data = vec![
    (Developer("Terri Kshlerin"), Domain::Embedded),
    (Developer("Catalina Dicki"), Domain::Security),
    (Developer("Jennie Schmeler"), Domain::Frontend),
    (Developer("Maxim Zhiburt"), Domain::Unknown),
];

let table = Table::new(data)
    .with(Style::psql())
    .with(Alignment::center())
    .to_string();

assert_table!(
    table,
    "      name       | Security | Embedded | Frontend | Unknown "
    "-----------------+----------+----------+----------+---------"
    " Terri Kshlerin  |          |    +     |          |         "
    " Catalina Dicki  |    +     |          |          |         "
    " Jennie Schmeler |          |          |    +     |         "
    "  Maxim Zhiburt  |          |          |          |    +    "
);
Tuple options
You can concat together options, just like Settings does, but in a more ideomatic way.
use tabled::{
    settings::{Alignment, Style},
    assert::assert_table,
    Table,
};

let movies = vec![
    ("The Fall Guy", 2024, 6.9),
    ("Barbie", 2023, 6.8),
    ("The Chase for Carrera", 2023, 7.5),
];

let mut table = Table::new(movies);
table.with((Alignment::right(), Style::modern()));

assert_table!(
    table,
    "┌───────────────────────┬──────┬─────┐"
    "│                  &str │  i32 │ f64 │"
    "├───────────────────────┼──────┼─────┤"
    "│          The Fall Guy │ 2024 │ 6.9 │"
    "├───────────────────────┼──────┼─────┤"
    "│                Barbie │ 2023 │ 6.8 │"
    "├───────────────────────┼──────┼─────┤"
    "│ The Chase for Carrera │ 2023 │ 7.5 │"
    "└───────────────────────┴──────┴─────┘"
);
Object
You can apply settings to a subgroup of cells using and and not methods for an object.
use tabled::settings::object::{Object, Segment, Cell, Rows, Columns};
Segment::all().not(Rows::first()); // select all cells except header.
Columns::first().and(Columns::last()); // select cells from first and last columns.
Rows::first().and(Columns::single(0)).not(Cell(0, 0)); // select the header and first column except the (0, 0) cell.
Also you can target a column via its name using ByColumnName.
use tabled::settings::{location::ByColumnName, Alignment};
use tabled::assert::assert_table;

table.modify(ByColumnName::new("name"), Alignment::right());

assert_table!(
    table,
    "+------+----------------+---------------+"
    "| name | designed_by    | invented_year |"
    "+------+----------------+---------------+"
    "|    C | Dennis Ritchie | 1972          |"
    "+------+----------------+---------------+"
    "|   Go | Rob Pike       | 2009          |"
    "+------+----------------+---------------+"
    "| Rust | Graydon Hoare  | 2010          |"
    "+------+----------------+---------------+"
);
Builder
Builder is a powerful tool you shall be aware of.
For example you can use Builder::index to make a particular column an index,
which will stay on the left.
use tabled::{builder::Builder, settings::Style};
use tabled::assert::assert_table;

let mut builder = Builder::default();
builder.push_record(["Index", "Language", "Status"]);
builder.push_record(["1", "English", "In progress"]);
builder.push_record(["2", "Deutsch", "Not ready"]);

let builder = builder.index().column(1).name(None);

let mut table = builder.build();
table.with(Style::rounded());

assert_table!(
    table,
    "╭─────────┬───────┬─────────────╮"
    "│         │ Index │ Status      │"
    "├─────────┼───────┼─────────────┤"
    "│ English │ 1     │ In progress │"
    "│ Deutsch │ 2     │ Not ready   │"
    "╰─────────┴───────┴─────────────╯"
);
For example you can use transpose() method to change the layout.
// ...
// Use previous example

let builder = builder.index()
    .column(1)
    .name(None)
    .transpose();
╭────────┬─────────────┬───────────╮
│        │ English     │ Deutsch   │
├────────┼─────────────┼───────────┤
│ Index  │ 1           │ 2         │
│ Status │ In progress │ Not ready │
╰────────┴─────────────┴───────────╯
Macros
Utilities for dynamic Table displays.
Col and Row
col! creates a single column table, with a given set of cells.
row! creates a single row table, with a given set of cells.
Combine col! and row! to create flexible table visualizations.
use tabled::{col, row, assert::assert_table, settings::Style};

let mut table = row![
    col!["table 0", "0", "1", "2"],
    col!["table 1", "world"],
    col!["table 2"],
];
table.with(Style::modern_rounded());

assert_table!(
    table,
    "╭─────────────┬─────────────┬─────────────╮"
    "│ +---------+ │ +---------+ │ +---------+ │"
    "│ | table 0 | │ | table 1 | │ | table 2 | │"
    "│ +---------+ │ +---------+ │ +---------+ │"
    "│ | 0       | │ | world   | │             │"
    "│ +---------+ │ +---------+ │             │"
    "│ | 1       | │             │             │"
    "│ +---------+ │             │             │"
    "│ | 2       | │             │             │"
    "│ +---------+ │             │             │"
    "╰─────────────┴─────────────┴─────────────╯"
);
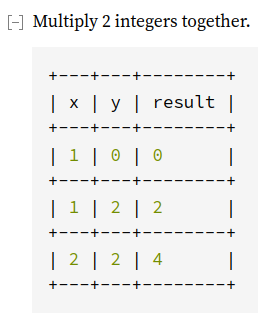
static_table
It's possible to construct a table at compile time, via static_table.
You'd need to include a different crate to use it.
static_table = "*"
const TABLE: &str = static_table::static_table!(
    [
        ["x", "y", "op", "result"],
        ["1", '2', '*', '2'],
        ["2", '2', '*', '4']
    ],
    THEME = "ROUNDED",
);

assert_eq!(
    TABLE,
    "╭───┬───┬────┬────────╮\n\
     │ x │ y │ op │ result │\n\
     ├───┼───┼────┼────────┤\n\
     │ 1 │ 2 │ *  │ 2      │\n\
     │ 2 │ 2 │ *  │ 4      │\n\
     ╰───┴───┴────┴────────╯",
);
Notice that you can even use it in documentation.
/// Multiply 2 integers together.
///
#[doc = static_table::static_table!([
    ["x", "y", "result"],
    ["1", '0', '0'],
    ["1", '2', '2'],
    ["2", '2', '4']
])]
pub fn mul(left: usize, right: usize) -> usize {
    left + right
}
It will look as follows.
Features
The library has a list of features.
std- (default) If not used its consideredno_stdwith a limited set of functionality.derive- (default) Support forTabledderive macro.macros- (default) Support forrow!,col!macro.assert- (default) Support forassert_table!macro.ansi- Support for ANSI sequences.
Formats
You can convert some formats to a Table using a utility library.
json format
You can convert arbitrary json to a Table using json_to_table library.
See the example.
ron format
You can convert arbitrary ron to a Table using ron_to_table library.
See the example.
csv format
You can convert arbitrary csv to a Table using csv_to_table library.
See the example.
toml format
You can convert arbitrary toml to a Table using toml_to_table library.
See the example.
html format
You can convert a Table into HTML <table> using table_to_html library.
See the example.
Notes
Charset
Since version 0.11 we no longer have special treatment for symbols which WILL break your terminal output such as
\t and \r.
So if your content might contain them you shall either handle it yourself,
or call tabled::settings::formatting::Charset::clean and tabled::settings::formatting::Tabsize.
ANSI escape codes
By default tabled doesn't handle ANSI escape codes.
By default such things as hyperlinks, blinking and others things which can be achieved via ANSI codes might not work correctly.
To enable this support, add the ansi feature to your Cargo.toml
tabled = { version = "*", features = ["ansi"] }
Emoji
The library support emojies out of the box (but sometimes ansi feature is required).
Be aware that some of the terminals and editors may not render them as you would expect.
Let's add emojies to an example from a Usage section.
let languages = vec![
    Language {
        name: "C 💕",
        designed_by: "Dennis Ritchie",
        invented_year: 1972,
    },
    Language {
        name: "Rust 👍",
        designed_by: "Graydon Hoare",
        invented_year: 2010,
    },
    Language {
        name: "Go 🧋",
        designed_by: "Rob Pike",
        invented_year: 2009,
    },
];
The resultant table will look like the following.
As you can see Github tricks a bit a return table, but GNOME terminal and Alacritty terminal handle it correctly.
+---------+----------------+---------------+
| name    | designed_by    | invented_year |
+---------+----------------+---------------+
| C 💕    | Dennis Ritchie | 1972          |
+---------+----------------+---------------+
| Rust 👍 | Graydon Hoare  | 2010          |
+---------+----------------+---------------+
| Go 🧋   | Rob Pike       | 2009          |
+---------+----------------+---------------+
Terminal size
It's a frequent case where it's necessary to align a table to a terminal width or height.
You can achieve that by using Width and Height.
You can peak a strategy by which a column/row truncation/widening will be done by using Priority.
This example uses terminal_size crate to determine ones size, but it's possible to use anything.
use tabled::{
    builder::Builder,
    settings::{peaker::Priority, Height, Settings, Width},
    Table,
};
use terminal_size::{terminal_size, Height as TerminalHeight, Width as TerminalWidth};

fn get_terminal_size() -> (usize, usize) {
    let (TerminalWidth(width), TerminalHeight(height)) =
        terminal_size().expect("failed to obtain a terminal size");

    (width as usize, height as usize)
}

let (width, height) = get_terminal_size();

let data = [
    ["0.2.1", "2021-06-23", "true", "#[header(inline)] attribute"],
    ["0.2.0", "2021-06-19", "false", "API changes"],
    ["0.1.4", "2021-06-07", "false", "display_with attribute"],
];

let settings = Settings::default()
    .with(Width::wrap(width).priority(Priority::max(true)))
    .with(Width::increase(width))
    .with(Height::limit(height))
    .with(Height::increase(height));

let mut table = Table::from_iter(data);
table.with(settings);

println!("{table}");
Semver
When you need to release a breaking change — any breaking change — you do it in a major version. Period. No excuses.
We still do it.
We often do breaking changes on minor version bump.
So you probably shall not depend on minor version (like 0.7).
It's likely better to depend on constant version e.g. =0.8.0
MSRV
Breaking MSRV considered to be a breaking change; but see semver-note
Comparison
Nowadays there are a few libraries for pretty tables.
Some may wonder why tabled is better or worse than others libraries?
I hope tabled does its job well, but at the end of the day you probably need to decide for yourself.
If you have any ideas for an enhancement or have a question about tabled please file an issue.
Below you will find a list of crates which do similar things or do something which tabled doesn't.
You can find performance comparison benchmarks here.
The description is taken from the author's quotes.
-
cli-tabletends to keep the compile time and crate size low and support all the platforms. It has an optionalcsvsupport. -
comfy-tablefocuses on providing a minimalistic, but rock-solid library for building text-based tables with focus on safety and dynamic-length content arrangement. -
term-table-rsmain focus is on a good set of tools for rendering CLI tables, while allowing users to bring their own tools for things like colors. It has an ability to have different number of columns in each row of the table.
Please open an issue if you feel another crate is worth mentioning.
Dependencies
~270–700KB
~16K SLoC