19 releases
| 0.9.2 | Aug 15, 2022 |
|---|---|
| 0.9.0 |
|
| 0.8.1 | Sep 30, 2021 |
| 0.7.0 | Apr 12, 2021 |
| 0.4.3 | Oct 12, 2019 |
#553 in GUI
48 downloads per month
320KB
657 lines
What is this?
This program lets you view, edit and simulate petri nets. It's also possible to model other kinds of graphs, like state machines and dependency graphs, which are bascially subsets of petri nets. It uses pnrs, a safe rust wrapper for pns, to load, edit and simulate the petri nets.
Example
Here an example of how the editor looks like:
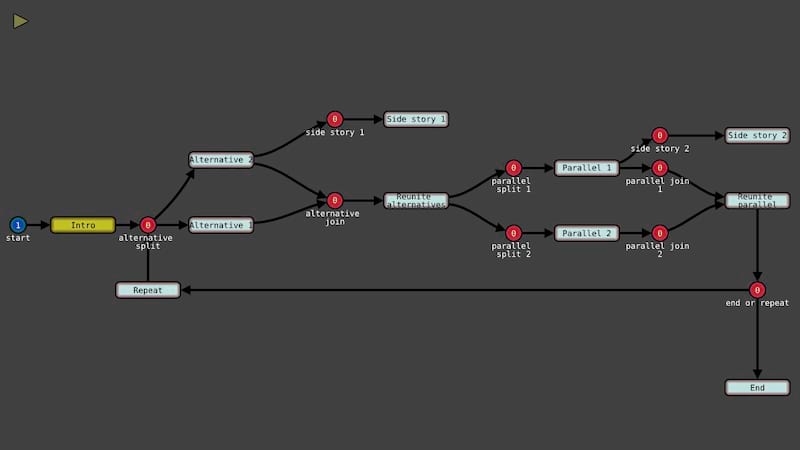
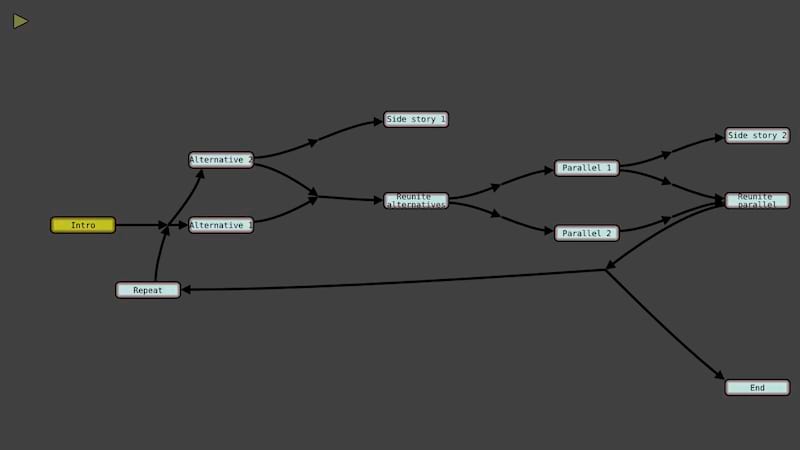
It's possible to use restricted modes, which are only useful in specific cases and might be easier to understand.
This one only displays the state:
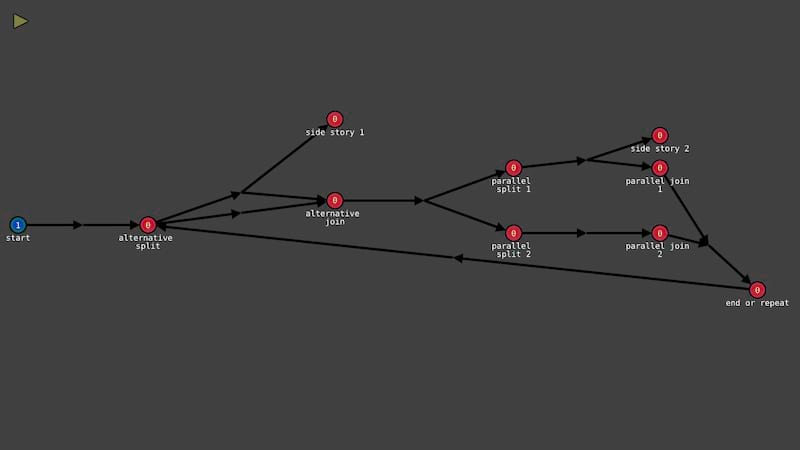
This one only displays the actions:
Installation
In order to install the latest release, you need cargo, which you can install using Rustup.
When you have cargo installed, you can just install this program without the need of manually cloning the repo using this command:
$ cargo install --git https://gitlab.com/porky11/pn-editor --features pns/static-build
You can also install the pns library on your system, which might be preferable to some users.
You don't need the part --features pns/static-build anymore.
In this case you don't have to specify any features:
$ cargo install --git https://gitlab.com/porky11/pn-editor
Then you get a new command called pn-editor, which starts the program.
You can also clone the repo yourself, go to the directory, and use cargo there to run the program. It works like this:
$ git clone https://gitlab.com/porky11/pn-editor
$ cd pn-editor
$ cargo run --release  # to run the program
$ cargo install --path .  # to install the program
In both cargo commands, when you don't have pns installed on your system, you need to specify this feature by adding --features pns/static-build at the end.
Usage
Standard Options
Alt + Del: Remove node selectedCtrl + O: Load petri net from fileAlt + O: Load petri net state from fileCtrl + S: Save petri net to fileAlt + S: Save petri net state to fileCtrl + F: Search for node by nameCtrl + N: Reset and use empty petri netCtrl + P: Play simulation (also switches to simulation mode)Ctrl + C: Copy selectedCtrl + V: Paste selectedCtrl + X: Cut selectedCtrl + E: Toggle text edit; disabled by default; when only one transition is selected, its descriptions can be editedCtrl + G: Toggle snapping; enabled by default; view and nodes snap to a gridCtrl + Plus: Increase token count of selected placesCtrl + 1: Set view mode to default; see and edit everythingCtrl + 2: Set view mode to state; see and edit only placesCtrl + 3: Set view mode to actions; see and edit only transitionsAlt + 1: Set render flow to omni directional; place everything like you wantAlt + 2: Set render flow to horizontal; arrows are normally drawn horizantally from left to rightAlt + 3: Set render flow to vertical; arrows are normally drawn vertically from top to bottom
Saving and loading
First you need to specify the directory where you want to save your project to. Multiple files are generated when saving and loaded when loading:
- Petri net structure
.pns:- contains the logical contents of the petri net
- the exact format is described here
- Petri net layout
.pnl:- describes the layout of the petri net
- if it's missing when loading, the layout will be generated automatically
- Petri net keys
.pnk:- a list of names for all the transitions
- if it's missing when loading, the names will be generated automatically
- the order is important
- Petri net keys for places
.pnkp:- a list of names for all the places
- if it's missing when loading, the names will be empty
- the order is important
- Story
.story:- Stores descriptions for every transition in a single text file
- Descriptions use transition names as headers, so order doesn't matter
- using the same name for different transitions will cause problems when reloading
Why so many file formats?
These are many different file formats. Why is not just one file created?
You might want to use some of these formats in other programs you write yourself. Maybe you don't care about specific aspects in these other programs.
You almost always care about the petri net structure itself, so you will probably include it.
You almost always want to ignore the layout of the petri net when exporting it.
The transition keys are probably pretty useful as well, but you might not need then, when you just use the story file.
The place keys are not that useful in most cases, since you only want to know, what is possible and what isn't, but you might also want to use them in some cases.
You might want to ignore the more exact descriptions of the story, especially if you didn't use this feature in the editor anyways.
Editing
General controls
While editing, the keys Shift, Ctrl and Alt basically have the following meaning:
Shift: Select multiple objectsCtrl: Create objectsAlt: Special controls and playing simulation
Both mouse buttons are mainly used for these tasks:
Left: Edit nodesRight: Edit connections
Specific controls
When pressing Ctrl + Left, a new transition node is created.
When pressing Ctrl + Right, a new place node is created.
When clicking a node, it will be selected. Selected nodes can be moved around by holding Left on it.
When clicking at some other node or at empty space, the selected nodes will be deselected.
When Shift is pressed while clicking Left on a node, it will be selected additionally.
When the node is already selected, it will be deselected.
When a new node is created while holding Shift, the previously selected nodes won't be deselected.
When holding Shift while moving a node, other selected nodes will move as well.
When moving a node using Ctrl + Left, it will be duplicated. Both nodes will use the same input and output connections.
When multiple nodes are selected and also holding Ctrl, all the nodes are duplicated.
When also holding Shift, the duplicates will be linked. This means, the new nodes represent the same node they were copied from.
If nodes are linked can be seen when one of the nodes is selected. They are connected by special lines. Besides all of them always contain the same data.
This is mainly useful to improve the layout visually, for example when a place or transition is connected to nodes, which are at very different locations.
When clicking a node with Right and releasing it above another node, both nodes will be connected.
When multiple nodes are selected and also holding Ctrl, all will be connected to the last node.
When also holding Alt, the existing connections will be removed.
If both nodes are of the same type, a new node of the other type will be inserted between them.
When also holding Shift, releasing in empty space will create a new node of the other type there, when releasing on the same node, a bidirectional connecton to a new node will be created.
Copying and Pasting
When copying something from a net, all selected nodes and connections between them are affected. The copy can be pasted anywhere, in the same program, even after loading a different net, in another program or even in text editors.
The copy will store the position relative to the mouse, so moving the mouse before pasting will change the position.
Pasting will always create new nodes for everything and never connect to existing nodes.
The format is similar to the binary format, but it's a text format and also contains information about the layout and transition names.
It's even possible to edit the pasted data as text and copy this text into a text editor. This way you can copy sections of your net and save them into a text editor. You can also modify them as text and paste them back.
Text Editing
It's possible to toggle text edit mode using Ctrl + E.
While it's enabled, and only a single transition is selected, a text editor window will appear on the right side of the screen and text input will go into this window. It's supposed to give every transition a meaning, by describing the action, that will be triggered.
The file suffix is .story, since this way a story can be told.
Searching
Ctrl + F enters search mode.
In search mode, you can enter a name and one of the matching nodes is focused.
Tab will let you look at different nodes with matching names. First it will focus all matching transitions, then all matching places. It's also possible to switch between places and transitions faster by pressing Ctrl + Tab.
Pressing Return will finish the search and select the focused node. Holding Ctrl while finishing will select all matching nodes.
Holding Shift will in both cases select them additionally.
Simulation
Pressing Ctrl + P will switch to simulation mode. In simulation mode editing is slightly restricted, but it's possible to simulate the net.
Clicking Alt + Left on a transition will fire it if possible, Alt + Right will unfire it again.
Unfireing is even possible in a different order.
It's always ensured, the state of the petri net is valid in edit mode, so unfireing is not possible for every fired transition. Also editing is restricted to be only possible, if no potential state could have taken a route, that's not possible after the edit anymore.
Pressing Ctrl + P again reverts to edit mode.
Ctrl + A will add a new empty state to the simulation.
Tab will switch between different states.
Saving and loading the net just works as before.
It's also possible to save and load states (the current progress) instead of the net. When loading, a new state will be created and added.
Except of the restriction, most features work in this mode, also searching. Duplication and copying will not necessarily copy the current token counts. The exact token counts are calculated dynamically based on the calls of the transitions, so this wouldn't make sense.
When some operation does not work in this mode, the reason is, some operations might break the current story. This means, if there exists any state, that could be created before, but cannot be created by fireing the same transitions in the same order afterwards, some operation is invalid.
Using simulation mode for editing is not just helpful for simulation, but if you already have a working game and want add new content, it's easy to ensure, you don't break it, this way.
View Modes
There are three modes:
- default mode
- state mode
- actions mode
Default mode is the most powerful mode, since it gives access to the full petri net. The other modes are restricted, but they have specific features.
Both restricted modes hide one of the node types, so it's easier to overview it. When creating a connected place or transition, the end node will always be of the same type and the hidden node type will be inserted implicitly.
State mode only gives access to the state of the petri net, represented by the places. It's bascially a state machine then. It's mostly useful for switching between alternative states or stories with multiple alternatives. A common example are visual novels.
Actions mode only gives access to the actions of the petri net, represented by transitions. It's basically a dependency graph then. It's mostly useful, when things are never alternative, and calling actions only allows new actions, never remove old ones. A common example are metroidvania games.
Render Flow
There are three render flow settings:
- omni directional
- horizantal
- vertical
All of them have different preferred directions of drawing node connections.
If you want the most freedom, just use the default omni directional render flow. If you have many cycles, this should most likely be used.
If most of your story is rather linear, and repetition does not appear often and should be visible immediately, horizontal or vertical render flows are more useful. Which of them you use is mostly preference. Horizontal renders arrows from left to right, vertical from top to bottom.
Dependencies
~12–16MB
~320K SLoC