19 releases
| 0.8.0 | Oct 30, 2023 |
|---|---|
| 0.7.0 | Jan 20, 2023 |
| 0.6.0 | Jun 20, 2022 |
| 0.5.4 | Jan 27, 2022 |
| 0.3.3 | Mar 27, 2020 |
#202 in GUI
17MB
13K
SLoC
Contains (Windows DLL, 2.5MB) lib/msvc/dll/64/SDL2.dll, (Windows DLL, 2MB) lib/msvc/dll/32/SDL2.dll, (Windows DLL, 1.5MB) lib/msvc/dll/32/SDL2_ttf.dll, (Windows DLL, 1.5MB) lib/msvc/dll/64/SDL2_ttf.dll, (static library, 1MB) lib/msvc/lib/32/SDL2test.lib, (static library, 1MB) lib/msvc/lib/64/SDL2test.lib and 44 more.
Engine
📖 Summary - 🌆 Screenshots - 🚀 Getting Started - 🛠️ Features - ⚠️ Known Issues - 💬 Contact
Summary
pix_engine is a cross-platform graphics & UI library for simple games,
visualizations, digital art, and graphics applications written in Rust,
supporting SDL2 (and soon Web-Assembly!) renderers.
The primary goal of this library is to be simple to setup and use for graphics or algorithm exploration and is not meant to be as fully-featured as other, larger graphics libraries.
It is intended to be more than just a toy library, however, and can be used to
drive real applications. The Tetanes NES emulator, for example uses
pix_engine for rendering, window and event handling.
Some examples of things you can create with pix-engine:
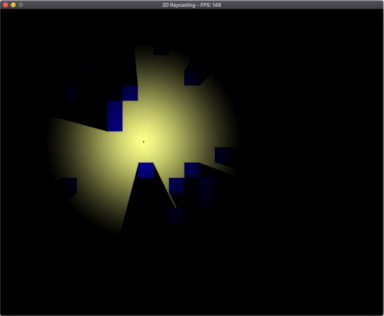
- 2D ray casting of scenes or objects.
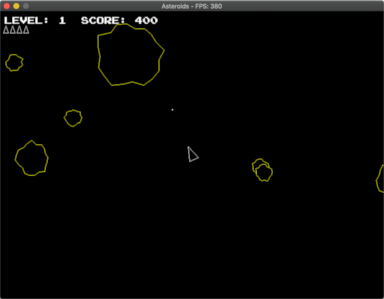
- 2D games like Asteroids, Tetris, Pong, or platformers including sound effects, music and UI elements.
- Simple 3D scenes or games.
- Audio playback and capture applications.
- User interfaces for basic applications or configuration.
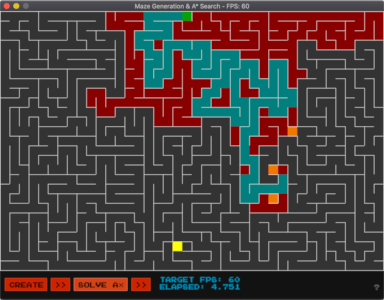
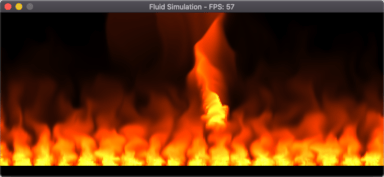
- Algorithm visualizations for sorting, searching, or particle simulations.
- Image viewing and editing.
- Visual art.
Minimum Supported Rust Version (MSRV)
The current minimum Rust version is 1.67.0.
Screenshots


Getting Started
Installing Dependencies
First and foremost you'll need Rust installed! Follow the latest directions at https://www.rust-lang.org/learn/get-started.
When building or running applications for a desktop target such as macOS,
Linux, or Windows and not a Web-Assembly target, you must install
SDL2 libraries. Note for windows: You may need to install
Visual Studio C++ Build Tools.
There are several options for installing SDL2, but these are the most common:
- Install via homebrew for
macOS, a package management tool likeaptforLinuxorMSVCforWindows.
For more details and installation options see the rust-sdl2 documentation.
macOS, Linux, or Windows 10 Subsystem for Linux (homebrew)
brew install sdl2 sdl2_gfx sdl2_image sdl2_mixer sdl2_ttf
Linux (package manager)
Note: The minimum SDL2 version is 2.0.20. Some package managers may not have
the latest versions available.
Ubuntu:
sudo apt-get install libsdl2-dev libsdl2-gfx-dev libsdl2-image-dev
libsdl2-mixer-dev libsdl2-ttf-dev
Fedora:
sudo dnf install SDL2-devel SDL2_gfx-devel SDL2_image-devel SDL2_mixer-devel SDL2_ttf-devel
Arch:
sudo pacman -S sdl2 sdl2_gfx sdl2_image sdl2_mixer sdl2_ttf
Windows (MSVC)
- Download the latest
SDL2MSVCdevelopment libraries from https://www.libsdl.org/download-2.0.php e.g. (SDL2-devel-2.0.20-VC.zip). - Download the latest
SDL2_image,SDL2_mixer, andSDL2_ttfMSVCdevelopment libraries from https://www.libsdl.org/projects/. e.g. (SDL2_image-devel-2.0.5-VC.zip). - Unzip each
.zipfile into a folder. - Copy library files:
- from:
lib\x64\
- to:
C:\Users\{Username}\.rustup\toolchains\{current toolchain}\lib\rustlib\{current toolchain}\libwhere{current toolchain}is likelystable-x86_64-pc-windows-msvc.- Note: If you don't use
rustup, See rust-sdl2 for more info on Windows installation.
- Note: If you don't use
- from:
- Copy all
dllfiles:- from:
lib\x64\ - to: your
cargoproject next toCargo.toml.
- from:
MSVC binaries for SDL2 are also present in this repository under the lib
folder.
Creating Your Application
Creating a visual or interactive application using pix-engine requires
implementing only a single method of the PixEngine trait for your
application: PixEngine::on_update which gets executed as
often as possible. Within that function you'll have access to a mutable
PixState object which provides several methods for modifying
settings and drawing to the screen.
PixEngine provides additional methods that can be implemented to
respond to user events and handle application startup and teardown.
Here's an example application which simply draws a circle following the mouse and renders it white or black depending if the mouse is held down or not:
use pix_engine::prelude::*;

struct MyApp;

impl PixEngine for MyApp {
    // Set up application state and initial settings. `PixState` contains
    // engine specific state and utility methods for actions like getting mouse
    // coordinates, drawing shapes, etc. (Optional)
    fn on_start(&mut self, s: &mut PixState) -> PixResult<()> {
        // Set the background to GRAY and clear the screen.
        s.background(Color::GRAY);

        // Change the font family to NOTO and size to 16 instead of using the
        // defaults.
        s.font_family(Font::NOTO)?;
        s.font_size(16);

        // Returning `Err` instead of `Ok` would indicate initialization failed,
        // and that the application should terminate immediately.
        Ok(())
    }

    // Main update/render loop. Called as often as possible unless
    // `target_frame_rate` was set with a value. (Required)
    fn on_update(&mut self, s: &mut PixState) -> PixResult<()> {
        // Set fill color to black if mouse is pressed, otherwise wite.
        if s.mouse_pressed() {
            s.fill(color!(0));
        } else {
            s.fill(color!(255));
        }

        // Draw a circle with fill color at the mouse position with a radius of
        // 80.
        let m = s.mouse_pos();
        s.circle([m.x(), m.y(), 80])?;

        Ok(())
    }

    // Clean up any state or resources before exiting such as deleting temporary
    // files or saving game state. (Optional)
    fn on_stop(&mut self, s: &mut PixState) -> PixResult<()> {
        Ok(())
    }
}

fn main() -> PixResult<()> {
    let mut engine = Engine::builder()
      .dimensions(800, 600)
      .title("MyApp")
      .show_frame_rate()
      .resizable()
      .build()?;
    let mut app = MyApp;
    engine.run(&mut app)
}
Features
Crate Feature Flags
The following features can be added to your Cargo.toml depending on your
needs. e.g.:
[dependencies.pix-engine]
version = "0.6.0"
default-features = false
features = ["serde"]
-
serde - Adds serde
Serialize/Deserializeimplementations for all enums/structs. -
backtrace - Enables the
backtracefeature for anyhow, which allows printing backtraces based on environment variables outlined in std::backtrace. Useful for debugging. -
opengl - Forces
sdl2to useopenglas its renderer. This feature is disabled by default, allowingsdl2to use whichever renderer it defaults to on the target system. For example, macOS defaults tometal.
PixState
PixState is the global application context for the entire
pix-engine lifecycle from setup to teardown. It contains all of the settings
and methods required to draw pixels to the screen, manage windows, textures,
rendering settings, etc. See Creating Your
Application for a brief introduction to the engine
lifecycle methods and examples of using PixState.
Drawing
All of the drawing primitives for drawing shapes, text, or UI widgets are all
available on the PixState instance. Some methods are only
available when the corresponding traits are in scope. Many traits are included
by default in the prelude.
Some examples:
// Draw a circle at `(x, y)` coordinates`(0, 0)` with a radius of `80`.
s.circle([0, 0, 80])?;

// Draw a rectangle at `(x, y)` coordinates `(10, 20)` with a width `80` and a
// height of `100`.
s.rect([10, 20, 80, 100])?;
There are also several convenience macros for creating shapes that can be used
for drawing, or storing inside a struct:
// Create a triangle with points at `(x, y)` coordinates `(10, 20)`, `(30, 10)`,
// `(20, 25)`.
let t = tri!([10, 20], [30, 10], [20, 25]);

// Create a 3D point at `(x, y, z)` coordinates `(10, 20, 10)`.
let p = point!(10, 20, 10);

// Create a square at point `p` with a width/height of `100`.
let r = square!(p, 100);
Textures
Textures are simple a representation of pixels but have some extra flexibility:
- They can be drawn to separately from the primary canvas being rendered.
- They can be transformed, clipped, or modified.
- They can be blended together and overlayed on each other.
By default, all drawing operations target the primary window canvas. Once drawn, the pixels are static and can only be drawn over. Using textures allows you to create things like draggable elements, popups, animation sprites, etc.
To create a texture:
// Create a texture with a width and height of 256, formatting as RGB with no
// alpha channel. You can also provide `None` as the format which will inherit
// the format of the current window.
let texture_id = s.create_texture(256, 256, PixelFormat::Rgb);

// Draw to the texture. These changes are not visible in the window.
s.set_texture_target(texture_id)?;
s.background(Color::BLACK);
s.text("Hello World!");
s.clear_texture_target();

// Now draw the texture to the current canvas. Specifying `None` as the `src`
// argument means use the entire texture size. The `dst` here is double the
// original texture which has the effect of scaling the texture by 2.
s.texture(texture_id, None, rect!(0, 0, 512, 512))?;

// To clean up unused textures, simply delete them.
s.delete_texture(texture_id)?;
Audio
A limited form of audio support is available, with wider support coming soon. By default, an audio queue is available that you can push samples to:
s.resume_audio(); // Audio queue starts in a `Paused` state.

// Some method generating `f32` samples between 0.0 and 1.0
let samples = generate_audio();
s.enqueue_audio(&samples);
There is also an AudioCallback trait you can
implement for doing callback-based audio generation. See the examples/ folder
for details. Using this callback you can also do limited audio recording and
playback with a microphone.
UI
Overview
pix-engine offers an immediate mode graphical user interface (IMGUI)
library which allows for rapid UI development that is performant and simple to
setup/iterate on. Some limitations:
- Styling is limited to simple color themes and spacing.
- No animations or graphical effects.
- Limited layout constructs - more complicated layouts require carefully crafted code.
- Limited responsiveness for changes in viewport.
Much of the API design is inspired by Dear ImGui, but note the following differences:
- There are no window rendering utilities or features. Instead, separate native windows can be opened with UI elements rendered within. This approach simplifies window management by leveraging the native window features like minimize, maximize, resizing, etc.
End-User Guide
Tab/Shift-Tabcycles focus through interactable elements.Enter/Returnon an active element simulates clicking on it.Ctrl+Click(Cmd+Clickon macOS) on a slider or drag box to edit the value as text.- Pressing
Tab/Escape/Returnexits editing mode.
- Pressing
- The mouse wheel can scroll elements that are out of view.
- Text Fields:
Ctrl+Backspace(Cmd+Backspaceon macOS) to delete all content.Alt+Backspace(Option+Backspaceon macOS) to delete a single word.Ctrl+X(Cmd+Xon macOS) to cut contents to the system clipboard.Ctrl+C(Cmd+Con macOS) to copy contents to the system clipboard.Ctrl+V(Cmd+Von macOS) to paste contents from the system clipboard.
Programmer Notes
- See
guiin theexamples/folder to get started. - The UI is generated in code with UI method calls executed on the
PixStateinstance in thePixState::on_updaterender loop which is called every frame. - Elements are rendered in-order from top-left, to bottom-right.
- Unless explicitly changed, each element will position itself below the
previous element. Calling
PixState::same_linewill shift position to the right of the previous element.
Windows
As your application grows, you may find the need to have different views open
simultaneously. This can be done by opening up additional windows to render
into. Each window has it's own canvas, while sharing the global PixState
context settings. The API is very similar to working with textures.
// Create a window with size of 800x600.
let window_id = s
  .window()
  .dimensions(800, 600)
  .title("My Window")
  .position_centered()
  .build()?;

// Draw to the window. These changes are immediately visible in the window.
s.set_window_target(window_id)?;
s.background(Color::BLACK);
s.fill(Color::RED);
s.text("Hello World!");
s.reset_window_target();

// A user can either close the window with the `X` button, `Ctrl-W`, `Alt-F4`,
// etc. or you can close it programatically.
s.close_window(window_id)?;
Note: One thing to consider when creating and managing widnows is that when a window gets closed, its ID becomes invalid. Attempting to draw in an invalid window will return an error. Thus, most window creation will also require removing invalid window IDs from their application:
fn on_window_event(
    &mut self,
    _s: &mut PixState,
    window_id: WindowId,
    event: WindowEvent,
) -> PixResult<()> {
    if event == WindowEvent::Close && self.popup_window == Some(window_id) {
      self.popup_window = None;
    }
    Ok(())
}
Logging
This library uses the log crate. To leverage
logging in your application, choose one of the supported logger implementations
and initialize it in your main function.
Example using env_logger:
fn main() -> PixResult<()> {
    env_logger::init();

    let mut engine = Engine::builder()
      .dimensions(800, 600)
      .title("MyApp")
      .build()?;
    let mut app = MyApp;
    engine.run(&mut app)
}
Known Issues
See the github issue tracker.
License
Licensed under either of
- Apache License, Version 2.0 (LICENSE-APACHE)
- MIT license (LICENSE-MIT)
at your option.
Contribution
Unless you explicitly state otherwise, any contribution intentionally submitted for inclusion in the work by you, as defined in the Apache-2.0 license, shall be dual licensed as above, without any additional terms or conditions.
Contact
For issue reporting, please use the github issue tracker. You can also contact me directly at https://lukeworks.tech/contact/.
Credits
This has been a true passion project for several years and I can't thank the open source community enough for the all the amazing content and support.
A special shout out to the following projects which heavily inspired the implementation and evolution of this crate:
- OneLoneCoder and the olcPixelGameEngine.
- The Coding Train and p5js.
- Dear ImGui
Dependencies
~3–12MB
~144K SLoC