1 unstable release
| 0.19.0 | Feb 25, 2023 |
|---|
#957 in Command-line interface
Used in 2 crates
400KB
12K
SLoC
THIS IS A FORK, PLEASE USE THE OFFICIAL REPO
lib.rs:
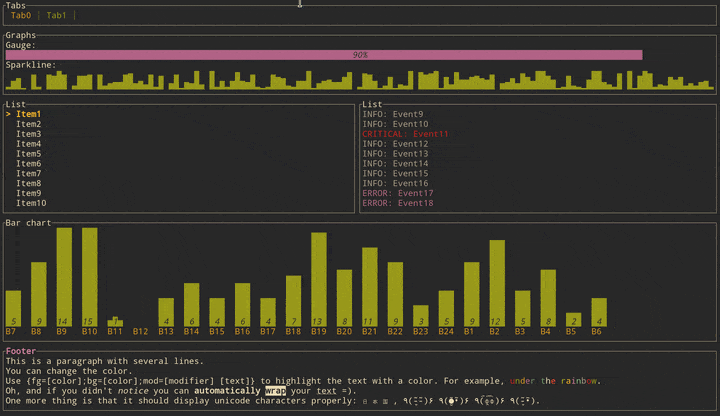
tui is a library used to build rich terminal users interfaces and dashboards.
Get started
Adding tui as a dependency
[dependencies]
tui = "0.19"
crossterm = "0.25"
The crate is using the crossterm backend by default that works on most platforms. But if for
example you want to use the termion backend instead. This can be done by changing your
dependencies specification to the following:
[dependencies]
termion = "1.5"
tui = { version = "0.19", default-features = false, features = ['termion'] }
The same logic applies for all other available backends.
Creating a Terminal
Every application using tui should start by instantiating a Terminal. It is a light
abstraction over available backends that provides basic functionalities such as clearing the
screen, hiding the cursor, etc.
use std::io;
use tui::{backend::CrosstermBackend, Terminal};

fn main() -> Result<(), io::Error> {
    let stdout = io::stdout();
    let backend = CrosstermBackend::new(stdout);
    let mut terminal = Terminal::new(backend)?;
    Ok(())
}
If you had previously chosen termion as a backend, the terminal can be created in a similar
way:
use std::io;
use tui::{backend::TermionBackend, Terminal};
use termion::raw::IntoRawMode;

fn main() -> Result<(), io::Error> {
    let stdout = io::stdout().into_raw_mode()?;
    let backend = TermionBackend::new(stdout);
    let mut terminal = Terminal::new(backend)?;
    Ok(())
}
You may also refer to the examples to find out how to create a Terminal for each available
backend.
Building a User Interface (UI)
Every component of your interface will be implementing the Widget trait. The library comes
with a predefined set of widgets that should meet most of your use cases. You are also free to
implement your own.
Each widget follows a builder pattern API providing a default configuration along with methods
to customize them. The widget is then rendered using Frame::render_widget which takes
your widget instance and an area to draw to.
The following example renders a block of the size of the terminal:
use std::{io, thread, time::Duration};
use tui::{
    backend::CrosstermBackend,
    widgets::{Widget, Block, Borders},
    layout::{Layout, Constraint, Direction},
    Terminal
};
use crossterm::{
    event::{self, DisableMouseCapture, EnableMouseCapture, Event, KeyCode},
    execute,
    terminal::{disable_raw_mode, enable_raw_mode, EnterAlternateScreen, LeaveAlternateScreen},
};

fn main() -> Result<(), io::Error> {
    // setup terminal
    enable_raw_mode()?;
    let mut stdout = io::stdout();
    execute!(stdout, EnterAlternateScreen, EnableMouseCapture)?;
    let backend = CrosstermBackend::new(stdout);
    let mut terminal = Terminal::new(backend)?;

    terminal.draw(|f| {
        let size = f.size();
        let block = Block::default()
            .title("Block")
            .borders(Borders::ALL);
        f.render_widget(block, size);
    })?;

    thread::sleep(Duration::from_millis(5000));

    // restore terminal
    disable_raw_mode()?;
    execute!(
        terminal.backend_mut(),
        LeaveAlternateScreen,
        DisableMouseCapture
    )?;
    terminal.show_cursor()?;

    Ok(())
}
Layout
The library comes with a basic yet useful layout management object called Layout. As you may
see below and in the examples, the library makes heavy use of the builder pattern to provide
full customization. And Layout is no exception:
use tui::{
    backend::Backend,
    layout::{Constraint, Direction, Layout},
    widgets::{Block, Borders},
    Frame,
};
fn ui<B: Backend>(f: &mut Frame<B>) {
   let chunks = Layout::default()
        .direction(Direction::Vertical)
        .margin(1)
        .constraints(
            [
                Constraint::Percentage(10),
                Constraint::Percentage(80),
                Constraint::Percentage(10)
            ].as_ref()
        )
        .split(f.size());
    let block = Block::default()
         .title("Block")
         .borders(Borders::ALL);
    f.render_widget(block, chunks[0]);
    let block = Block::default()
         .title("Block 2")
         .borders(Borders::ALL);
    f.render_widget(block, chunks[1]);
}
This let you describe responsive terminal UI by nesting layouts. You should note that by default the computed layout tries to fill the available space completely. So if for any reason you might need a blank space somewhere, try to pass an additional constraint and don't use the corresponding area.
Dependencies
~3–14MB
~104K SLoC