2 unstable releases
| 0.2.0 | Sep 15, 2022 |
|---|---|
| 0.1.0 | Apr 12, 2022 |
#370 in Email
165KB
1.5K
SLoC

service-io is a library to build servers that offering services with really little effort.
- Choose an input connector.
- Choose an output connector.
- Choose your services.
- Run it!
One of the main use-cases is to offer services without hosting a server.
How it works?

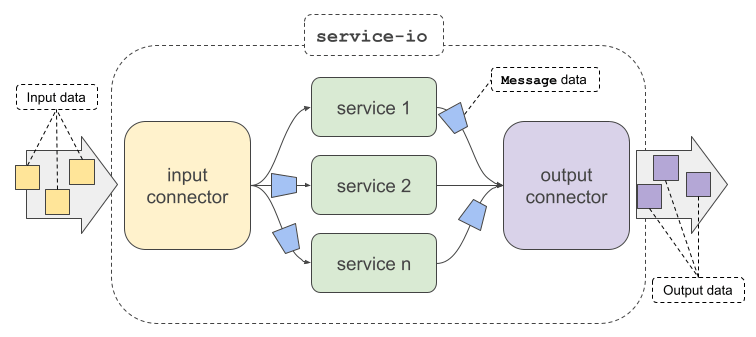
All of them, inputs/outputs and services "speak" the same language:
the Message type.
Inputs obtain and transform input data into a Message.
Services receive Messages and generate other Messages usually doing some kind of processing.
Outputs transform a Message into output data and deliver it.
Check the current built-in input/output connectors and services.
Features
- Easy to use. Running a server with a bunch of services with (really) few lines of code.
- Hostingless. Run custom server code without hosting server using the existing email infrastructure with the IMAP/SMTP connectors.
- Scalable. Create your own inputs/outputs/services implementing a trait with a single method. Check docs
- Multiplatform. Run your local service-server in any computer you have.
Getting Started
Add the following to your Cargo.toml
service-io = "0.1"
Example
By running this example in any of your home computer,
sending an email (as an example, to services@domain.com)
with public-ip in the subject, you will obtain a response email with your home public IP!
In a similar way, sending an email with process ls -l in the subject will return
an email with the files of the folder used to run the example.
use service_io::engine::Engine;
use service_io::connectors::{ImapClient, SmtpClient, imap};
use service_io::services::{PublicIp, Process, Echo, Alarm};
use service_io::secret_manager::PasswordManager;

#[tokio::main]
async fn main() {
    Engine::default()
        .input(
            ImapClient::default()
                .domain("imap.domain.com")
                .email("services@domain.com")
                .secret_manager(PasswordManager::new("1234")),
        )
        .output(
            SmtpClient::default()
                .domain("smtp.domain.com")
                .email("services@domain.com")
                .secret_manager(PasswordManager::new("1234")),
        )
        .add_service("echo", Echo)
        .add_service("alarm", Alarm)
        .add_service("public-ip", PublicIp)
        .add_service("process", Process)
        // Add any other service you want
        .run()
        .await;
}
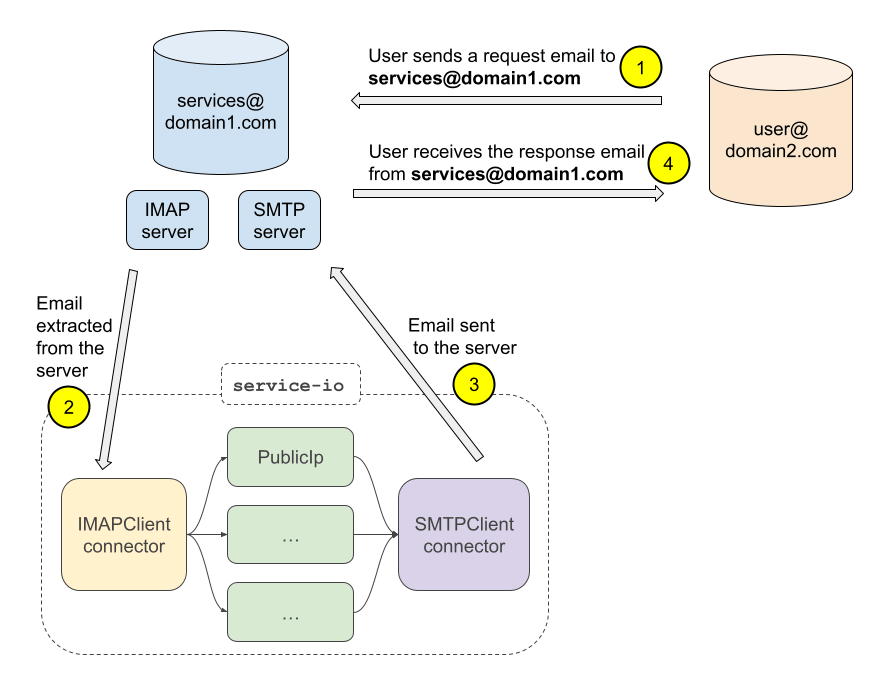
Any email sent to services@domain.com will be interpreted as a request by the ImapClient connector.
If the first word of the subject matches public-ip, the request will be processed by the PublicIp service.
The service PublicIp will generate a response that SmtpClient will be deliver by email
to the remitter of the request email.
Check the Engine type for additional methods as input mapping/filters or adding whitelists to your services.
Test it with a Google account!
Gmail only allow to use OAuth2 as access mechanism.
You can no longer use a password from an application to log in.
For that reason, in order to use the IMAP and SMTP connectors we need 3 values related to OAuth2: client_id, client_secret and refresh_token.
Follow the next steps to get it:
- Open your the google console associated to the gmail account you want to use.
- Create a new proyect.
- Add an OAuth 2.0 credential. This step will five you a
client_idandclient_secret. - Run the following script to generate a
refresh_token(this script is the python3 ported of the gmail-oauth2-tools):python3 util/oauth2.py --generate_oauth2_token --client_id=<client_id> --client_secret=<client_secret> - Open the navigator and copy the value it gives you into the console. This should show you the
refresh_token.
Now, test if it's working with the email_server example. Run:
cargo run --example email_server -- \
    --imap-domain imap.gmail.com \
    --smtp-domain smtp.gmail.com \
    --email <user>@gmail.com \
    --oauth2-path-url https://accounts.google.com/o/oauth2/v2/auth \
    --oauth2-token-url https://www.googleapis.com/oauth2/v3/token \
    --oauth2-client-id <client_id> \
    --oauth2-client-secret <client_secret>\
    --oauth2-refresh-token <refresh_token>\
    -vv
If you send an email with subject s-echo to your <user>@gmail.com, in few seconds you should receive the same email.
Congratulation! You have your own hostingless server.
Hostingless server use-case
If you want to offer some custom service that uses custom server code you are forced to pay and maintain a hosting server, even if the service you are offering is eventual or does not use many resources.
To solve this problem, you can use the already existent email infrastructure using the IMAP and SMTP protocols to handle the emails as requests/responses and link them with your services.
service-io helps in this context.
Run locally an instance of service-io with IMAP/SMTP connectors.
The IMAP connector will periodically fetch the emails your clients sends,
then your services will process those emails and generate a response,
and finally the SMTP connector will deliver the response emails back to the user.
Anyone from any device with an email client can interact with your local server deployment. There is no hosting maintenance and no front-end app development.

Contribute
-
Have you implemented a service or connector? If its functionallity is not private, share it with others! Make a Pull Request so everyone can use it :)
-
Do you have any cool idea, found a bug or have any question or doubt? Do not hesitate and open an issue!
Dependencies
~17–33MB
~596K SLoC