3 releases
| 0.0.3 | Oct 11, 2020 |
|---|---|
| 0.0.2 | Sep 13, 2020 |
| 0.0.1 | Sep 2, 2020 |
#63 in #snapshot
95KB
2K
SLoC
Parrot 🦜
A command-line snapshot testing tool for your scripts and CLI programs.
parrot allows you to take and organize snapshots of your program outputs (status code, stdout and stderr) and later check that those ouputs are still the same.
Features
- Effortless end-to-end testing of scripts and CLI programs.
- Organize snapshots with tags.
- Interactive REPL to navigate and interact with your snapshots.
Disclaimer
This project is still under development, it may have rough corners and the interface may change overtime. Don't hesitate to try it for small projects, but don't rely solely on parrot for your production grade software test suite.
Table of contents
Installation
You first need to install Rust, then you can install parrot with
cargo install parrot-snap
Usage
To use parrot with your project, you first have to initialize it:
parrot init
This will create a .parrot folder that will hold all your snapshots. You can then add your first snapshot:
parrot add 'echo "Hello, world!"'
parrot will show you a preview of the snapshot and ask for confirmation. If you decide to save the snapshot parrot will open your favorite editor, there you can edit the description file: the first line will be used as the snapshot name, the rest as description. Exit your editor and you're good, you've created your first snapshot.
You can now check that your program's outputs didn't change with:
parrot run
For a more interactive experience, for instance while developing, you can open parrot's REPL with:
parrot
From there you can navigate snapshots and execute commands.
Principle
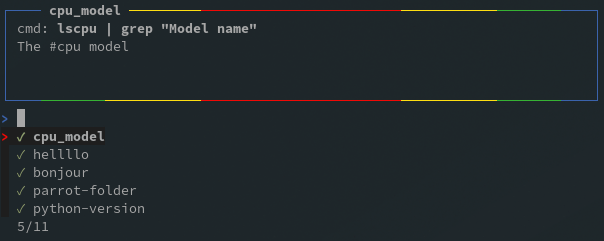
A central feature of parrot is the ability to add tags to snapshots: each time you add snapshot you are asked for a name and a description, if you put hashtags in the descriptions (like #this) those can be use later to browse and run your snapshots.
While parrot is running, it maintains a view of your snapshots. You can modify that view with the filter and clear commands (see next section) to search by names, tags or even failing snapshots. By using tag wisely you can easily run only the part of your test set that correspond to what you are working on, or infer the issue by browsing tags of failing tests.
Commands
You can interact with snapshots by using commands, either by executing them directly:
parrot exec 'f #demo; r*"
Or in the REPL (parrot's interactive shell):
parrot
Most commands have a 1 letter shorthand version to help you get things done faster. You can also execute multiple commands by separating them with semi-colons: ;, this is especially handy with parrot exec subcommand.
Here is the list of available commands and their descriptions:
Quit (q)
quit
q
Quit parrot.
Help (h)
help
h
Display the commands cheat-sheet.
Filter (f)
filter <name>
f <name>
f #<tag>
f ~
f +
f -
Apply a filter to the current view:
<name>: Select all snapshots with a name containing<name>.#<tag>: Select all snapshots with the tag<tag>.~: Select all snapshots with 'waiting to be run' status.+: Select all snapshots with 'passed' status.-: Select all snapshots withh 'failed' status.
Clear (c)
clear
c
Remove all filters from the current view.
Run (r)
run
r
r *
Run the selected snapshot, or all snapshots in the current view if * is passed as argument.
Show (s)
show
s
s *
Show the selected snapshot, or all snapshots in the current view if * is passed as argument.
Edit (e)
edit
e
Edit the selected snapshot name or description.
Update (u)
update
u
u *
Update the selected snapshot by running the command and saving the new outputs. Update all the snapshots in the current view if * is passed as argument.
Delete (d)
delete
d
d *
Delete the selected snapshot, or all snapshots in the current view if * is passed as argument.
Customization
Editor
To decide which editor to use, parrot looks at the EDITOR environment variable, you can change your default editor by setting this variable:
export EDITOR=nvim
Theme
The default theme (shown above) is scarlet, inspired by the eponymous macaw, but there is a handful of other themes you can choose from:
| theme | preview |
|---|---|
| scarlet | |
| blue-and-yellow | |
| yellow-crested | |
| military | |
| hyacinth | |
| gray |
To set a theme update the PARROT_THEME variable:
export PARROT_THEME=hyacinth
If your terminal does not support true colors, there is an ansi theme you can still use:
export PARROT_THEME=ansi
Current limitations
parrot is developed and tested on Linux, it should work on MacOS too (can someone confirm that?).
Dependencies
~6.5–8.5MB
~150K SLoC