7 releases
| 0.3.4 | Mar 27, 2024 |
|---|---|
| 0.3.3 | Mar 27, 2024 |
| 0.3.1 | Sep 16, 2023 |
| 0.2.0 | Sep 16, 2023 |
| 0.1.0 | Feb 9, 2023 |
#5 in #clarity
730 downloads per month
Used in 12 crates
(9 directly)
11KB
283 lines
Clarinet
Clarinet is a Clarity runtime packaged as a command line tool, designed to facilitate smart contract understanding, development, testing and deployment. Clarinet consists of a Clarity Read-Evaluate-Print-Loop (REPL) environment and a testing harness. When used together, Clarity and the REPL environment enable you to rapidly develop and test a Clarity smart contract, allowing you to deploy the contract to devnet, testnet, or mainnet.
Clarity is a decidable smart contract language that optimizes for predictability and security, meaning you can know with certainty, from the code itself, what the program will do. Smart contracts allow you to encode essential business logic on a blockchain.

Clarinet 101
Hiro has created an introductory video tutorial series that guides you through some of the fundamentals of Clarinet, and how it can help develop, test, and deploy Clarity smart contracts. You can watch the series here.
Installation
Install on macOS (Homebrew)
To install Clarinet on macOS, run the following command:
brew install clarinet
Install on Windows
If you would like to install Clarinet on Windows, the easiest way to install Clarinet on Windows is to use the MSI installer. You can download the executable from the releases page.
Clarinet is also available on Winget; the package manager that Microsoft began including in the latest Windows updates:
winget install clarinet
Install from a pre-built binary
To install Clarinet from pre-built binaries, download the latest release from the releases page.
Unzip the binary, then copy it to a location that is already in your path, such as /usr/local/bin.
# note: you can change the v0.27.0 with version that are available in the releases page.
wget -nv https://github.com/hirosystems/clarinet/releases/download/v0.27.0/clarinet-linux-x64-glibc.tar.gz -O clarinet-linux-x64.tar.gz
tar -xf clarinet-linux-x64.tar.gz
chmod +x ./clarinet
mv ./clarinet /usr/local/bin
On MacOS, you may get security errors when trying to run the pre-compiled binary. You can resolve the security warning with command
xattr -d com.apple.quarantine /path/to/downloaded/clarinet/binary
Install from source using Cargo
If you would like to install Clarinet from source using Cargo, there are some specific steps you will need to follow, which are described below.
Prerequisites
You must first Install Rust to use the Rust package manager Cargo.
If you are using Debian and Ubuntu-based distributions, make sure to run the following command to install required packages before building Clarinet.
sudo apt install build-essential pkg-config libssl-dev curl
Build Clarinet
When you are ready to build Clarinet, you can build from source using Cargo with the following commands:
git clone https://github.com/hirosystems/clarinet.git
cd clarinet
cargo clarinet-install
By default, you will be in Hiro's development branch, develop, with code that has not been released yet. If you plan on submitting any changes to the code, then this is the right branch for you.
If you want the latest stable version, switch to the main branch by entering the following command:
git checkout main
Getting started with Clarinet
The following sections describe how to create a new project in Clarinet and populate it with smart contracts. Clarinet also provides tools for interacting with your contracts in a REPL, and performing automated testing of contracts.
Setup shell completions
Clarinet has many different built-in commands, which are useful to enable tab-completion in your shell. You can use clarinet to generate the shell completion scripts for many common shells using the command:
clarinet completions (bash|elvish|fish|powershell|zsh)
After generating the file, please refer to the documentation for your shell to determine where this file should be moved and what other steps may be necessary to enable tab-completion for clarinet.
Create a new project
Once you have installed Clarinet, you can create a new project by entering the following command:
clarinet new my-project && cd my-project
Clarinet will create a project directory with the following directory layout:
.
├── Clarinet.toml
├── contracts
├── settings
│   └── Devnet.toml
│   └── Testnet.toml
│   └── Mainnet.toml
└── tests
The Clarinet.toml file contains configuration for the smart contracts in your project. When you create contracts in
your project, Clarinet will add them to this file.
The settings/Devnet.toml file contains configuration for accounts in the Clarinet console, including the seed
phrases and initial balances. Initial balances are in microSTX.
For a detailed video description on how you can create a new project, please see the Creating a New Project YouTube video.
Add a new contract
Clarinet can handle adding a new contract and its configuration to your project with the following command:
clarinet contract new bbtc
Clarinet will add 2 files to your project: the contract file in the contracts directory, and the contract test file
in the tests directory.
.
├── Clarinet.toml
├── contracts
│   └── bbtc.clar
├── settings
│   └── Devnet.toml
│   └── Mainnet.toml
│   └── Testnet.toml
└── tests
    └── bbtc_test.ts
Clarinet will also add configuration to the Clarinet.toml file for your contract.
[project.cache_location]
path = ".cache"
[contracts.bbtc]
path = "contracts/bbtc.clar"
You may add contracts to your project by adding the files manually; however, you must add the appropriate configuration
to Clarinet.toml in order for Clarinet to recognize the contracts.
Check your contracts
Clarinet provides syntax and semantics checkers for Clarity, which enable you to check if the Clarity code in your project is valid by using the following command:
clarinet check
This command uses the Clarinet.toml file to locate and analyze all of the contracts in the project. If the Clarity code is valid, the command will indicate success with the following message:
✔ 2 contracts checked
The checker may also report warnings that indicate the code is valid; however, you should be aware of a specific condition that might arise. For example, the check-checker analysis discussed below will generate warnings. If there are errors in the code, the output of the command will indicate the kind and location of the errors.
You may also perform syntax-check on a single file by using the following command.
clarinet check <path/to/file.clar>
If there are no syntax errors, the output of the command will be a success message similar to the example below.
✔ Syntax of contract successfully checked
Note Any syntactical errors in the Clarity code will be reported, but type-checking and other semantic checks will not be performed because Clarinet will only look at this one contract, since it does not have the full context to perform a complete check.
Static Analysis
Check-Checker
The check-checker is a static analysis pass you can use to help find potential vulnerabilities in your contracts. To enable this pass, add the following lines to your Clarinet.toml file:
[repl.analysis]
passes = ["check_checker"]
The check-checker pass analyzes your contract to identify places where untrusted inputs might be used in a potentially dangerous way. Since public functions can be called by anyone, any arguments passed to these public functions should be considered untrusted. This analysis pass takes the opinion that all untrusted data must be checked before being used to modify the state on the blockchain. Modifying the state includes any operations that affect wallet balances, or any data stored in your contracts.
- Actions on Stacks wallets:
- stx-burn?
- stx-transfer?
- Actions on fungible tokens:
- ft-burn?
- ft-mint?
- ft-transfer?
- Actions on non-fungible tokens:
- nft-burn?
- nft-mint?
- nft-transfer?
- Actions on persisted data:
- Maps:
- map-delete
- map-insert
- map-set
- Variables:
- var-set
- Maps:
In addition to those operations, the check-checker is also a bit opinionated and prefers that untrusted data be checked near the source, making the code more readable and maintainable. For this reason, the check-checker also requires that arguments passed into private functions and return values must be checked.
- Calls to private functions
- Return values
Finally, another opportunity for exploits appears when contracts call functions from traits. Those traits are untrusted, just like other parameters to public functions, so they are also required to be checked.
- Dynamic contract calls (through traits)
When an untrusted input is used in one of these ways, you will see a warning like this:
bank:27:37: warning: use of potentially unchecked data
        (as-contract (stx-transfer? (to-uint amount) tx-sender customer))
                                    ^~~~~~~~~~~~~~~~
bank:21:36: note: source of untrusted input here
(define-public (withdrawal-unsafe (amount int))
In the case where an operation affects only the sender's own wallet (e.g. calling stx-transfer? with the sender set to tx-sender), then there is no need to generate a warning, because the untrusted input is only affecting the sender, who is the source of that input. To put it another way, the sender should be able to safely specify parameters in an operation that affects only themselves. This sender is also potentially protected by post-conditions.
For a more detailed description on how to use the Check-Checker, please see the Catch Smart Contract Vulnerabilities With Clarinet’s Check-Checker Feature YouTube video.
Options
The check-checker provides some options that can be specified in Clarinet.toml to handle common usage scenarios that may reduce false positives from the analysis:
[repl.analysis.check_checker]
strict = false
trusted_sender = true
trusted_caller = true
callee_filter = true
If strict is set to true, all other options are ignored and the analysis proceeds with the most strict interpretation of the rules.
The trusted_sender and trusted_caller options handle a common practice in smart contracts where there is a concept of a trusted transaction sender (or transaction caller), which is treated like an admin user. Once a check has been performed to validate the sender (or caller), then all inputs should be trusted.
In the example below, the asserts! on line 3 is verifying the tx-sender. Because of that check, all inputs are trusted (if the trusted_sender option is enabled):
(define-public (take (amount int) (from principal))
    (let ((balance (- (default-to 0 (get amount (map-get? accounts {holder: from}))) amount)))
        (asserts! (is-eq tx-sender (var-get bank-owner)) err-unauthorized)
        (map-set accounts {holder: from} {amount: balance})
        (stx-transfer? (to-uint amount) (as-contract tx-sender) tx-sender)
    )
)
The callee_filter option loosens the restriction on passing untrusted data to private functions, and instead, allows checks in a called function to propagate up to the caller. This is helpful, because it allows you to define input checks in a function that can be reused.
In the example below, the private function validate checks its parameter. The public function save calls validate, and when the callee_filter option is enabled, that call to validate will count as a check for the untrusted input, amount, resulting in no warnings from the check-checker.
(define-public (save (amount uint))
    (begin
        (try! (validate amount))
        (var-set saved amount)
        (ok amount)
    )
)

(define-private (validate (amount uint))
    (let ((current (var-get saved)))
        (asserts! (> amount current) err-too-low)
        (asserts! (<= amount (* current u2)) err-too-high)
        (ok amount)
    )
)
Annotations
Sometimes, there is code that the check-checker analysis is unable to determine is safe; however, you know the code is safe. You want to pass this information to the check-checker to disable warnings that you consider to be false positives. To handle these cases, the check-checker supports several annotations, implemented using "magic comments" in the contract code.
#[allow(unchecked_params)]
This annotation tells the check-checker that the associated private function is allowed to receive unchecked arguments. It will not generate a warning for calls to this function that pass unchecked inputs. Inside the private function, the parameters are considered unchecked and could generate warnings.
;; #[allow(unchecked_params)]
(define-private (my-func (amount uint))
    ...
)
#[allow(unchecked_data)]
This annotation tells the check-checker that the following expression is allowed to use unchecked data without warnings. It should be used with care, since this will disable all warnings from the associated expression.
(define-public (dangerous (amount uint))
    (let ((sender tx-sender))
        ;; #[allow(unchecked_data)]
        (as-contract (stx-transfer? amount tx-sender sender))
    )
)
#[filter(var1, var2)]
This annotation tells the check-checker to consider the specified variables to be checked by the following expression. This is useful for the case where your contract does some indirect check that validates that an input is safe, but there is no way for the analysis to recognize this. In place of the list of variable names in the annotation, an * may be used to filter all inputs.
Note The command below is the safest and preferred way to silence warnings that you consider false positives.
(define-public (filter_one (amount uint))
    (let ((sender tx-sender))
        ;; #[filter(amount)]
        (asserts! (> block-height u1000) (err u400))
        (as-contract (stx-transfer? amount tx-sender sender))
    )
)
Execute a test suite
Warning:
clarinet testhas been be deprecated in Clarinet 2 in favor of a new way of testing smart contracts Learn more in the announcement blog post or in the clarinet-sdk Readme.
Load contracts in a console
The Clarinet console is an interactive Clarity REPL environment that runs in-memory. Any contracts in the current project will be automatically loaded into memory.
clarinet console
You can use the ::help command in the console for a list of valid commands, which can control the state of the
REPL chain, and allow you advance the chain tip. Additionally, you can enter Clarity commands into the console and observe
the result of the command.
You can exit the console by pressing Ctrl + C twice.
Changes to contracts are not loaded into the console while it is running. If you make any changes to your contracts you must exit the console and run it again.
Spawn a local Devnet
You can use Clarinet to deploy your contracts to your own local offline environment for testing and evaluation on a blockchain by using the following command:
clarinet devnet start
Note Make sure you have a working installation of Docker running locally.
Interacting with contracts deployed on Mainnet
Composition and interactions between protocols and contracts are one of the key innovations in blockchains. Clarinet was designed to handle these types of interactions.
Before referring to contracts deployed on Mainnet, these contracts should be explicitly be listed as a requirement in the manifest Clarinet.toml, either manually:
[project]
name = "my-project"
[[project.requirements]]
contract_id = "SP2KAF9RF86PVX3NEE27DFV1CQX0T4WGR41X3S45C.bitcoin-whales"
or with the command:
clarinet requirements add SP2KAF9RF86PVX3NEE27DFV1CQX0T4WGR41X3S45C.bitcoin-whales
When adding a contract requirement to your project, the epoch of your contracts listed in the Clarinet.toml must be greater than or equal to the epoch of the required contract.
For example, if the contract SP3K8BC0PPEVCV7NZ6QSRWPQ2JE9E5B6N3PA0KBR9.amm-swap-pool-v1-1 is added as a requirement, the contracts using this requirement would need to have an epoch of at least 2.3 in the Clarinet.toml:
[[project.requirements]]
contract_id = 'SP3K8BC0PPEVCV7NZ6QSRWPQ2JE9E5B6N3PA0KBR9.amm-swap-pool-v1-1'

[contracts.test]
path = 'contracts/test.clar'
clarity_version = 2
epoch = 2.3
Clarinet will be able to resolve the contract-call? statements invoking requirements present in your local contracts by downloading and caching a copy of these contracts and using them during the execution of your test suites. All of the different features are available in clarinet.
When deploying your protocol to Devnet / Testnet, for the contracts involving requirements, the setting remap_requirements in your deployment plans must be set.
As a step-by-step example, we use here the following contract, bitcoin-whales
If you examine this contract, you will see that there are 3 different dependencies: two from the same project (included in the same Clarinet.toml file), and one referring to a contract deployed outside of the current project.
Same Project
In the contract snippet shown below (line:260-265), there are dependencies on the contracts conversion and conversion-v2 which are included in the same Clarinet.toml file.
(define-read-only (get-token-uri (token-id uint))
  (if (< token-id u5001)
    (ok (some (concat (concat (var-get ipfs-root) (unwrap-panic (contract-call? .conversion lookup token-id))) ".json")))
    (ok (some (concat (concat (var-get ipfs-root) (unwrap-panic (contract-call? .conversion-v2 lookup (- token-id u5001)))) ".json")))
    )
)
External Deployer
In this code snippet, there is a dependency on the nft-trait (line:001) deployed by 'SP2PABAF9FTAJYNFZH93XENAJ8FVY99RRM50D2JG9.
(impl-trait 'SP2PABAF9FTAJYNFZH93XENAJ8FVY99RRM50D2JG9.nft-trait.nft-trait)
- Dependencies from external contracts should be set in
[[project.requirements]]
[project]
name = "my-project"

[[project.requirements]]
contract_id = "SP2PABAF9FTAJYNFZH93XENAJ8FVY99RRM50D2JG9.nft-trait"

[project.cache_location]
path = ".cache"

[contracts.bitcoin-whales]
path = "contracts/bitcoin-whales.clar"

[contracts.conversion]
path = "contracts/conversion.clar"

[contracts.conversion-v2]
path = "contracts/conversion-v2.clar"

[repl.analysis]
passes = ["check_checker"]

[repl.analysis.check_checker]
strict = false
trusted_sender = false
trusted_caller = false
callee_filter = false
As a next step we can generate a deployment plan for this project. If you are running clarinet devnet start for the first time, this file should be created by Clarinet. In addition, you can run clarinet deployment generate --devnet to create or overwrite the file.
---
id: 0
name: Devnet deployment
network: devnet
stacks-node: "http://localhost:20443"
bitcoin-node: "http://devnet:devnet@localhost:18443"
plan:
  batches:
    - id: 0
      transactions:
        - requirement-publish:
            contract-id: SP2PABAF9FTAJYNFZH93XENAJ8FVY99RRM50D2JG9.nft-trait
            remap-sender: ST1PQHQKV0RJXZFY1DGX8MNSNYVE3VGZJSRTPGZGM
            remap-principals:
              SP2PABAF9FTAJYNFZH93XENAJ8FVY99RRM50D2JG9: ST1PQHQKV0RJXZFY1DGX8MNSNYVE3VGZJSRTPGZGM
            cost: 4680
            path: ".requirements\\SP2PABAF9FTAJYNFZH93XENAJ8FVY99RRM50D2JG9.nft-trait.clar"
        - contract-publish:
            contract-name: conversion
            expected-sender: ST1PQHQKV0RJXZFY1DGX8MNSNYVE3VGZJSRTPGZGM
            cost: 340250
            path: "contracts\\conversion.clar"
            anchor-block-only: true
        - contract-publish:
            contract-name: conversion-v2
            expected-sender: ST1PQHQKV0RJXZFY1DGX8MNSNYVE3VGZJSRTPGZGM
            cost: 351290
            path: "contracts\\conversion-v2.clar"
            anchor-block-only: true
        - contract-publish:
            contract-name: bitcoin-whales
            expected-sender: ST1PQHQKV0RJXZFY1DGX8MNSNYVE3VGZJSRTPGZGM
            cost: 87210
            path: "contracts\\bitcoin-whales.clar"
            anchor-block-only: true
As the example above shows, Clarinet will remap the external contract to Hiro's Devnet address. In addition, it will also create a copy of the contract in the folder requirements
Deploy contracts to Devnet / Testnet / Mainnet
You can use Clarinet to publish your contracts to Devnet / Testnet / Mainnet environment for testing and evaluation on a blockchain.
The first step to deploy a contract is to generate a deployment plan, with the following command:
clarinet deployment generate --mainnet
After cautiously reviewing (and updating if needed) the generated plan, you can use the command to handle the deployments of your contract, according to your deployment plan:
clarinet deployment apply -p <path-to-plan.yaml>
Use Clarinet in your CI workflow as a GitHub Action
Clarinet may also be used in GitHub Actions as a step of your CI workflows.
You may set-up a simple workflow by adding the following steps in a file .github/workflows/github-actions-clarinet.yml:
name: CI
on: [push]
jobs:
  tests:
    name: "Test contracts with Clarinet"
    runs-on: ubuntu-latest
    steps:
      - name: "Checkout code"
        uses: actions/checkout@v3
      - name: "Check contract syntax"
        uses: docker://hirosystems/clarinet:latest
        with:
          args: check
      - name: "Setup Node.js"
        uses: actions/setup-node@v4
        with:
          node-version: "18.x"
      - name: "Prep CI"
        run: npm ci
      - name: "Execute unit tests"
        run: npm run test:report
      - name: "Upload code coverage"
        uses: codecov/codecov-action@v3
        with:
          files: ./coverage.lcov
          verbose: true
You may also add the steps above in your existing workflows. The generated code coverage output can then be used as is with GitHub Apps like https://codecov.io.
For more information on how you can use GitHub Actions with Clarinet, please see the A Simple CI With Clarinet and GitHub YouTube video
Debug your contracts
VS Code Debugger
Clarinet supports the Debug Adapter Protocol (DAP) which enables you to debug your smart contracts inside of VS Code, or any code editor that supports the DAP protocol.
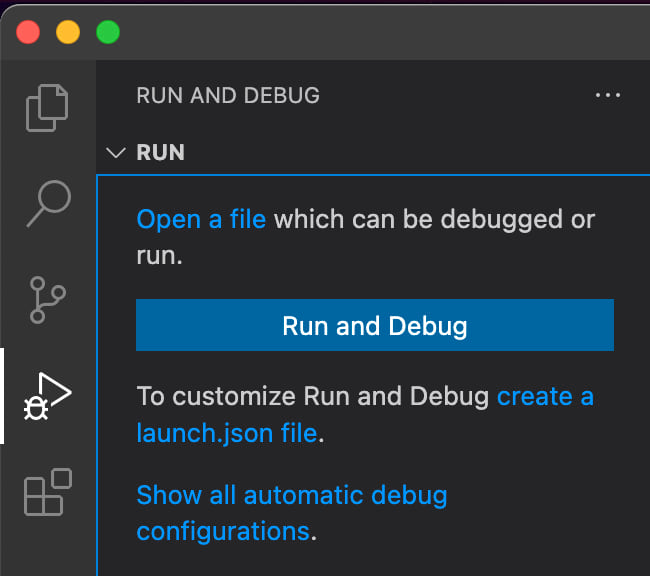
To setup a debug session, you will first need to create a launch.json file to tell VS Code what you want to debug. The easiest way to do this is to let VS Code generate the template for you by opening the "Run and Debug" view and clicking "create a launch.json file".
This will create the file .vscode/launch.json with the default template:
{
  // Use IntelliSense to learn about possible attributes.
  // Hover to view descriptions of existing attributes.
  // For more information, visit: https://go.microsoft.com/fwlink/?linkid=830387
  "version": "0.2.0",
  "configurations": [
    {
      "type": "clarinet",
      "request": "launch",
      "name": "Call .foo.bar",
      "manifest": "${workspaceFolder}/Clarinet.toml",
      "expression": "(contract-call? .foo bar 42)"
    }
  ]
}
Depending on your needs, you will want to set the name field to whatever makes sense for your project, then set the expression to the Clarity expression that you would like to debug. In the case of the default example shown in the template above, the debugger would start executing the bar function of the foo contract, passing the argument 42. Once this file is configured, the debugger works as expected for any VS Code debugging.
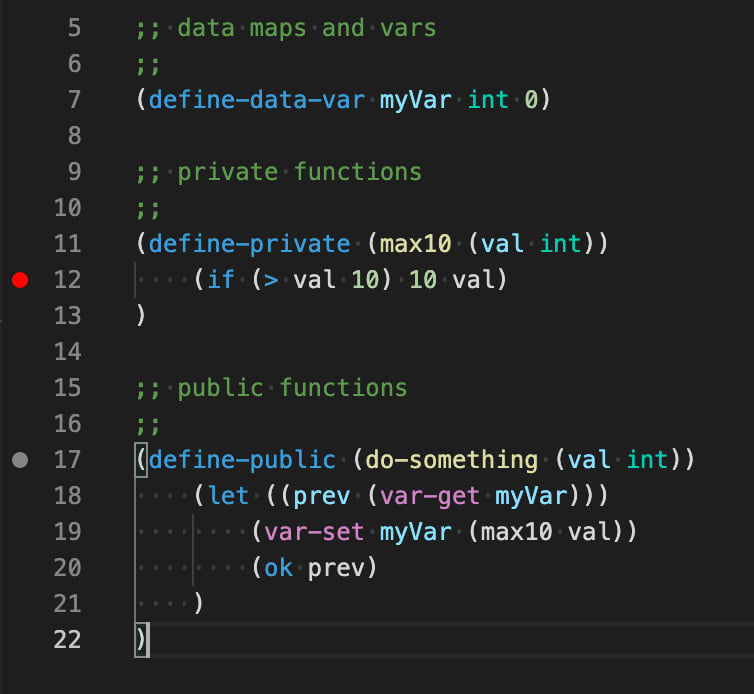
Execution begins paused at the first expression. The debug toolbar includes buttons to continue, step over, step into, step out, restart, and stop, in that order.

Breakpoints can be set by clicking in the left gutter next to the code or using the right-click menu at a specific code location.
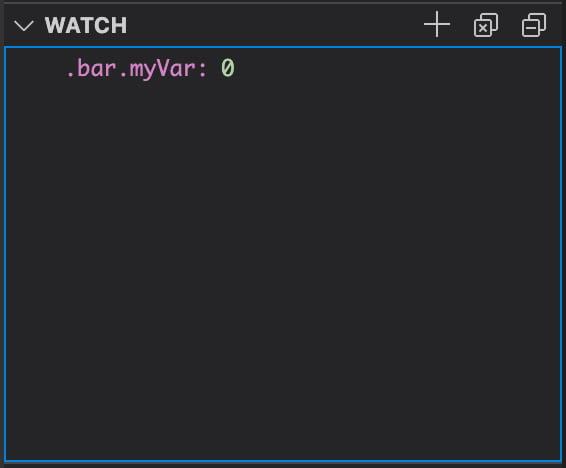
Data watchpoints may also be set, by clicking the + in the Watch section of the Debug side bar and typing the contract variable to watch in the format <principal>.<contract>.<name> or using the shortcut for a local contract, .<contract>.<name>. When a watchpoint is set on a contract variable, execution will pause when its value will change.
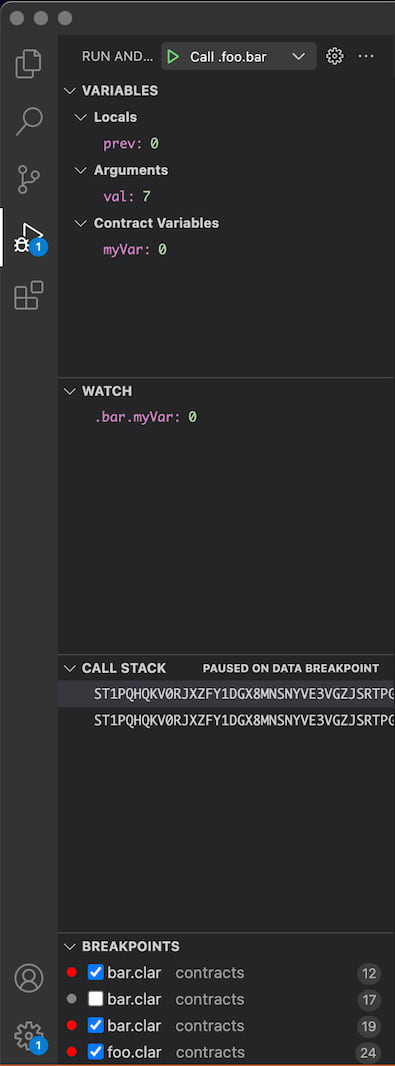
During execution, the values of the current contract's variables, the current function's arguments, and any local variables (i.e. from a let expression) are shown in the side bar. The current watchpoints are also shown with their current values. In both cases, the contents of a map are not shown, but can be queried in the Debug Console. The call stack is also updated to show the call stack of the current execution.
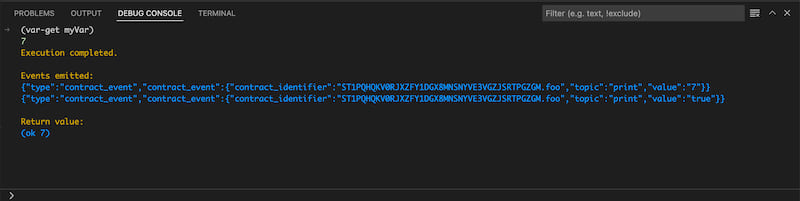
At any point during execution, an expression can be evaluated in the current context via the Debug Console. Just type any valid Clarity expression and hit enter to evaluate it. Upon completion, the events emitted and the return value are printed to the debug console.
For more information on how you can use VS Code to debug smart contracts, please see the How to Debug Smart Contracts in Clarinet’s VS Code Extension YouTube video.
Command Line Debugger
Inside of the console (clarinet console), there is a debugger for stepping through your contracts on the command line, including support for:
- Breakpoints
- Source: Break at a specific line (and optional column) of a contract (
breakorbcommand)b SP466FNC0P7JWTNM2R9T199QRZN1MYEDTAR0KP27.miamicoin-token:28:4 - Function: Break at a specific function (
breakorbcommand)b .crashpunks-v2.transfer - Data: Break on read/write to a variable or map (
watchorwto break on write,rwatchorrwto break on read, andawatchorawto break on read or write)w contracts/SP2KAF9RF86PVX3NEE27DFV1CQX0T4WGR41X3S45C.bitcoin-whales.payout
- Source: Break at a specific line (and optional column) of a contract (
- Step execution
- Step-in: Step into the sub-expressions (
steporscommand) - Step-out: Complete execution of the current expression and return the result back to the parent (
finishorfcommand) - Step-over: Continue to completion of the current expression, stepping over sub-expressions (
nextorncommand) - Continue: Continue execution until hitting a breakpoint or completing execution (
continueorccommand)
- Step-in: Step into the sub-expressions (
- Evaluate and print the result of any expression (
printorpcommand)
To initiate a debug session, first enter the REPL console using the following command:
clarinet console
Then, at the REPL prompt, enter this command to debug any expression:
::debug (contract-call? .foo hello .bar))
At the debug prompt, use any of the commands described above, or use help to get the full help documentation.
For more information about how to debug a smart contract using the command line, please see the Debug Your Smart Contracts With Clarinet’s New Inline Debugger YouTube video.
Execution Trace
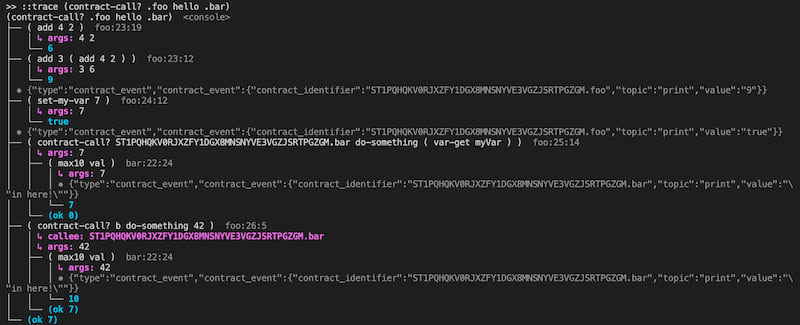
When you are in the console (clarinet console), the ::trace <expr> command enables you to execute an expression and print a trace of the execution, which can be very helpful for identifying problems with the contract.
This trace shows all function calls, both internal calls to private functions, and contract calls to other contracts. For each call, the parameters and return value are shown in the trace. Any events that are emitted are also shown in the trace.
Deploy with Hyperchains on Devnet
Clarinet can be used for facilitating experimentations with Hyperchains.
To begin working with subnets, in your Devnet.toml, enable the following flag:
[devnet]
# ...
enable_subnet_node = true
This same file may also be used for customizing the subnet-node (miner, etc).
When running the command:
clarinet devnet start
Clarinet will spin-up a subnet node. More documentation on how to use and interact with this incoming L2 can be found on the Hyperchain repository.
Bugs and feature requests
If you encounter a bug or have a feature request, we encourage you to follow the steps below:
- Search for existing issues: Before submitting a new issue, please search existing and closed issues to check if a similar problem or feature request has already been reported.
- Open a new issue: If it hasn't been addressed, please open a new issue. Choose the appropriate issue template and provide as much detail as possible, including steps to reproduce the bug or a clear description of the requested feature.
- Evaluation SLA: Our team reads and evaluates all the issues and pull requests. We are available Monday to Friday and we make a best effort to respond within 7 business days.
Please do not use the issue tracker for personal support requests or to ask for the status of a transaction. You'll find help at the #support Discord channel.
Contributing to Clarinet
Contributions are welcome and appreciated. The following sections provide information on how you can contribute to Clarinet.
Prerequisites
Before contributing to Clarinet, please ensure you meet the following requirements:
- rust (>=1.52.0)
- cargo (>=1.52.0)
- node (>=v14.16.0) - Used for git commit hook
- npm (>=7.18.0) - Used for git commit hook
Guide
This repo follows the Conventional Commit specification when writing commit messages.
NoteIt is important that any pull requests you submit have commit messages that follow this standard.
To start contributing:
-
Fork this repo and clone the fork locally.
-
Create a new branch
git checkout -b <my-branch> -
Run
npm iin the local repo to install and initializehuskyandcommitlint.npm i -
These tools will be used in a
git commithook to lint and validate your commit message. If the message is invalid,commitlintwill alert you to try again and fix it.Here is an example of a bad message response:
git commit -m "bad message"
⧗   input: bad message
✖   subject may not be empty [subject-empty]
✖   type may not be empty [type-empty]

✖   found 2 problems, 0 warnings
ⓘ   Get help: https://github.com/conventional-changelog/commitlint/#what-is-commitlint

husky - commit-msg hook exited with code 1 (error)
Here is an example of a good message response:
git commit -m "fix: added missing dependency" [my-branch 4c028af] fix: added missing dependency 1 file changed, 50 insertions(+) -
After making your changes, ensure the following:
cargo buildruns successfully.cargo tstruns successfully.cargo tstis an alias declared in./cargo/config, it runs cargo-nextest
- You have formatted your code with
cargo fmt --all -- - All functional tests in the
examplesdirectory pass.for testdir in $(ls examples); do pushd examples/${testdir} ../../target/debug/clarinet check . popd done
-
Submit a pull request against the
developbranch for review.
Code of Conduct
Please read our Code of conduct since we expect project participants to adhere to it.
Community
Join our community and stay connected with the latest updates and discussions:
-
Join our Discord community chat to engage with other users, ask questions, and participate in discussions.
-
Visit hiro.so for updates and subscribing to the mailing list.
-
Follow Hiro on Twitter.
Dependencies
~0.8–9MB
~79K SLoC