4 releases
Uses new Rust 2024
| new 0.5.1 | May 21, 2025 |
|---|---|
| 0.5.0 | May 16, 2025 |
| 0.4.6 | Apr 29, 2025 |
| 0.4.5 | Apr 27, 2025 |
#70 in HTTP server
434 downloads per month
530KB
978 lines
AntTP
Background
Autonomi Network (a.k.a. Safe Network) is a distributed data network where both mutable and immutable data can be stored. It can considered as a best of class web3 experience.
AntTP is a HTTP service which serves data from Autonomi over conventional HTTP connections. This allows regular web browsers (and other apps) to retrieve data from Autonomi without needing any client libraries, CLIs, etc.
Users can either spin up a local AntTP service or deploy one to a public environment. This enables developers to integrate with Autonomi in a more conventional way and gives end users a conventional browsing experience.
AntTP was formally known as sn_httpd.
Features
AntTP currently provides the following:
- Data retrieval from Autonomic using archives for human readable naming
/[ARCHIVE_XOR_ADDRESS]/[MY_FILE_NAME]. Enables regular static sites to be uploaded as an archive, with files browsed by file name. E.g. - http://localhost:8080/91d16e58e9164bccd29a8fd8d25218a61d8253b51c26119791b2633ff4f6b309/autonomi/david-irvine-autonomi-founder.jpg
- Proxy server to allow
http://[ARCHIVE_XOR_ADDRESS]/[MY_FILE_NAME]to be resolved. Allows sites to pivot from a 'root' directory and a smoother user experience. E.g. - Routing from URLs to specific
[XOR_ADDRESS]or[FILE_NAME]. Enables SPA (single page apps) such as Angular or React to be hosted (once a routeMap is provided - see example-config - Native integration of the
autonomilibraries into Actix web framework. These are both written in Rust to provide smooth integration. As Actix is core toAntTP, it can be extended for specific use cases easily.
Run instructions
List help from binary:
anttp --help
AntTP is a HTTP proxy which serves data from Autonomi over conventional HTTP connections

Usage: anttp [OPTIONS]

Options:
  -l, --listen-address <LISTEN_ADDRESS>                [default: 0.0.0.0:8080]
  -s, --static-file-directory <STATIC_FILE_DIRECTORY>  [default: ]
  -w, --wallet-private-key <WALLET_PRIVATE_KEY>        [default: ]
  -d, --download-threads <DOWNLOAD_THREADS>            [default: 8]
  -h, --help                                           Print help
  -V, --version                                        Print version
Run binary with defaults
anttp
Build and run from source code:
cargo run OR cargo run -- <args>
Where arguments are:
-l, --listen-addressis the IP address and port to listen on.-s, --static-file-directoryis a directory to host local/static files in.-w, --wallet-private-keyis a secret key for a wallet used for uploads.-d, --download-threadsis the number of parallel threads used for chunk downloads.
Proxy Configuration
Using AntTP as a proxy is optional, but it improves the user experience.
Configuring AntTP as a proxy is more secure, as it blocks calls out to clear net sites. All traffic is directed to Autonomi, ensuring no data is leaked beyond AntTP and Autonomi.
Using a proxy also enables shorter URLs, where the target web application XOR is considered the 'host' in a traditional web sense. For some web applications, this may be a requirement, due to how they route their links.
Configuring a browser to use AntTP as a proxy is easy. Any regular web browser that has proxy settings can be used (e.g. Firefox) or allows CLI arguments to enable them (e.g. Brave).
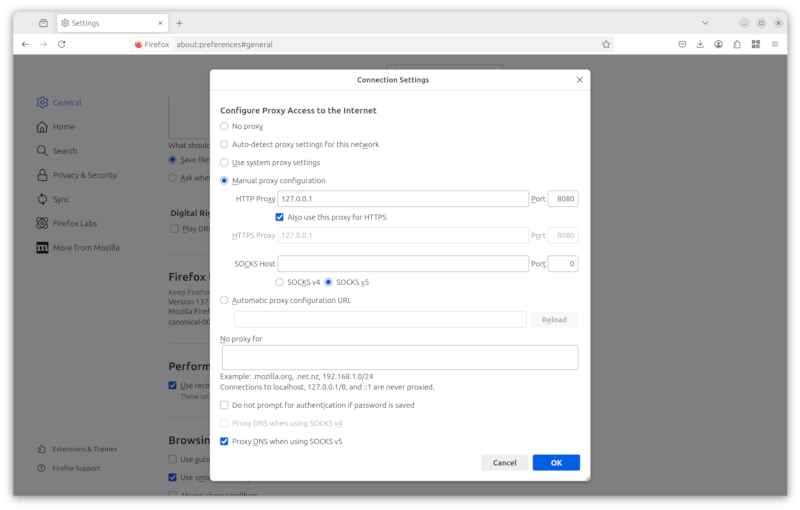
Firefox Configuration
- Go to
Settingsfrom the burger drop down - Type 'proxy' in the
Find in Settingsinput box - Click
Settings...button - Click
Manual proxy configuration - Enter
127.0.0.1in theHTTP Proxyinput box and8080in thePortinput box (or whichever non-default IP/port you are using) - Check the
Also use this proxy for HTTPScheck box - Check the
SOCKS v5check box - Check the
Proxy DNS when using SOCKS v5check box - Then click
OKand start browsing Autonomi over AntTP!
See the example screenshot below:
Brave Configuration
Brave browser only uses system wide proxy settings, unless it is launched with proxy arguments:
brave --proxy-server="127.0.0.1:8080" http://a0f6fa2b08e868060fe6e57018e3f73294821feaf3fdcf9cd636ac3d11e7e2ac/BegBlag.mp3
(or whichever non-default IP/port you are using)
Security
If you're running AntTP on your own, personal, machine, you can ignore the security warnings for using HTTP. All data transmitted between your browser and AntTP will remain on your machine only.
If you use a remote AntTP, ensure you use HTTPS, as your data will be transmitted to/from that remote proxy.
Build Instructions
Dependencies
On Ubuntu:
Install Rust
sudo apt-get install rustup
Download latest stable release:
rustup default stable
Linux Target
It is recommended that the MUSL target is used to prevent runtime dependency issues.
On Ubuntu:
sudo apt-get install musl-tools
Then add target:
rustup target add x86_64-unknown-linux-musl
Then build release:
cargo build --release --target x86_64-unknown-linux-musl
Windows Target
On Ubuntu:
sudo apt-get install mingw-w64
Then add target:
rustup target add x86_64-pc-windows-gnu
Then build release:
cargo build --release --target x86_64-pc-windows-gnu
ARM Target
On Ubuntu:
sudo apt install gcc make gcc-arm* gcc-aarch64* binutils-arm* binutils-aarch64* pkg-config libssl-dev
Then add target:
rustup target add arm-unknown-linux-musleabi
rustup target add gcc-arm-linux-gnueabi
Then update the environment:
export CARGO_TARGET_AARCH64_UNKNOWN_LINUX_MUSL_LINKER=aarch64-linux-gnu-gcc
export CC=aarch64-linux-gnu-gcc
Then build release:
cargo build --release --target aarch64-unknown-linux-musl
Archive Upload
To upload a directory to Autonomi as an archive, do the following:
cd your/directoryant file upload -p <directory>
This command will return information about the uploads and summarise with something like:
Uploading file: "./1_bYTCL7G4KbcR_Y4rd78OhA.png" Upload completed in 5.57326318s Successfully uploaded: ./ At address: 600d4bbc3d7f316c2fe014ca6986c6ea62200be316e34bd307ae3aa68f8e3cfc
The 'At address' is the archive address, which you can now reference the uploaded files like:
Via a proxy (to localhost:8080):
http://a0f6fa2b08e868060fe6e57018e3f73294821feaf3fdcf9cd636ac3d11e7e2ac/BegBlag.mp3
Or via direct request:
http://localhost:8080/a0f6fa2b08e868060fe6e57018e3f73294821feaf3fdcf9cd636ac3d11e7e2ac/BegBlag.mp3
Web Application Customisation
See example-config for customising how your website/app behaves on AntTP:
{
  "routeMap": {
    "": "index.html",
    "blog/*": "index.html",
    "blog/*/article/*": "index.html"
  }
}
- Create an app-config.json file in the directory you intend to upload/publish to Autonomi
- Add the
routeMapkey - Add any routes that should be mapped to a file
- Use "" as a key to serve the target file for the root URL, e.g. index.html
- Use "/blog/*" as a key to serve the target file for any URL with blog followed by a filename
- Use "/blog//article/" as a key to serve the target file for any URL with a blog and article specified
- The blog/article above are not keywords. Any names can be used to suit the routing approach needed
- Upload the directory as an archive to Autonomi (see above for more details)
ant file upload -p <directory>
- Browse to the archive XOR address with your browser and confirm the routing is correct
- Why add routes?
- Many modern frameworks expect all requests to be routed through a single HTML file, which then pull in Javascript dependencies, which then handles the routing of your app components. Angular, for example, requires this sort of routing.
- If you just want an index instead of a file listing being rendered, providing a
routeMapwill also enable this. This is handy when you want a default page/app/script to load for a URL, without needing to specify the filename too.
PubAnt.com - Publish your Website
For more information on how to publish a website on Autonomi Network, PubAnt.com is an excellent resource.
Once your site has been published, it can be accessed through a regular browser, through AntTP.
Example site - IMIM!
A sister application for AntTP is the IMIM blog. The source code is located at IMIM, and enabled authors
to write Markup text files and publish them on Autonomi. Using AntTP, these blogs can be viewed anywhere that an
instance is running.
IMIM includes examples of route maps and how Angular apps can be integrated with AntTP. It also gives a realistic example of performance and how immutable file caching can effectively reduce latency to near zero in most cases. IMIM is also a great place to create a blog.
If your browser is configured as an AntTP proxy, take a look here at an example blog all about Autonomi:
Why not take a look and start your own immutable blog today?
Roadmap
- Documentation
- Basic README
- Improved README
- Add tutorials / API details
- Link with IMIM as sample project
- Files
- Enable file downloads from XOR addresses
- Enable file downloads from archives with friendly names
- Directories (archives)
- Enable directory listing in HTML (default)
- Enable directory listing with JSON (using
acceptheader) - Enable multiple file uploads as multipart form data
- Creates an archive, adds the files, then uploads to Autonomi
- Async operation, with POST for data and GET for status checks
- Caching
- Cache immutable archive indexes to disk to reduce lookups to Autonomi
- Set response headers to encourage long term caching of XOR data
- Add eTag header support to encourage long term caching of all immutable data (with/without XOR)
- Proxy server
- Resolve hostnames to XOR addresses for files
- Resolve hostnames to XOR addresses for archives
- Streaming downloads
- Add streaming support for data requested with RANGE headers
- Add streaming support for all other data requested
- Advanced Autonomi API integration
- REST API
- Pointer
- Scratchpad
- Graph
- Register
- Chunk (in addition to file support, which is already implemented)
- BLS support
- Create, sign, verify
- Derived keys
- Analyze address support
- Vault support (CRUD, cost)
- Data upload cost
- Wallet support
- get balance
- send tokens
- get transaction history
- gRPC API
- Pointer
- Scratchpad
- Graph
- Register
- Chunk (in addition to file support, which is already implemented)
- BLS support
- Create, sign, verify
- Derived keys
- Analyze address support
- Vault support (CRUD, cost)
- Data upload cost
- Wallet support
- get balance
- send tokens
- get transaction history
- Websockets
- Stream immutable data types
- Stream changes to mutable data types
- REST API
- Testing
- Core unit test coverage
- Full unit test coverage
- Performance testing
- Improve CLI arguments
- Offline mode (requests without connected client library dependency)
- Accounting features
- Bandwidth usage/tracking
- Payments for data uploads (i.e. for public proxies)
Dependencies
~82–120MB
~2.5M SLoC