1 unstable release
| 0.1.0 | Jul 2, 2019 |
|---|
#1174 in Embedded development
22 downloads per month
9KB
68 lines
proton-c
Board Support Crate for the Proton C.
Hardware Setup
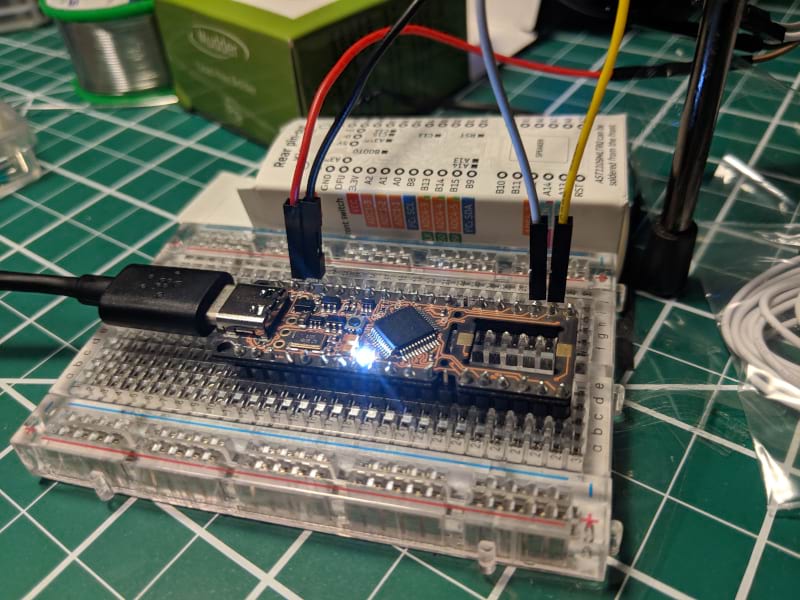
Beyond the Proton C itself, it is highly recommended to setup a an ST-Link hardware debugger. It is also recommend to solder on header pins to hook up the ST-Link via a bread board. A soldering iron and solder may be needed to attach the header pins.
Hardware List
-
USB-C to USB-Whatever-Connects-to-the-Computer cable (one capable of data transfer, required)
-
ST-Link Debugger (recommended)
-
Female to female breadboard jumper cable wires (usually comes with the ST-Link itself, recommended)
-
Breadboard (recommended)
-
2.54mm straight single row pin header strips (recommended)
-
Male to male breadboard jumper cable wires (recommended)
Hooking up the ST-Link
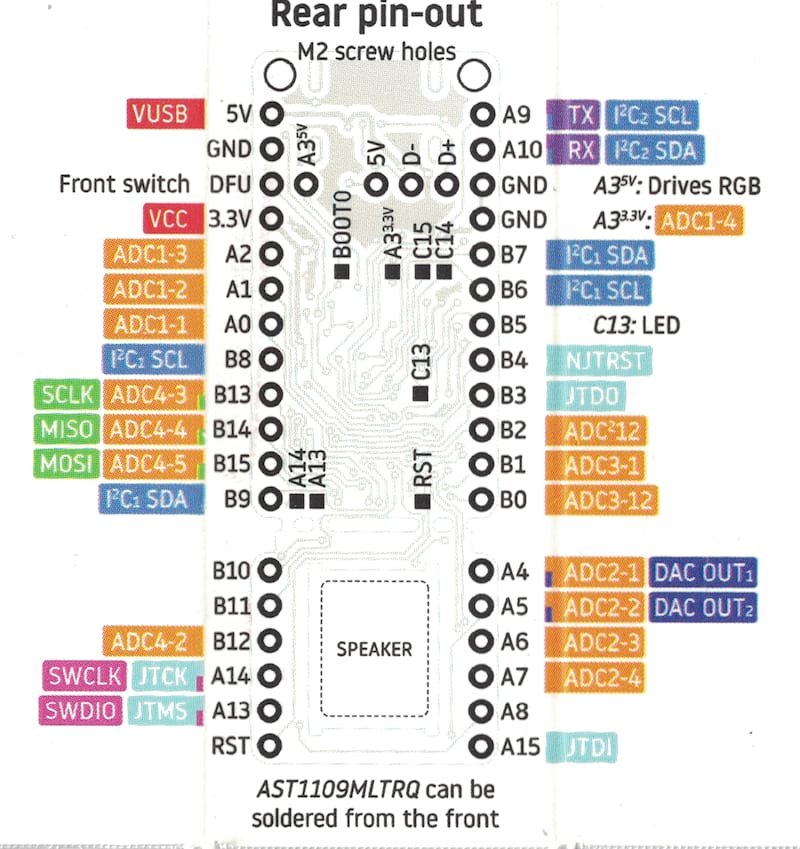
After the header pins are soldered up and the Proton C is attached to a breadboard, the ST-Link needs to be connected to the relevant debugging ports. Connect the following ports on the ST-Link to the ports on the Proton C:
- SWDIO: A13
- SWCLK: A14
- GND: GND
- 5V: 5V
Connecting the Proton C to the Computer
Connect the USB from the ST-Link and the cable connected to the USB-C port of the Proton C to the computer—both are needed.
Software Setup
It should go without saying that Rust Nightly and Cargo are needed. To build, flash, and run a few other things need to be installed.
Rust Platform Target
To build for the Pronton C, the thumbv7em-none-eabihf target is needed. You
can install it running the following:
rustup target add thumbv7em-none-eabihf
Other Dependencies
To flash and debug through the ST-Link, the following are needed:
openocdgdb-multiarch
For operating systems other than Ubuntu / Debian-based distros, these may be installed under different names.
Running
The setup to build, flash, debug, and reset needs 3 different terminals:
- 1 terminal to run the OpenOCD server
- 1 terminal to build, flash, and run debugging using GDB
- 1 terminal to reset the Proton C after flashing
Running the OpenOCD Server
To run the server with correct configuration change directory to where this repo is located, then run:
openocd
This server will be used by the other terminals to interact and send commands to the Proton C.
Building, Flashing, and Debugging
Cargo is configured to build, flash, and start debugging in this repo, simply run:
cargo run
...and everything will get started. Once this is completed you will need to
reset the Proton C, see instructions on resetting below. To stop debugging,
enter the command: quit.
Resetting
After a program has been flashed to the Proton C, it needs to be reset. This can normally be done by unplugging any power sources and power cycling the Proton C, but to make life easier you can use the ST-Link and OpenOCD to instruct the Proton C to reset.
-
Connect to the OpenOCD server:
telnet localhost 4444 -
Reset whenever needed:
reset run
Dependencies
~25MB
~709K SLoC